
We did not hurt, injur, or maim any animals or ponies throughout the making of this tutorial. We completed all our heroic action sequences in CGI. Furthermore, we are not liable for what you build after learning how to be a Ninja. Never go Full Ulbricht.
How To SetUp Your local Serverless Environment
You can clone a sample of the application we will be using in this tutorial here: Serverless-Starter-Service
Please refer to this repo as you follow along with this tutorial.
Introduction
It is amazing how quickly the technology community iterates over innovative technology frameworks, and architectural paradigms to solve the never-ending series of problems and work-arounds that a new tool, or solution inevitably brings to the table. Even more enjoyable to watch is the relentless chatter, and online chat and commentary that spreads like wildfire all over the internet and the Twittersphere, that goes on discussing how to use the latest toolset and framework to build the next software that will Change the World for the Better. I must admit, although I sound cynical about the whole thing, I too am a part of the problem; I am an AWS Serverless Fanboy.

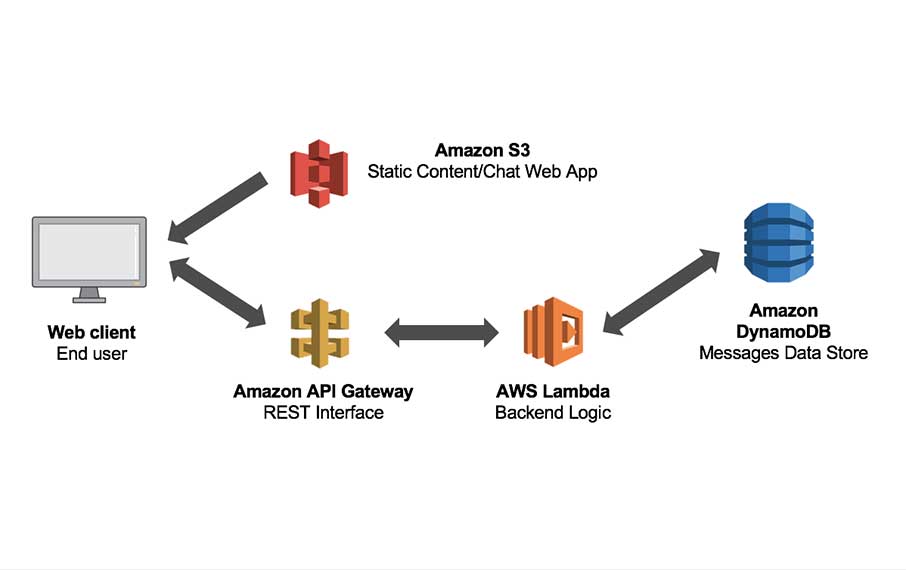
The aim of this tutorial is to deploy a simple application on AWS to share with you, our favorite readers, the joys of developing applications on the Serverless Framework with AWS. The application we will be walking you through today, includes a backend API service to handle basic CRUD operations built on something we like to call the DARN Technology Stack. Yes, we created a new acronym for your recruiter to get excited about. They will have no idea what you are talking about, but they will get you an interview with Facebook if you tell them that you completed this tutorial to become a fully-fledged and certified Application Developer on the DARN Cloud. (That is an outright lie. Please do not believe any guarantees the maniac who authored this article promises you.) The DARN Stack includes the following tool set:
- DynamoDB
- AWS Serverless Lambda
- React.js
- Node.js
Technology Stack
For a more precise list of tools that we will be implementing throughout the development lifecycle of this multi-part series, below I have highlighted the technologies that we will be using to deploy our application on AWS using the ServerlessFramework:
- AWS Lambda & API Gateway to expose the API endpoints
- DynamoDB is our NoSQL database
- Cognito supplies user authentication and secures our API’s
- S3 will host our application & file uploads
- CloudFront will serve our application to the world
- Route53 is our domain registry
- Certificate Manager provides us with SSL/TLS certificates
- React.js is our single page application
- React Router to develop our application routing functionality
- Bootstrap for the development of our React UI components in Bootstrap
- Stripe will process our credit card payments
- GitHub will our project repositories
Local Development Environment Setup & Configuration: Part 1
One of the more difficult activities I faced as a junior developer a very long, long, time ago was understanding that the type of project that I would be working on, very much dictated how I would eventually have to configure my machine locally, to be ready to develop ground breaking and world changing software. Anytime you read a mention to world changing softwarefrom here on out, please refer to episodes of HBO’s Silicon Valley to understand the thick sarcasm sprinkled throughout this article. My point is that I have always felt that most tutorials seem to skim over the idea of setting up your local development environment, as if it were a given that developers were born with the inherent understanding of the differences between npm, yarn, bower, and the never ending list of package managers and slick tools available to ‘help’ you succeed at this life in SoftwareDevelopment… For a historical perspective with a wholistic take on this matter please brush up on your knowledge of a topic some people refer to as RPM Hell.
To avoid Dependency Hell, we have decided to codify and create a series of Best Practices you can take with you for the development of the application in this tutorial and any other projects you work on in the future. For the goals of completing the application in this tutorial please make sure to configure all local development machines using the tools, dependencies, and configuration parameters described in this article. This list is not definitive and is only meant as a baseline from which to begin the development of your applications as quickly and as easily as possible.
JavaScript Toolkit
The idea of a JavaScript Toolkit is to more easily onboard new engineers onto a fast-moving team of Software Stallions. I prefer the title of Ninja, but that’s not important right now. The important thing is to get the job and to act like you know what you are doing so that you can keep said job, no?
Anyway; There is a file you will be making use of called the package.json file that will eventually make this process easy for you every time you want to start a new project. What I mean is that once you understand the significance of all of the project dependencies declared in any random package.json file you find out there on the Internets, all you will really ever need to do is to run: $ npm install from the project directory of an application with a package.json file to install all of the dependencies declared. We are not going to do that in this Part 1 of our Serverless + React.js Mini-Series of a tutorial. Instead, I am going to hold your hand and walk you through each command, one, simple, step, at a time.
For those of you not interested in starting at the bottom because you are already Level-12 Ninja Assassins, then please… continue to Part 2: How To Configure Your Serverless Backend API – Not yet Published!. This section is for those who prefer to do things right.
Seriously though, this is what you will be working with throughout the course of this multi-part tutorial:
- Node Version Manager
- Editor
- SublimeText3
- PackageControl
- Babel
- ESLint
- JSFMT
- SublimeLinter
- SublimeLinter-eslint (Connector)
- SublimeLinter-annotations
- Oceanic Next Color Scheme
- Fix Mac Path (Only If using MacOS)
- SublimeText3
- AWS CLI
- Serverless Compute
- AWS Lambda
- Infrastructure As Code
- ServerlessFramework
- Package Manager
npm
- Automation Approach
- Transpiling
- Babel (Included in ServerlessFramework!)
- Module Format
- ES6Modules (CommonJS)
- Bundling
- WebPack4 (Included in ServerlessFramework![serverless-webpack]](http://github.com/serverless-heaven/serverless-webpack))
- Linting
- ESLint
- eslint-plugin-react
- babel-eslint
- esformatter
- esformatter-jsx
- Testing
- Continuous Integration Server
- AWS CodeDeploy & CodePipeline
- HTTP Mock Framework
- Sourcemaps
Install Node.js with NVM (Node Version Manager)
On 7 November 2018, AWS announced to the world that AWS Lambda, will now officially support Node.js v8.10.0. This project will use NVM (Node Version Manager) to work with different versions of Node.js between projects and to mitigate against any potential environment upgrades implemented in the future by any 3rd party vendors. To ensure that we are working on the correct version of Node.js for this project please install nvm and node as follows:
- Refer to the Node Version Manager Documentation if this information is out of date
- Installation (Choose ONE based on your system OS):
- cURL:
curl -o- http://raw.githubusercontent.com/creationix/nvm/v0.33.11/install.sh | bash - Wget:
wget -q0- http://raw.githubusercontent.com/creationix/nvm/v0.33.11/install.sh | bash - The installation will add the following to your
.bashrcor.bash_profilein yourhomedirectory:
export NVM_DIR="$HOME/.nvm" [ -s "$NVM_DIR/nvm.sh" ] && \. "$NVM_DIR/nvm.sh" # This loads nvm [ -s "$NVM_DIR/bash_completion" ] && \. "$NVM_DIR/bash_completion" # This loads nvm bash_completion - cURL:
- Run the following command to verify the installation of
nvm:- run from Terminal:
$ command -v nvm - Expected Output:
nvm
- run from Terminal:
- On macOS, if you receive and error of
nvm: command not found, then you need to add the following line to your.bash_profilefound in yourhomedirectory as shown below:source ~/.bashrc
- To download, compile, and install a specific version of Node.js, then please run the following command to obtain Node.js v8.10.0 as needed to be able to work with AWS Lambda:
$ nvm install 8.10.0- You can list available versions to install using:
$ nvm ls-remote
- The completed output should look like this, showing that you are now ready to start building services in AWS Lambda!

- Give yourself a pat on the back! Being able to hit the ground running as a new developer on a new team, is a skill that many employers would pay a few bucks extra to have more of in their organizations. Always refer to this page and tell your friends that this is where you can get the low-down on how to get it done without having to ask 10 questions on our favorite technology forums out in the ether.
Setup Editor and Install Linting
For JavaScript, React.js, and the build process that we are using in SublimeText3 we will continue to configure linting, and formatting, while making use of OpenSource libraries and tools to help make this implementation of React.js more efficient. Please take the following steps to complete the installation of ESLint:
- Install ESLint: Must install BOTH Globally & Locally
- Global Install:
$ npm install -g eslint - Local Install: (Must complete from the
rootof the project directory!!!)
$ npm install --save-dev eslint
- Local Install of the
babel-eslintlibrary also: (Must complete from therootof the project directory!!!)
$ npm install --save-dev babel-eslint
- Global Install:
- Verify that you can run
eslintfrom within thelocalproject directory:- run from Terminal:
$ ./node_modules/.bin/eslint -v - Expected Output:
v5.15.0 (Or Latest) - Here is what the output should look like right now:

- run from Terminal:
From this point forward, you can run: $ eslint . and the linter will help you and your development team check syntax, find problems, and enforce code style across your entire organization. In my case, that means just team Wilson and I hammering away at the keyboard debating the intricacies of JavaScript Memory Leaks and the best approach to achieve the best string concatenation efficiency. I am sure this is all very relatable. Here is what my code review process looks like when Wilsondoes not use the eslint settings I have specifically laid out for you today:
Wilson: The SCRUM Master

Confirm ESLint Configuration Settings & Attributes
From the project root directory run $ ls -a, and confirm that you can see the file called: ~/MyApp/Backend/services/ServerlesStarterService/.eslintrc.js within the serverless project directory for the service you are implementing. Please look at the structure I have chosen to use as the $PATH for this example. Take this as a hint for now and we will go over this in detail a bit later. For now, simply open the file from within the ServerlesStarterServicedirectory by running $ subl .eslintrc.js from your terminal to confirm that the following information is in the file:
module.exports = {
  "extends": ["eslint:recommended", "plugin:react/recommended"],
  "parser": "babel-eslint",
  "plugins": ["react"],
  "parserOptions": {
    "ecmaVersion": 8,
    "sourceType": "module",
    "ecmaFeatures": {
      "jsx": true
    }
  },
  "env": {
    "node": true,
    "es6": true,
    "es7": true
  },
  "rules": {
    "react/jsx-uses-react": 2,
    "react/jsx-uses-vars": 2,
    "react/react-in-jsx-scope": 2,
    "no-alert": 2,
    "no-array-constructor": 2,
    "no-caller": 2,
    "no-catch-shadow": 2,
    "no-labels": 2,
    "no-eval": 2,
    "no-extend-native": 2,
    "no-extra-bind": 2,
    "no-implied-eval": 2,
    "no-iterator": 2,
    "no-label-var": 2,
    "no-labels": 2,
    "no-lone-blocks": 2,
    "no-loop-func": 2,
    "no-multi-spaces": 2,
    "no-multi-str": 2,
    "no-native-reassign": 2,
    "no-new": 2,
    "no-new-func": 2,
    "no-new-object": 2,
    "no-new-wrappers": 2,
    "no-octal-escape": 2,
    "no-process-exit": 2,
    "no-proto": 2,
    "no-return-assign": 2,
    "no-script-url": 2,
    "no-sequences": 2,
    "no-shadow": 2,
    "no-shadow-restricted-names": 2,
    "no-spaced-func": 2,
    "no-trailing-spaces": 2,
    "no-undef-init": 2,
    "no-underscore-dangle": 2,
    "no-unused-expressions": 2,
    "no-use-before-define": 2,
    "no-with": 2,
    "camelcase": 2,
    "comma-spacing": 2,
    "consistent-return": 2,
    "curly": [2, "all"],
    "dot-notation": [2, {
      "allowKeywords": true
    }],
    "eol-last": 2,
    "no-extra-parens": [2, "functions"],
    "eqeqeq": 2,
    "key-spacing": [2, {
      "beforeColon": false,
      "afterColon": true
    }],
    "new-cap": 2,
    "new-parens": 2,
    "quotes": [2, "double"],
    "semi": 2,
    "semi-spacing": [2, {
      "before": false,
      "after": true
    }],
    "space-infix-ops": 2,
    "keyword-spacing": 2,
    "space-unary-ops": [2, {
      "words": true,
      "nonwords": false
    }],
    "strict": [2, "global"],
    "yoda": [2, "never"]
  }
};
Please add the eslintrc.js file with the information above if you do not have it in your directory as shown above.
Moving forward, we can continue to install the ESLint plugins that we will need to use for our React.js implementations also. In the root of the project directory, run the following two commands to install the React.js plugin for ESLint:
$ npm install eslint-plugin-react --save-dev$ npm install -g eslint-plugin-react --save-dev(Install globally also)
Running $ ./node_modules/.bin/eslint src (with src being the path to your JavaScript files), will now parse your sources with Babel and will provide you with linting feedback to the command line.
We think it’s going to be best (and just easiest quite frankly), to just alias that last command with something like: $ npm run lint as part of your automation approach by adding the following script into the package.json file that you can find in the root directory of your application:
"scripts": {
    "lint": "eslint .",
    ...
  },

  ...
- Run:
$ npm run lintto lint your project from theterminal.
The linter will now supply feedback on syntax, bugs, and problems, while enforcing code style, all from within the comfort of your terminal. Do not fool yourself, this will work in vim also! For all those :wq! fans out there, the hope, is on our side… #UseTheForce.
A typical output running ESLint from the terminal as instructed would look something like this (depending on your project and the silly errors you make):

One more thing, from within the project root directory please make sure that you have a file called .esformatter in existence. You are going to need that $ ls -a command to find it. If it does not exist, go ahead, and create it with a simple $ touch .esformatter and :wq! the following bit of information into the file (if it already exists, just make sure this is in there!):
{
  "preset": "default",

  "plugins": [
    "esformatter-quotes",
    "esformatter-semicolons",
    "esformatter-literal-notation",
    "esformatter-parseint",
    "esformatter-spaced-lined-comment",
    "esformatter-var-each",
    "esformatter-collapse-objects",
    "esformatter-remove-trailing-commas",
    "esformatter-quote-props"
  ],

  "quotes": {
    "type": "double"
  },

  "collapseObjects": {
    "ObjectExpression": {
      "maxLineLength": 79,
      "maxKeys": 1
    }
  },

  "indent": {
    "value": "  ",
    "AlignComments": false
  },

  "whiteSpace": {
    "before": {
      "ObjectExpressionClosingBrace": 0,
      "ModuleSpecifierClosingBrace": 0,
      "PropertyName": 1
    },
    "after": {
      "ObjectExpressionOpeningBrace": 0,
      "ModuleSpecifierOpeningBrace": 0
    }
  }
}
From here on out every time you save your JavaScript files all the formatting completes automatically for you. Sort of, we just must configure all of this into our trusty SublimeText3 text editor now!
Before we get into it, yes, you can use vim. I promise you, you will find people who will die by vim throughout your career. My belief; keep it simple, buy the SublimeText3 license and just use that over every other IDE that will bombard your spam folder in your email. SublimeText3 provides the simplicity of vim without having to memorize the abstract commands like :wq! that will inevitably leave you with a mess of *.swp files, because I guarantee that most of you will never clean them out and it becomes a hassle. Keep it simple, do not over complicate your life in an already all too complicated environment, and get the tool that is really cheap, easy on the eyes, and provides enough of the fancy functionality of a really expensive IDE and the simplicity of vim without having to turn your anonymous functions into ES6 syntax with an esoteric regex-replace like this $ :%s/function \?(\(.*\)) {/(\1) => {/.
SublimeText3 Configuration
To complete the configuration in SublimeText3 please install PackageControl and the following packages from within SublimeText3:
- The easiest way to achieve this is to navigate to the SublimeText3
View–>ShowConsolemenu, and continue to paste the following code provided by PackageControl:# For SublimeText3 ONLY! import urllib.request,os,hashlib; h = '6f4c264a24d933ce70df5dedcf1dcaee' + 'ebe013ee18cced0ef93d5f746d80ef60'; pf = 'Package Control.sublime-package'; ipp = sublime.installed_packages_path(); urllib.request.install_opener( urllib.request.build_opener( urllib.request.ProxyHandler()) ); by = urllib.request.urlopen( 'http://packagecontrol.io/' + pf.replace(' ', '%20')).read(); dh = hashlib.sha256(by).hexdigest(); print('Error validating download (got %s instead of %s), please try manual install' % (dh, h)) if dh != h else open(os.path.join( ipp, pf), 'wb' ).write(by)The configuration parameters supplied above, will generate an
Installed Packagesdirectory on yourlocalmachine (if needed). It will download the Package Control.sublime-package over HTTP instead of HTTPS because of known Python standard library constraints, and the file will apply SHA-256 to confirm that it is in fact a valid file.WARNING: Please do not copy or install this code via this tutorial or our website. It will change with every release of PackageControl. Please make sure to view the Official PackageControl Release Documentation page and installation instructions to get the most recent version of the code shared in this tutorial. You can obtain the most up-to-date information needed directly from: PackageControl.
- Next, please continue to navigate through to
SublimeText–>Preferences–>PackageControl–>InstallPackagesand install the following tools:- Babel
- ESLint
- JSFMT
- SublimeLinter
- SublimeLinter-eslint (Connector)
- SublimeLinter-annotations
- Oceanic Next Color Scheme
- Fix Mac Path (If using MacOS ONLY)
- Once you have completed the above, go ahead and navigate to:
View–>Syntax–>Open all with current extension as ...–>Babel–>JavaScript (Babel)with anyfile.jsopen to configure the settings for the syntax isJSandJSX. - It is helpful to setup a
JSXformatter for your text editor also. In our case we are using esformatter-jsx. You will have to figure out where yourSublimeText3Packagesdirectory is, to complete yourjsfmtconfiguration. Run the following commands to complete this step:$ cd ~/Library/Application\ Support/Sublime\ Text\ 3/Packages/jsfmt$ npm install jsfmt
- Try to run:
$ npm ls esformatterbefore continuing to step #3 - If you have
esformatterinstalled, then skip step #3 and run:$ npm install esformatter-jsx
$ npm install esformatter esformatter-jsx(See notes above before going ahead with this step!!!)- Test the installation of each package and run:
$ npm ls <package>(See the expected output below)

- From the
jsfmtpackage directory (See above if you do not remember!hint: See Step #1 from above) run:$ ls -aand open a file inSublimeText3called:$ subl jsfmt.sublime-settingsand paste the following configuration settings:
{
  // autoformat on file save events
  "autoformat": false,

  // This is an array of extensions for autoformatting
  "extensions": ["js",
    "jsx",
    "sublime-settings"
  ],

  // options for jsfmt
  "options": {
    "preset": "jquery",
    // plugins included
    "plugins": [
      "esformatter-jsx"
    // "esformatter-quotes",
    // "esformatter-semicolons",
    // "esformatter-braces",
    // "esformatter-dot-notation"
    ],
    "jsx": {
      "formatJSX": true, // Default value
      "attrsOnSameLineAsTag": false, // move each attribute to its own line
      "maxAttrsOnTag": 3, // if lower or equal than 3 attributes, they will be on a single line
      "firstAttributeOnSameLine": true, // keep the first attribute in the same line as the tag
      "formatJSXExpressions": true, // default is true, if false, then jsxExpressions does not apply formatting recursively
      "JSXExpressionsSingleLine": true, // default is true, if false the JSXExpressions may span several lines
      "alignWithFirstAttribute": false, // do not align attributes with the first tag
      "spaceInJSXExpressionContainers": " ", // default to one space. Make it empty if you do not like spaces between JSXExpressionContainers
      "removeSpaceBeforeClosingJSX": false, // default false. if true <React.Component /> => <React.Component />
      "closingTagOnNewLine": false, // default false. if true attributes on multiple lines will close the tag on a new line
      "JSXAttributeQuotes": "", // values "single" or "double". Leave it as empty string if you do not want to change the attributes' quotes
      "htmlOptions": {
        // put here the options for js-beautify.html
      }
    }
  },
  "options-JSON": {
    "plugins": [
      "esformatter-quotes"
    ],
    "quotes": {
      "type": "double"
    }
  },
  "node-path": "node",
  "alert-errors": true,
  "ignore-selection": false
}
Install and Activate Color Theme optimized for React.js
OceanicNext is a color scheme and syntax highlighter on SublimeText3 that is perfect for babel-sublime JavaScript and React.js. Please go ahead and review the Oceanic Next Documentation and Installation Instructions. However, it would be great if you could complete the instructions below so we can get through the rest of this tutorial. We may start building something now that we have a legitimate local environment to work on.
- Navigate to
SublimeText–>Preferences–>Settings–>Usermenu and add the following configuration parameters:"color_scheme": "Package/Oceanic Next Color Scheme/Oceanic Next.tmTheme", "theme": "Oceanic Next.sublime-theme", - Navigate to
SublimeText–>Preferences–>PackageControl–>InstallPackagesand install the following:- Oceanic Next Color Scheme
- Select the correct theme from:
SublimeText–>Preferences–>ColorScheme–>Oceanic Next
From this point forward your local development environment is ready to work with and will be able to provide you and your Scrum Master, Wilson, with the right kind of automated feedback you need to have as a professional Jedi, I mean… Engineer, so that you can debug and extend the most complex of Mobile Applications on the DARN Cloud…
If you can figure out a better way to make the technicalities of setting up linting and formatting on a Linux machine without ever having known the terminal, a tad bit more entertaining and easier to digest than this little tutorial we put you through today, then please enlighten my friends and I pretending to be the masters of the Dark Side. UNTIL THEN:
Your local environment is ready for work and is configured correctly… Good Luck!