
How To Configure Infrastructure As Code, Mock Services, & Unit Testing
This is a continuation of our multi-part series on building a simple web application on AWS using AWS Lambda and the ServerlessFramework. You can review the first and second parts of this series starting with the setup of your localenvironment at:
You can also clone a sample of the application we will be using in this tutorial here: Serverless-Starter-Service
Please refer to this repo as you follow along with this tutorial.
Configuring Infrastructure As Code
The ServerlessFramework lets you describe the infrastructure that you want configured for your serverless + microservice based application logic. You can use template files in .yml or .json format to tell AWS CloudFormation what exact resources you need deployed on AWS to correctly run your application. The YAML or JSON-formatted files are the blueprints you design and architect to build your services with AWS resources. We can see that by using the AWS Template Anatomy to describe our infrastructure, that the templates on AWS CloudFormation will include a few major sections described in the template fragments shown below:
YAML-formatted
This is a YAML-formatted template fragment. You can find more information on JSON-formatted templates at: AWS Template Anatomy.
---
AWSTemplateFormatVersion : "version date",

Description:
  String

Metadata:
  template metadata

Parameters:
  define any parameters

Mappings:
  configure your mappings

Conditions:
  declare any conditions

Transform:
  define any transforms

Resources:
  application resources

Outputs:
  define your outputs
The Resources section of the template is the only section that needs in your YAML or JSON-formatted template. When describing the services you need deployed to AWS on your CloudFormation templates it will be helpful to use the order I will be describing below because some sections may refer to values in a previous section, however, you can include these sections in your template in any order that you feel is appropriate.
- Format Version (optional)
- This is the AWS CloudFormation template version that the
YAMLorJSON-formatted file abides by. This is a versioning format internal to AWS and can change independently of any API or WSDL versions published.
- Description (optional)
- This is simply a description of the template on AWS CloudFormation. If used, you SHALL include this section after the Format Version section listed above.
- Metadata (optional)
- You can use this object to give CloudFormation more information about the application and the template you are using to use AWS infrastructure.
- Parameters (optional)
- These are values that you can declare and pass to your
serverless.ymlfile at runtime when you update or create a stack on CloudFormation. You can use these parameters and call them from theResourcesorOutputssections defined in yourserverless.ymlfile.
- Mappings (optional)
- If you are familiar with lookup tables, you will find that you can use this section to specify conditional parameters with a mapping of associated key: value pairs. You can easily match key: value pairs with an Fn::FindInMap function within the
ResourcesandOutputssections.
- Conditions (optional)
- You can also control the creation of a resource or whether resource properties have values assigned that you declare when you update or create a stack in AWS. Depending on whether a stack is for a development or production environment, you can for example, conditionally create a resource for each stage as needed by your application.
- Transform (optional)
- With AWS::Include you can use
transformto work withserverless.ymlgists that you save in a separate directory from your mainserverless.ymltemplate file. You can save your gists in an Amazon S3 bucket to reuse your functions across an infinite amount ofserverless.ymlfiles. You can also use this to better define your AWS Serverless Application Model (AWS SAM) files. However, because we are using the ServerlessFramework we will not discuss how to usetransformwith the AWS SAM framework here.
- Resources (REQUIRED)
- This is the only required Template Section that you MUST include in your
serverless.ymlfile in your serverless backend. You SHALL use this section to specify the precise stack resources and their properties that you need AWS CloudFormation to create for you on AWS. You can use ServerlessFramework to define the infrastructure you need to deploy with yourserverless.ymlfile.
- Outputs (optional)
- This section will let you view your properties on the CloudFormation stack and the values that it returns to you. You can easily use the AWS CLI to use commands that will display the values returned by your stack for outputs that you declare in your
serverless.ymlfile.
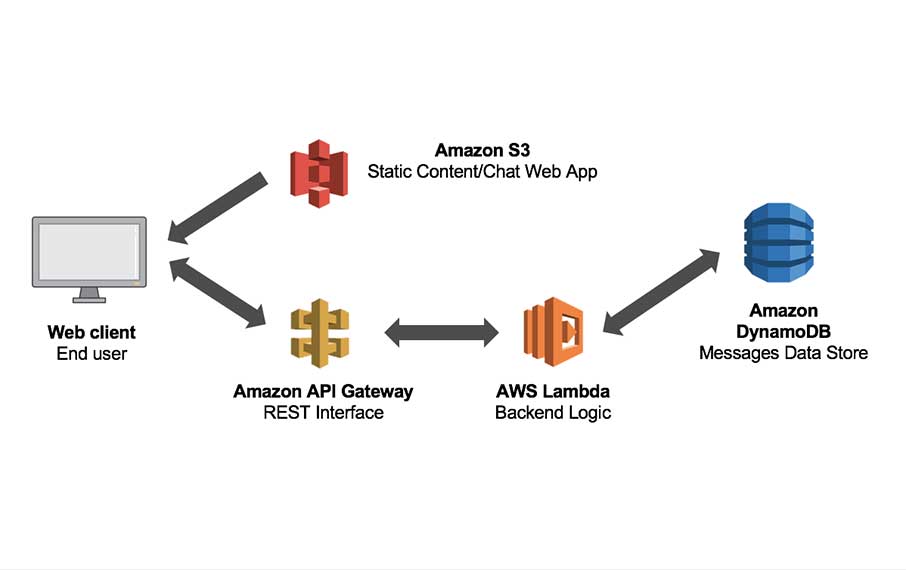
In our CloudFormation Template called serverless.yml found in each of our serverless + microservices that we implement for our API, we describe the AWS Lambda functions, API Gateway endpoints to configure, DynamoDB tables, Cognito User & Identity Pools, and S3 Buckets that we need to deploy to our serverless + microservice properly. This reality is what we call Infrastructure As Code. The goal in using an IAC Architecture is to reduce or prevent errors by avoiding the AWS Management Console. When we describe our Infrastructure As Code we can quickly and easily create multiple environments with minimal development time and effort exerted.
Transpiling and converting ES Code in Node v8.10 is the responsibility of the serverless-webpack plugin that we include with the ServerlessFramework.
AWS Resources & Property Types Reference
This is the AWS Resource & Property Types Reference information for the resources and properties that AWS CloudFormation supports as Infrastructure As Code. Resource type identifiers SHALL always look like this:
service-provider::service-name::data-type-name
We will use a few of the services that you can find in the AWS Resource & Property Types Reference. Below you will find a list of the resources in our demo application that we have implemented for this tutorial:
For now, please open the serverless.yml file found at the ServerlessStarterService repository. Please look at the sections below for an explanation of each declaration in our ServerlessFramework, CloudFormation template:
# TODO: http://serverless.com/framework/docs/providers/aws/guide/intro/

# New service names create new projects in aws once deployed
service: serverless-starter-service(node.js)

# Use the serverless-webpack plugin to transpile ES6
# Using offline to mock & test locally
# Use warmup to prevent Cold Starts
plugins:
  - serverless-webpack
  - serverless-offline
  - serverless-plugin-warmup

# configure plugins declared above
custom:
  # Stages are based on the stage value-params you pass into the CLI when running
  # serverless commands. Or fallback to settings in provider section.
  stage: ${opt:stage, self:provider.stage}

  # Load webpack config
  # Enable auto-packing of external modules
  webpack:
    webpackConfig: ./webpack.config.js
    includeModules: true

  # ServerlessWarmup Configuration
  # See configuration Options at:
  # http://github.com/FidelLimited/serverless-plugin-warmup
  warmup:
    enabled: true # defaults to false
    forlderName: '_warmup' # Name of folder generated for warmup
    memorySize: 256
    events:
      # Run WarmUp every 720 minutes
      - schedule: rate(720 minutes)
    timeout: 20

  # Load secret environment variables based on the current stage
  # Fallback to default if it is not in PROD
  environment: ${file(env.yml):${self:custom.stage}, file(env.yml):default}

provider:
  name: aws
  runtime: nodejs8.10
  stage: dev
  region: us-east-1

  # Environment variables made available through process.env
  environment:
    #### EXAMPLES
    # tableName: ${self:custom.tableName}
    # stripePrivateKey: ${self:custom.environment.stripePrivatekey}
Taking a closer look at the YAML-formatted template above, the service block is where you will need to declare the name of your serverless + microservice with CloudFormation. The ServerlessFramework will use this as the name of the stack to create on AWS. If you change this name and redeploy it to AWS, then CloudFormation will simply create a new project for you in your AWS account.
The environment block is where we load secrets saved in our env.yml file. You must remember that AWS Lambda only gives you 4KB of space for this file which should be more than enough for our needs. The important thing to remember is to keep your logic modular and do not put all of you application secrets in one file. Use an env.yml file for each serverless + microservice that you implement. The secrets and custom variables that we load from our env.yml file are based on the stage that we are deploying to at any given point in the development lifecycle using file(env.yml):${self:custom.stage}. If you do not define your stage, then our application will fall back to load everything under the default: block with file(env.yml):default. The ServerlessFramework will check if custom.stage is available before falling back to default.
As shown in the example, we can also use this mechanism to add other custom variables that we may need loaded at any given time. You may add any environment variable to the environment block using something like:
${self:custom.environment.DECLARE_YOUR_VARIABLE}
Any custom variable that we declare in the manner shown above is available to our Lambda function with something like this:
process.env.DECLARE_YOUR_VARIABLE
Configure an API Endpoint
In the ServerlessStarterService serverless.yml AWS CloudFormation template that describes our infrastructure, we define the functions that we have implemented as Lambda that we want exposed on AWS. You must remember that each serverless + microservice will have its own serverless.yml template in the project’s root directory that will define the endpointsassociated with each serverless + microservice. Below is an example of a Lambda function defined in our ServerlessStarterService CloudFormation template:
functions:
  # Defines an HTTP API endpoint that calls the microServerless function in handler.js
  # - path: url path is /microServerless
  # - method: GET request
  # - cors: enabled CORS (Cross-Origin Resource Sharing) for browser cross
  #     domain api call
  # - authorizer: authenticate using an AWS IAM Role
  displayService:
    handler: handler.starterService
    events:
      - http:
          path: starterService
          method: get
          cors: true
          authorizer: aws_iam
    # Apply Warmup to each lambda to override
    # settings in custom.warmup block globally.
    warmup:
      enabled: true
Do not think that you must memorize this information. Use the Force and read the documentation and ask questions on Stack Overflow to discuss with the larger community of Jedi. As needed, do not forget to refer to the AWS Resource & Property Types Reference information for the resources and properties that AWS CloudFormation supports as Infrastructure As Code.
You configured your new serverless + microservice using the Infrastructure As Code architecture.
Mocking Serverless + MicroServices before Deploying to AWS
We have to mock, or fake the input parameters for a specific event needed by our Lambda’s with a *.json file to be stored in a directory within the serverless + microservice project that we will use by executing the ServerlessFramework’s invokecommand. The invoke command will run your serverless + microservice code locally by emulating the AWS Lambda environment. As the old saying goes however:
“If everything were candy and nuts, everyday would be Christmas…” – unknown
You just must remember that this is not a 100% perfect emulation of the AWS Lambda environment. There will be some differences between your cloud environment and your local machine, but this will do for most use-cases. There are a lot of discussions online, and tools available that promote different approaches that you can take to perfect your localenvironment and your machine for local development outside of the Cloud. We will be mocking the context of our serverless + microservices within this tutorial with simple mock data only. We will leave the study of these tools for a future tutorial. We do however find resources like LocalStack, which is a tool that supplies an easy testing and mocking framework for developing Cloud applications on the AWS Cloud, remarkably interesting, to say the least. Please feel free to experiment with LocalStack and let us know how it works, in the future we will extend this tutorial to include a guide on its implementation also.
When saving a *.json-formatted event in a /<microservice-project-directory>/mocks directory that we will use with the ServerlessFramework invoke command, we will execute the local serverless event as shown below:
Example Usage of invoke
$ serverless invoke local --function functionName --path mocks/testFile.json
invoke Options on local
--functionor-f: The name of the function in your microservice that you want to invoke locally. Required.--pathor-p: The path to ajsonfile storing the input data that you need to pass to the invoked Lambda that an event in the queue will trigger at a specific state in the application. This path is relative to therootdirectory of the microservice.--dataor-d: This is theStringdata you need to pass as aneventto your Lambda function. Be aware that if you pass both--pathand--data, the information included in the--pathfile will overwrite the data that you passed with the--dataflag.--raw: This flag will allow you to pass data as a raw string, even if the string you are working with is a.json-formatted string. If you do not set this flag, then any.json-formatted data that you pass into the CLI when youinvoke local, will imply that the AWS Cloud runtime will parse and pass this data to your function as anobject.--contextPathor-x: This is the path to the.json-formatted file that you must store the input that you will pass in as acontextparameter value to the function that you decide toinvokelocally. This path is relative to therootdirectory of your serverless + microservice.--contextor-c: This isstringdata that you want to pass as thecontextto the function that you want toinvokelocally. The information included with the--contextPathflag will overwrite the data that you passed with the--contextflag.--envor--e: This is astringthat will represent an environment variable that you want to declare when youinvokeyour function locally. The format of the environment variable SHALL have a declaration with the following syntax:<name> = <value>. You can reuse this for more than one environment variable that you may need declared in your application.
The invoke local command gives us the ability to fake it until we make it while implementing the serverless architecture for our applications. The functionality provided by the ServerlessFramework will set reasonable environment configuration parameters for us that will allow us to successfully test the functions that we trigger with invoke local. The ServerlessFramework configures all the local AWS specific values that are like those that we find in the actual AWS Cloud where our Lambda functions will execute when we deploy our application. It is also important to remember that ServerlessFramework will define the IS_LOCAL variable when using invoke local. This is important because it will prevent you from executing a request to services in production accidentally to help you safeguard your application while developing and extending new features. The ServerlessFramework will do its best to help you and I from reliving any Dilbert cartoons.
invoke local serverless function example with --data
$ serverless invoke local --function functionName --path mocks/data.json
In the example you can see that we are using the --function option as described, to tell invoke local which Lambda we want to mock on our local machine. When using the -f flag we also must provide the name of the Lambda function that we want to trigger with invoke local on our development machine. We are using functionName as a placeholder for the name of the Lambda function that we want to invoke.
Moving on, you will notice that we have also used the --path option to pass the .json-formatted data that we have saved in the mocks/data.json file that is relative to our project directory. We will use this information when we trigger the invoke local command for the functionName that we have declared as our Lambda in this example.
Example data.json File
{
  "resource": "/",
  "path": "/",
  "httpMethod": "GET",
  // etc  //
}
Limitations
We have tried to condense the most important topics and fundamentals that you need to understand to correctly mock and implement your application as a serverless + microservice. Please refer to the invoke local documentation to better understand how the ServerlessFramework helps you emulate the AWS Cloud on your local machine to help you expedite the development of your application that will help make the world a better place…
Node.js, Python, Java, and Ruby are the only runtime environments that currently support the invoke local emulation environment. To obtain the correct output when using the Java runtime locally, your response class will need to implement the toString() method.
invoke local Mock example with ServerlessStarterService
Earlier, we asked you to create a project structure for the PayMyInvoice demo application that we will build once we complete the review of the fundamentals of serverless application development. If you recall, we asked you to complete a few steps to Setup the Serverless Framework locally. After installing and renaming the ServerlessStarterService as instructed, you should have ended up with a project structure for the PayMyInvoice application that looks a little something like this:
PayMyInvoice
    |__ services
       |__ invoice-log-api (renamed from template)
       |__ FutureServerlessMicroService (TBD)
To show you how to Mock your services locally, we would like to step back from this example for a second to walk you through a specific example we have set up for you in the ServerlessStarterService repository.
Please keep both of this repositories close. We will be performing exercises in both to better relate the material in this tutorial to each other.
Navigate to your home directory from your terminal and clone the ServerlessStarterService so that you can deploy it locally after we perform our invoke local testing and mocking.
$ git clone http://github.com/lopezdp/ServerlessStarterService.git- Run:
$ npm install $ serverless invoke local --function displayService
- The
displayServicefunction is the name of the lambda function that we have declared in theserverless.ymlfile. The lambda functions in the ServerlessStarterService template should look like this:
functions:
# Defines an HTTP API endpoint that calls the microServerless function in handler.js
# - path: url path is /microServerless
# - method: GET request
# - cors: enabled CORS (Cross-Origin Resource Sharing) for browser cross
#     domain api call
# - authorizer: authenticate using an AWS IAM Role
displayService: # THIS IS THE NAME OF THE LAMBDA TO USE WITH INVOKE LOCAL!!!
  handler: handler.starterService
  events:
    - http:
        path: starterService
        method: get
        cors: true
  # Warmup can be applied to each lambda to override
  # settings in custom.warmup block globally.
  warmup:
    enabled: true
- After executing
invoke localyour output should look something like this:
Invoke Local Output

More precisely your terminal will give you some .json output that will look like the following bit of text:
{
    "statusCode": 200,
    "body": "{\"message\":\"You are now Serverless on AWS! Your serverless lambda has executed as it should! (with a delay)\",\"input\":\"\"}"
}
Dont worry, I will walk you through this some more in a future section of this tutorial while we build the demo application. Keep reading young padawan, and may the force be with you.
Resources and IAM Permissions
When an event defined by your application triggers a Lambda function on the AWS Cloud, the ServerlessFramework creates an IAM role during the execution of the logic on your serverless + microservice. This will set all the permissions to the settings that we provided during the implementation of our infrastructure that you see in the iamRoleStatements block, that is in your serverless.yml file for the serverless + microservice in question. Every call your application makes to the aws-sdkimplemented in this Lambda function, will use the IAM role that the ServerlessFramework created for us. If you do not explicitly declare this role, then AWS will perform this task by creating a key pair and secret as an environment variable like:
AWS_ACCESS_KEY_IDAWS_SECRET_ACCESS_KEY
The problem with mocking your services on your local machine with invoke local is that your machine does not have Jeff Bezos’ magic money inside of it. The role needed to invoke these Lambda functions are not available!!! You are not AWS! Trust me, I wish I was Jeff Bezos too (or at least his bank account). As a Cuban, I can wholeheartedly tell you that he is the hero of an Island of Caribeños who came to the USA in search of the ever so elusive Sueño Americano or what some call the American Dream. #Learn2Code.
не верь не бойся не проси
Russian Trained Programmers

Now you know why I am an AWS #fanboy but I still must explain what is wrong with this picture…
It is different when you use the ServerlessFramework and its invoke local function because the role just is not available to your local machine and the aws-sdk is just going to default to using your default profile that you specified inside of your AWS credential configuration file. You can control how we use the default choice, or not, by hard coding another user directly in your code (not ideal), or with a key pair of environment variables (preferred).
Please take some time to review the official AWS documentation to better understand what you need to achieve in a secure manner. In this tutorial, the JavaScript SDK is our primary concern, but this process should be similar for all SDK’s:
- loading-node-credentials-shared
- loading-node-credentials-lambda
The point of all of this is to make you aware that the set of permissions used will be different, regardless of the approach you decide to implement. You will have to play around with different tools because you will not be able to precisely emulate the actual AWS IAM Policy in place. Not to sound repetitive, but therefore we recommend resources like LocalStack, which is a tool that supplies an easy testing and mocking framework for developing cloud native applications on the AWS Cloud. Future tutorial in the making… (Not anytime soon though! –> Unless you send Bitcoin!)
You can now Mock and FAKE all your Serverless + MicroServices locally before Deploying to AWS.
Serverless Unit Testing & Code Coverage
We are taking an automated testing approach to achieving our ideal Code Coverage goals. Automated tests SHALL execute whenever a new change to the source code is merged into the main development branch of the project repository. We think that using a tool like GitHub is really the best approach here in terms of your project repositories; just keep things simple and unbelievably you will change your life!
You can implement Automated Testing with typical unit tests that will execute individual software modules or functions, in our case our unit tests will execute our Lambda functions on the AWS Cloud. When implementing your tests, you really want to try to make them useful, if not at least relevant to the goal of your application’s business logic. You really want to take some time to think of any edge cases that your users may be inputting into your application to ensure that your application’s user experience meets your user’s needs and expectations. If you are working as part of a team, you really should collaborate with them on the different test cases that you should implement to mitigate any potential errors, that your users may confront out in the wild…
Examples of useful test cases should consider the following:
- Tests which reproduce any bugs and their causes to verify that errors have a resolution by the latest updates to the application.
- Tests that return the details that confirm the correct and precise implementation of the system requirements and specifications. Tests that return the proper
data typesas specified in the system’s data dictionary would be an appropriate metric. - Tests that confirm that your software is correctly handling expected or unexpected edge, and corner cases are appropriate.
- Tests that confirm any expected state changes and interactions with loosely coupled modules and system components are a Best Practice.
Throughout our automated testing processing and workflow, code coverage KPI’s and metrics are a source of data to record and keep safe. It would be ideal to support Linear Code Sequence Coverage above 80%.
Jest.js Implementation and Configuration
This tutorial and its author have decided to use Jest.js for this “lecture”. We have decided to use this automated testing framework to test our codebase and the correctness of our logic and our application’s functionality because Jest.js is very simple, it works with the libraries and frontend frameworks that we will be implementing in future parts to this series, it takes minimal configuration, it is easy to determine the percentage of code coverage we have implemented and most importantly, Jest.js is well documented.
For this tutorial and the demo application that we will be walking through together shortly, you will notice a directory within each serverless + microservice labeled something like:
/<serverless-microservice-project>/tests/<component>.test.js
Jest.js is already installed as a dependency in your package.json file, which means that every time you npm install a new serverless + microservice project with our Serverless-Starter-Service project, you will automatically have Jest.js installed on your local environment for you. Easy Peasy my friend, work smart is the name of the game… For all the rest of you out there who simply refuse to just follow along because you absolutely must do everything from scratch yourself, then go ahead and get it done with the following cmd:
$ npm install --save-dev jest
You still must push forward, there is always more to accomplish; you also need to add a line of .json to update the scripts block in your package.json file. You need to add the following:
"scripts": {
  "test": ":jest"
}
With the above configuration complete, you will be able to use the $ npm test command to run your unit testing with the Jest.js framework from your terminal.
Add Unit Tests
Ideally you will want to try to keep your project files organized, you know, unlike the way you keep your bedroom. Show this to your mother, go ahead, let her know that you are out here getting an education and not wasting away watching porn. The internet is not all trolls and Dark Web, you can find a good example or two out here in this digital desert wasteland my friends. Either way, keep yourself organized!!! Anytime you add or implement any new unit tests for each serverless + microservice endpoint you define in each of your Lambda functions, make sure to create a new file for the endpoint that you are implementing. Proceed as such:
$ touch ~/<ApplicationProjectName>/service/<serverless-microservice-project>/tests/<serverless-endpoint>.test.js
Pay attention to the relative structure of the path that I have chosen to use in the example above as it will make more sense once we start digging into the implementation details of our demo application in this tutorial series. The crucial point to remember is that <test>.js files will save in the /tests directory. Easy enough, no???
We can use the example starter.test.js file that we have implemented in our Serverless-Starter-Service project to better understand how we will be implementing our test cases with the Jest.js framework:
Need to Debug Implementation (Not Ready for Publishing)!!!
import * as handler from "../handler.js";

// FIXME: Correct eslint `no-undef` errors
test("starterService Execution", async () => {
  const event = "event";
  const context = "context";
  const callback = (error, response) => {
    expect(response.statusCode).toEqual(200);
    expect(typeof response.body).toBe("string");
    expect(response.body).toMatch(/executed/);
  };

  await handler.starterService(event, context, callback);
});
The implementation of our tests is straight forward and easy, once you can understand how to assert values and data types as provided from our serverless + microservice responses. Here we are simply adding one test to assert that the response we are getting back from our service is a string. We carry out this with the .toMatch() method in the last line of the test we have implemented here as an example. We will explain this further as we implement the functionality in our demo application. In the meantime, be sure to read more about using Jest.js as a testing tool in their documentation.
Run Tests
Once you have your unit tests implemented, you can run those tests in your command line interface from the root of project using the following command:
$ npm test
The terminal will supply an output for a successful result that will look like this:
Testing Output
$ npm test

> serverless-starter-service(node.js)@1.1.16 test /Users/MyDocs/DevOps/ServerlessStarterService
> jest

 PASS  tests/starter.test.js
  ✓ starterService Execution (1007ms)

Test Suites: 1 passed, 1 total
Tests:       1 passed, 1 total
Snapshots:   0 total
Time:        2.044s
Ran all test suites.
Unit Test Output

And that is it. We have discussed the fundamentals of building out the backend logic of an application using the serverless + microservice architecture with AWS Lambda. You know what Lambda functions are, how to configure and implement the logic you need in each Lambda, you know how to Mock, or fake your serverless + microservices on your local machine using the invoke local command provided to us by the ServerlessFramework, and you know how to implement the Unit Tests we will need to implement to create an automated testing pipeline we can use to eventually Continuously Integrate & Continuously Deploy our application to the different stages we define for our development and production environment slater on.
All services should implement the proper logic within the correct project structure as described. You will then mock and test each service before deploying any resources or infrastructure to the AWS Cloud as a software development Best Practice.