Part 4 : Code Review, Deploy, & Configure an effective CI/CD Pipeline on AWS
This is a continuation of our multi-part series on building a simple web application on AWS using AWS Lambda and the ServerlessFramework. You can review the first, second, and third parts of this series starting with the setup of your localenvironment at:
- How To SetUp Your
localServerless Environment - How To Configure Your Serverless Backend API
- How To Configure Your Infrastructure As Code, Mock Services, & Unit Testing
You can also clone a sample of the application we will be using in this tutorial here: Serverless-Starter-Service
Please refer to this repo as you follow along with this tutorial.
Code Review Agility
We have definitely covered a lot of ground by now, and it may be best to take a minute and work through a Code Review of sorts, that we can use to absorb all of this information that we have reviewed and implemented together before merging our code and deploying our services into production. It is definitely a good idea to take this time to think about the workflow we will put in place to manage our day to day development and implementation activities as a team of engineers. In my case it’s just Wilson and I, remember?
Collaborating with other team members can be tricky, that is, it can be tricky if you don’t have a plan in place to work in an organized manner!!! We recommend that the documentation for any project repository include a set of ContributionGuidelines.md that dictate how each member of your team shall interact with the organization’s source code. There are numerous examples out in the ether that you can look to as a set of guiding principles, and yet, you know I have a suggestion for you anyway. As someone who has published OpenSource work for NASA as a contractor, I suggest you model any ContributionGuidelines that you make for you and your team after the NASA OpenMCT project guildelines to start off. It is pretty straght forward and really gets to the point in terms of what a good OpenSource contribution policy should look like.
Pull Request Check Lists Examples & Best Practices
In an Agile development environment, we just want a process that we can use to iterate over a predefined Code Reviewworkflow that will help us implement and merge new updates to our source code efficiently, transparently, and with close to zero downtime in the Wild. When a team member writes and implements a set of features, there should be someone, again, in my case Wilson, who will review the code you have implemented on a topic-branch in git after you create a Pull Request for your project lead to review your code.
The Code Review process is an important part of your team workflow because it allows you to share the knowledge you gained from the implementation of the logic and functionality that defines the feature you will deploy, it gives you a layer of quality assurance that lets your peers contribute and provide insight into the feature you will deploy, and it allows new team members to learn from the rest of the team by taking ownership of a feature and implementing the logic the new feature needs to deploy.
The Agile framework requires that every Code Review complete a Pull Request in phases. The first phase would require your Tech Lead to look at your implementation and any changes you made, and compare it to the code that you are refactoring. The second phase of the review requires the Reviewer to add feedback and comments to your implementation that critique your work. The Reviewer should get you to question all scenarios and edge-cases that you have to consider before approving your Pull Request.
You should complete and attached these checklists to any pull requests you create or file as an author or reviewer of a new feature in your project’s repository. When you decide to merge a pull request please complete a checklist similar to the version of the checklists provided below:
Author Checklist
- Do the changes implement the correct feature?
- Did you implement and update your Unit Tests?
- Does a build from the
CmdLine Pass? - Has the author tested changes?
Reviewer Checklist
- Do the changes implement the correct functionality?
- Are there a sufficient amount of Unit Tests included?
- Does the file’s code-style and inline comments meet standards?
- Are the commit messages appropriate?
Collaborating with your team throughout the Code Review process is the most important part of the Pull Request workflow. When you create a Pull Request you initialize a collaborative review process that iterates between the updating and reviewing of your code. The process finishes with the Reviewer executing a merge of your code onto the next brange in the stage of deployment that your team defined.
The Pull Request & Agile Code Review

What have you done!?!?
If you have gotten this far I am impressed. You might still have a chance at completing your first production ready application soon enough. We still need to customize the logic in our starter template so that it matches the list of Lambda functions that I promised you earlier that we would eventually get around to implementing. We are not there yet, but we are really close. Let’s take a second to put it all down into a sort of OnePager that we can use to refer back to these commands throughout future projects.
Serverless MicroService Implementation Best Practices
- Setup
localServerless Environment:- Instal
nvmand Node.js v8.10.0 - Setup Editor & Instal ESLint
- Configure SublimeText3
- Instal
- Configure your Serverless Backend on AWS:
- Decrease Application Latency with Warm Starts
- Understand the AWS Lambda Runtime Environment
- Register with AWS and configure your AWS-CLI
- Setup the ServerlessFramework for
localdevelopment
- Infrastructure As Code, Mock Services, & Unit Testing:
- Configuring your Infrastructure As Code
- Configure an API Endpoint
- Mocking Services before Deployment
- Unit Testing & Code Coverage
- Run Tests before Deployment
Deploy the ServerlessStarterService Template
We have finally gotten to the coolest part of this tutorial. The buildup is enormous, I know. Do not let your head explode on me yet, I Promise there is a point to all of this. We have already run npm install, run lint, and test on our Serverless-Starter-Service that we have cloned on our local machine; We also mocked the Serverless-Starter-Service locally with sls local invoke and our local environment responded with all of the appropriate Response: 200 OK messages as expected. Now it is time to deploy our serverless + microservice to see what we can do. Are you ready?!?!
Navigate into the Serverless-Starter-Service project directory on your local machine and execute the following command in your terminal:
$ serverless deploy
Here is the result of the deployment; the output also includes the Service Information you need to consume the resources from the API you have just implemented on AWS!
Serverless-Starter-Service Output
MyDocs (master) ServerlessStarterService
$ serverless deploy
Serverless: WarmUp: setting 1 lambdas to be warm
Serverless: WarmUp: serverless-starter-service-node-dev-displayService
Serverless: Bundling with Webpack...
Time: 1008ms
Built at: 2019-03-29 19:19:19
               Asset      Size  Chunks             Chunk Names
    _warmup/index.js  8.94 KiB       0  [emitted]  _warmup/index
_warmup/index.js.map  7.42 KiB       0  [emitted]  _warmup/index
          handler.js  6.84 KiB       1  [emitted]  handler
      handler.js.map  5.82 KiB       1  [emitted]  handler
Entrypoint handler = handler.js handler.js.map
Entrypoint _warmup/index = _warmup/index.js _warmup/index.js.map
[0] external "babel-runtime/regenerator" 42 bytes {0} {1} [built]
[1] external "babel-runtime/helpers/asyncToGenerator" 42 bytes {0} {1} [built]
[2] external "babel-runtime/core-js/promise" 42 bytes {0} {1} [built]
[3] external "source-map-support/register" 42 bytes {0} {1} [built]
[4] ./handler.js 2.58 KiB {1} [built]
[5] external "babel-runtime/core-js/json/stringify" 42 bytes {1} [built]
[6] external "babel-runtime/helpers/objectWithoutProperties" 42 bytes {1} [built]
[7] ./_warmup/index.js 4.75 KiB {0} [built]
[8] external "aws-sdk" 42 bytes {0} [built]
Serverless: Package lock found - Using locked versions
Serverless: Packing external modules: babel-runtime@^6.26.0, source-map-support@^0.4.18
Serverless: Packaging service...
Serverless: Creating Stack...
Serverless: Checking Stack create progress...
.....
Serverless: Stack create finished...
Serverless: Uploading CloudFormation file to S3...
Serverless: Uploading artifacts...
Serverless: Uploading service serverless-starter-service-node.zip file to S3 (1.4 MB)...
Serverless: Validating template...
Serverless: Updating Stack...
Serverless: Checking Stack update progress...
................................................
Serverless: Stack update finished...
Service Information
service: serverless-starter-service-node
stage: dev
region: us-east-1
stack: serverless-starter-service-node-dev
resources: 16
api keys:
  None
endpoints:
  GET - http://g0xd40o7wd.execute-api.us-east-1.amazonaws.com/dev/starterService
functions:
  displayService: serverless-starter-service-node-dev-displayService
  warmUpPlugin: serverless-starter-service-node-dev-warmUpPlugin
layers:
  None
MyDocs (master) ServerlessStarterService
$
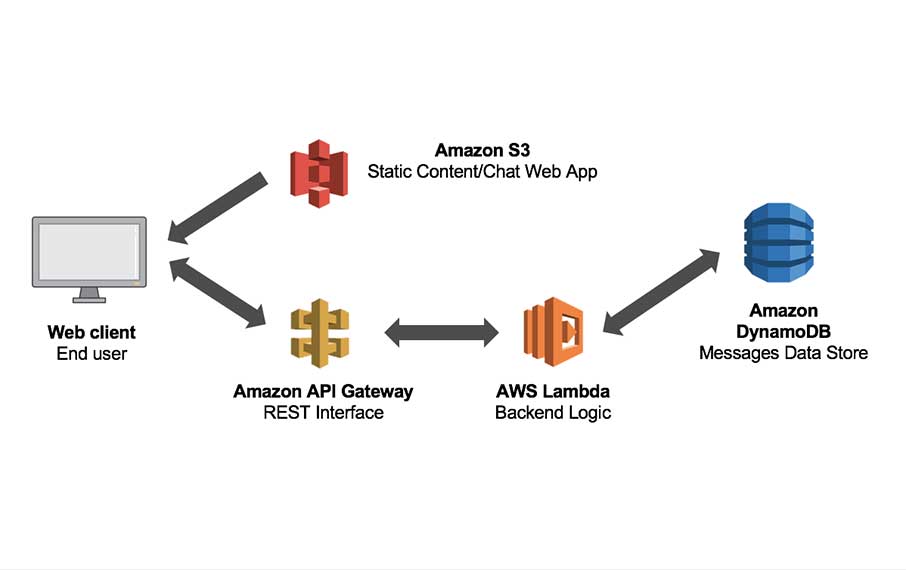
Serverless Starter Service Template API Endpoint
This is the endpoint to our Lambda. You should have something similar that will produce a similar result if you have followed along:
- Template Endpoint:
http://g0xd40o7wd.execute-api.us-east-1.amazonaws.com/dev/starterService
Deployment Output to terminal

Triggering the new resource we deployed on API Gateway from the address bar in our browser to our new Template Endpoint at http://g0xd40o7wd.execute-api.us-east-1.amazonaws.com/dev/starterService will produce the following output to our device screen:
{
	"message":"You are now Serverless on AWS! Your serverless lambda has executed as it should! (with a delay)",
	"input": {
		"resource":"/starterService",
		"path":"/starterService",
		"httpMethod":"GET",
		"headers": {
			"Accept":"text/html,application/xhtml+xml,application/xml;q=0.9,*/*;q=0.8",
			"Accept-Encoding":"br, gzip, deflate",
			"Accept-Language":"en-us",
			"CloudFront-Forwarded-Proto":"http",
			"CloudFront-Is-Desktop-Viewer":"true",
			"CloudFront-Is-Mobile-Viewer":"false",
			"CloudFront-Is-SmartTV-Viewer":"false",
			"CloudFront-Is-Tablet-Viewer":"false",
			"CloudFront-Viewer-Country":"US",
			"Host":"g0xd40o7wd.execute-api.us-east-1.amazonaws.com",
			"User-Agent":"Mozilla/5.0 (Macintosh; Intel Mac OS X 10_14_4) AppleWebKit/605.1.15 (KHTML, like Gecko) Version/12.1 Safari/605.1.15",
			"Via":"2.0 6ba5553fa41dafcdc0e74d152f3a7a75.cloudfront.net (CloudFront)",
			"X-Amz-Cf-Id":"20__-h2k2APyiG8_1wFfAVbJm--W1nsOjH1m0la_Emdaft0DxqzW7A==",
			"X-Amzn-Trace-Id":"Root=1-5c9eac1d-58cadfb397aea186074bd6ab",
			"X-Forwarded-For":"134.56.130.56, 54.239.140.19",
			"X-Forwarded-Port":"443",
			"X-Forwarded-Proto":"http"
		},
		"multiValueHeaders": {
			"Accept":["text/html,application/xhtml+xml,application/xml;q=0.9,*/*;q=0.8"],
			"Accept-Encoding":["br, gzip, deflate"],
			"Accept-Language":["en-us"],"CloudFront-Forwarded-Proto":["http"],"CloudFront-Is-Desktop-Viewer":["true"],
			"CloudFront-Is-Mobile-Viewer":[
				"false"
			],
			"CloudFront-Is-SmartTV-Viewer":[
				"false"
			],
			"CloudFront-Is-Tablet-Viewer":[
				"false"
			],
			"CloudFront-Viewer-Country":[
				"US"
			],
			"Host":[
				"g0xd40o7wd.execute-api.us-east-1.amazonaws.com"
			],
			"User-Agent":[
				"Mozilla/5.0 (Macintosh; Intel Mac OS X 10_14_4) AppleWebKit/605.1.15 (KHTML, like Gecko) Version/12.1 Safari/605.1.15"
			],
			"Via":[
				"2.0 6ba5553fa41dafcdc0e74d152f3a7a75.cloudfront.net (CloudFront)"
			],
			"X-Amz-Cf-Id":[
				"20__-h2k2APyiG8_1wFfAVbJm--W1nsOjH1m0la_Emdaft0DxqzW7A=="
			],
			"X-Amzn-Trace-Id":[
				"Root=1-5c9eac1d-58cadfb397aea186074bd6ab"
			],
			"X-Forwarded-For":[
				"134.56.130.56, 54.239.140.19"
			],
			"X-Forwarded-Port":[
				"443"
			],
			"X-Forwarded-Proto":[
				"http"
			]
		},
		"queryStringParameters":null,
		"multiValueQueryStringParameters":null,
		"pathParameters":null,
		"stageVariables":null,
		"requestContext": {
			"resourceId":"bzr3wo",
			"resourcePath":"/starterService",
			"httpMethod":"GET",
			"extendedRequestId":"XU_UiEVSIAMFnyw=",
			"requestTime":"29/Mar/2019:23:37:01 +0000",
			"path":"/dev/starterService",
			"accountId":"968256005255",
			"protocol":"HTTP/1.1",
			"stage":"dev",
			"domainPrefix":"g0xd40o7wd",
			"requestTimeEpoch":1553902621048,
			"requestId":"8cef7894-527b-11e9-b360-f339559a98bd",
			"identity": {
				"cognitoIdentityPoolId":null,
				"accountId":null,
				"cognitoIdentityId":null,
				"caller":null,
				"sourceIp":"134.56.130.56",
				"accessKey":null,
				"cognitoAuthenticationType":null,
				"cognitoAuthenticationProvider":null,
				"userArn":null,
				"userAgent":"Mozilla/5.0 (Macintosh; Intel Mac OS X 10_14_4) AppleWebKit/605.1.15 (KHTML, like Gecko) Version/12.1 Safari/605.1.15",
				"user":null
			},
			"domainName":"g0xd40o7wd.execute-api.us-east-1.amazonaws.com",
			"apiId":"g0xd40o7wd"
		},
		"body":null,
		"isBase64Encoded":false
	}
}
With the completion of this review and with the deployment of our ServerlessStarterTemplate, we are ready to proceed with the configuration of a proper Continuous Integration & Continuous Deployment pipelline that will allow us to abstract the deployment of our services a bit so that we can focus on implementing new features instead of maintaining infrastructure.
You have successfuly deployed your first serverless + microservice on AWS with the ServerlessFramework!
Implementing Continuous Integration & Continuous Deployment on AWS
Moving forward with our project, and this tutorial, we can now take some time to discuss and understand the principles, practices, and benefits of adopting a DevOps mentality. We will also study and review concepts in Continuous Integration and Continuous Delivery to really start getting comfortable deploying enterprise ready software to the AWS Cloud. Just to make sure you are ready, we will review and get you comfortable with commiting your code to a Version Control repository on something like GitHub, and I’ll show you how to setup a continuous integration server and integrate it with AWS DevOpstools like CodeDeploy and CodePipeline.
“Opportunity is missed by most people because it is dressed in overalls and looks like work.” – Thomas A. Edison
DevOps definitely conjures up the feeling of mysticism and confusion amongst those who discuss it in the cryptographic and vitriolic corners of the Dark Web and Tor Browser drum circles. If there was anything that you can call The Force, it would definitely be DevOps.
DevOps is really a benevolent force for cultural good that promotes collaborative working relationships between development teams, and their operational counterparts to work together to deploy and deliver software and infrastructure at a pace that allows the business units to cash in on the monetization of new features. The biggest benefit to this philosophy, is that the business teams can be sure that their efforts enforce the reliability and stability of the production environment holistically, because all of the key stakeholders are involved in the success of the product.
Implementing a DevOps mindset allows you to completely automate your deployment process, testing and validating every new feature that you implement using a consistent process-framework, starting with every developer on your team, all the way until the feature finds itself in use by your users, in production. This process is designed to eliminate IT silos of information across distributed teams of developers and operations teams. The idea is to breakdown the barriers that prevent teams from accessing information transparently, so that you can deploy infrastructure programatically, using a standard resource template, that allows you and your team to focus on developing new features and launching your product faster.
The idea is to apply software development practices like quality control, testing, and code reviews to infrastructure and feature deployment that can be rolled into production with little intervention and minimal risk. Transparency is prioritized so that every team member has a clear view at every stage of the development and deployment process from its implemetation by the dev team, all the way to the operations team that monitors and measures your application’s resources and infrastructure deployed in production.
Understanding Continuous Integration (CI)
Continuous Integration started with this evolution of collaborative ideas that we now call DevOps. Ine perfect world, you want you and your team of engineers implementing and integrating new features into your platform, continuously, i.e. Continuous Integration.
As you continuously integrate new features into your platform that will make the world a better place; hopefully, you and your group of code monkeys, have defined some kind of git commit style guideinto those needles ContributionGuidelines.mdthat I told you about earlier. What you need to be doing is continuouslly using $ git commit to $ git push origin new-feature-branch-1 new features that you implement into some god forsaken form of central version control repository that you and your team use to share and review code.
When you or someone on your team implements a new change to the source code that you have saved on your central, and version controlled repository, that is hopefully on something Free, like GitHub, the changes you $ git push must complete a build process that includes an automated unit testing phase that we used jest.js to implement in a previous discussion in this tutorial series for our use case. The architecture that decided to implement is suppossed to give you immediate feedack about any changes that you introduce into the source code files that you save on GitHub.
Being able to obtain a response with instant feedback from the implementation paradim that we have tried to show you throughout this tutorial series, enables you and the rest of your team to fix and correct any mistakes, errors, or bugs that you find along the way, quickly, so that you and your team may continue moving forward and iterating over the development of your product, so you can take it to market ASAP! The whole point of Continuous Integration is to optimize the $ git merge topic-branch of new features into your source code so that you can stay focused on launching new products that help your business and operations teams measure bottom line growth. When you deliver quality software very fast,your business will make more money and will be able to afford to pay you you salary. Play ball because there is no crying in Baseball!!!
Continuous Integration (CI) Workflow

Development
Visually, on the development side of the team, this would look like the image above with a developer making a change to a business feature deployed into production. The developer would commit the new code changes to the project’s GitHub repository onto the master branch. The master branch is where all of the changes that the engineers on the team make to their topic branches flow into, once each Pull Request is reviewed and merged into production.
The code changes that your engineers will $ git merge into production after the Code Reviews are complete for each feature implementation, will automatically trigger a system Build. A system Build that your Continuous Integration pipeline triggers automatically when your CI Server detects your newest changes, will verify that your code will compile and execute successfully at runtime. Our Unit Tests that we implement will execute at this time, and will run against the new code changes that our CI Server detects when merged onto the master branch by your team. The goal used as a Best Practice in these scenarious is to have our CI Servers complete the Build and Test process quickly so that you and your development team get the immediate feedback you need to quickly iterate your way to a solution. The name of the game is speed, and launch your product ASAP.

Operations
When the idea of Continuous Integration devolved into this paradigm that we now call DevOps, it was originally only put into practice by engineering and devlopment teams within their Agile framework to deliver quality code faster. Database Administrators, IT Operators, and Network Admins didn’t pay any attention to these models, and they moved on provisioning and autoscaling servers and load balancers on their own, in secret. Over time however, as the DevOps mentality and its transparent culture of collaboration amongst teams spread throughout the business realm, more teams adopted its philosophy. At some point, someone wrote a book about all of the headaches these companies were facing with these distributed teams of information silos, and one day, when CEO’s were convinced of its ability to improve their bottom line, all of these software development patterns and practices percolated through the industry which led infrastructure and operations teams straight to their adoption.
Graphically, this means that you and your operations engineers can write all of your infrastructure, as code, in a declarative YAML or json-formatted template and commit it to the same GitHub repository that your engineering and development teams are using to commit code to impolement new features. Following in the footsteps on the development teams, we then proceed to have our CI Server pull any of our infrastructure changes that we merge onto our Version Control Repositories to automate our build and unit testing processes. In the case of infrastructure we won’t be compiling and code or triggering any unit tests. Instead, we will use the build process to spin up any Linux Images (AMIs) or resources that we need to have deployed to the cloud. Furthermore, instead of testing code, we will use the test phase to validate our YAML-formatted templates used by [CloudFormation] and to run infrastructure tests to be sure our application is listening on the expected network ports and that our enpoints are returning the expected http responses.
The goal here is the same as in development, to get feedback quickly; we want to get your infrastructure engineer immediate information pertaining to the status of the resources deployed. Your operations teams need to be able to anticipate any issues and respond to feedback immediately to correct any issues that may appear in production.
Understanding Continuous Delivery (CD)
Continuous Delivery simply builds on the concept and process of Continuous Integration and is intended to automate the entire release of the application all the way on through the production environment. To execute this continuous integration and delivery lifecycle your team has to commit to practicing the DevOps culture transparently and in a consistent and Agile manner.
Development and operations teams shall implement the same model for versioning both application and infrastructure implemented as code to allow your Continuous Integration (CI) Servers to run automated builds and tests, that will trigger the deployment of new versions of our application to development branches before we decide to promote them into production ourselves. This brings up an important distinction in the different variations that we can choose to run our CI/CD pipelines which we will discuss shortly. For now please take a second to review a simple example of what a CI/CD Pipeline will look like:
This is a CI/CD Pipeline

We will need to follow a workflow similar to the pipeline described above, on both the development and operations sides of our implementation teams. Both of our teams will have to have the discipline to follow a standard set of ContributionGuidelines.md as we have discussed in previous parts in this series to holds team members accountable and committed to pushing all of their changes to our GutHub repositories that we are using as our Version Control Framework. With you and the rest of the team committing changes to the repository that stores our project’s source code, our Continuous Integration (CI) Server will initiate the builds and tests that will then trigger a deplpoyment to either a new or existing environment in production. This is our CI/CD Pipeline as shown in the image above.
The image does in fact simplify what we will be implementing over the course of this tutorial. We will also touch upon a few more complex examples throughout the rest of this tutorial. You can also customize your own CI/CD Pipeline to suit your own project’s needs, to include as many stages as you may require to suitably deploy your application with minimal risk of failure.
Continuous DELIVERY Stages

Looking at this implementation from the high level view of the Systems Architect, the above is what a CI/CD Pipeline variation looks like. As we have discussed, the first step in the process includes a source stage where you and your team will commit your changes to the source and any new feature implementations to your respositories on GitHub.
The next stage will run a build process that will compile your source code and spin up any AMI‘s, Lambda‘s, or other infrastructure that your Operations team has declared as code, and which your application needs to function at scale. This stage will also perform and run unit tests, and infrastructure template validations on the resources declared as code that you will deploy with CloudFormation. Unit Tests are executed within this build step to mitigate against any errors or bugs that are introduced by any changes to the source at this stage of the process. Your Unit Tests SHALL trigger a deployment into the staging environment next INSTEAD OF deploying into production automatically. When the Final Release of the application to the production environment is NOT executed automatically, then this is known as Continuous DELIVERY. Typically there is a Business Rule or Manual Activity completed before the final decision is made to release, and promotethe new version into production.
Furthermore, you can add a stage that is run after Unit Tests are completed on your application’s source code files that mayload tests and execute them against your infrastructure to make sure that your application’s performance is acceptable. The objective of all of this is to make sure that everything must be validated and shown to work as designed at each stage before it moves on to the next step of the delivery or deployment process.
Continuous DEPLOYMENT Stages

Here is where things get tricky and where everyone confuses the diferences between Continuous Delivery vs Continuous Deployment. Be careful, there are always decisions to make, and this is one of those times when a decision must be made. In having to choose a path, this is the exact point where the road begins to diverge for many DevOps Teams. In a Continuous DEPLOYMENT pipeline on AWS, the last step of moving into production is automatic. As long as each stage of the pipeline on AWS was successful, the code that you commit to GitHub will ALWAYS go through the pipeline and into productionAUTOMATICALLY, assuming that all stages have completed and pased all testing successfuly.
In summary, in a Continuous DEPLOYMENT pipeline on AWS, the goal is to completely automate everything from end-to-end. The commits that we push to our GitHub repositories will automatically trigger a build phase and any appropriate Unit Testing on your appliction’s source code and infrastructure as code. The workflow will culminate with the deployment of the application into either a development, or staging environment, where will eventually be pushing our application into production from, onl after having completed a MANUAL process or BUSINESS RULE validation with the project’s principals.
In our specific use case as we work through the implementation of the PayMyInvoice application throughout the rest of this tutorial, we will be eliminating the manual task that provisions and configures our infrastructure, while making sure to define all of our application and infrastructure source code declaratively, to optimize our workflow with an implementation of a Continuous Deployment pipeline on AWS for our implementation of a CI/CD workflow for our application.
By pushing all of our application and infrastructure source code to a repository where we $ git commit all of our changes, you and your team will have the benefit and ability to see exactly what team member has changed and added to the sourcecode. This transparency and versioning controlled by a central repository also allows you to rollback to previous versions of you software as need and in case of emergency.
The implied goal of all of the processes is to unify the software delivery process so that our application and its infrastructure are treated as one object that we can run through our end-to-end automated testing build phase to validate all of our application, infrastructure, and configuration logic and provisioning is correct and to the project’s requirements and specifications.
[AWS CodeBuild] and AWS Code Pipeline are a few tools we will be using to implment our CI/CD pipeline. CodeBuild allows us to easily AUTOMATE our build and DEPLOYMENT to rapidly release new features and services. CodePipeline is a Continuous Delivery service that lets us model and visualize our solftware releases.