Table of Contents
ToggleIn the last installment, we learned about the basics of Umbraco and what is new in Umbraco 8. Now we are going to delve into coding basic functionality and making our code as modular as possible.
Before we delve into the code, let’s talk a little about the different types of controllers available to us and which one is appropriate in a given circumstance.
Umbraco Controllers
In addition to the standard ASP.Net MVC controller, Umbraco provides us with two other types of controllers. The RenderMvc Controller and Surface Controller. In a nutshell, both controllers give you control over Umbraco that you simply would not have with a standard MVC controller.
Surface Controller
Surface controllers inherit from standard MVC controllers, so you have all the functionality of a standard MVC controller, plus Umbraco specific functionality. A surface controller is interacting with the front-end pages and are particularly useful for rendering child actions. Any time you have a custom form, you will want to use a surface controller. Surface controllers provide access to important Umbraco objects such as UmbracoHelper and UmbracoContext. Surface controllers are auto-routed, so you never have to manually setup your own routes. Umbraco handles all of this behind the scenes. If you want to “hijack” a route, you would use the RenderMvc Controller.
RenderMvc Controller
This type of controller is the total opposite of the surface controller. This gives you greater control over how your views are rendered. These controllers provide you with the ability to execute custom code before your views are rendered instead of simply blindly executing the pages and providing you with no control with what happens before the view is rendered. For instance, you can apply granular security rules to your pages & if coded correctly, you can even implement item level security so that only display certain parts of pages to certain users. This also provides you with an opportunity to manipulate the model associated with a page before the page is rendered.
Tying it all together
In Umbraco surface controllers and RenderMvc controllers give you the ability to do more than just serve content and allow for you to also customize the way that Umbraco serves up content instead of simply boxing you in. You really shouldn’t ever have to use a standard controller unless you are doing something completely outside of Umbraco.
Adding some functionality
Macros
Macros are simply reusable units of code. Umbraco comes with several useful snippet’s out of the box, one of which we will be using momentarily. Macros can either be used in a Rich Text Editor or called programmatically. In this post we will be adding a new page to the site, so we should have a navigation menu & this is one of those snippets that Umbraco gives us right out of the box.
To add the navigation menu to Umbraco, the first thing that you’ll want to do is login to the back office, go to settings, right click on partial view macros and select “New partial view macro from snippet,” and then click on Navigation. You will then be shown the partial view that is about to be created. You can customize this if you like, but for the moment, we will leave it as it is. All we are going to do now is name the partial “Navigation” and click save. Since we will never be calling this from within a rich text editor, it’s time to hook this up to our site. For the moment, the only view that we have is ~/Views/Homepage.cshtml, so that’s what we are going to edit. Go ahead and delete lines 51 thru 67 and replace it with:
@Umbraco.RenderMacro(@"Navigation")
Bam, we’re done! It’s not displaying anything right now because we don’t have any other pages, but I don’t want it to display only other pages, it should obviously display the root page & of course this is a Bootstrap 4 site, so it should be styled as such. So, let’s go back to ~/MacroPartials/Navigation.cshtml view and add the root page (Homepage) & make it look pretty. When we are finished with the changes, Navigation.cshtml should look like this:
@inherits Umbraco.Web.Macros.PartialViewMacroPage

@using Umbraco.Web

@{ var selection = Model.Content.Root().Children.Where(x => x.IsVisible()).ToArray(); }

<div class="collapse navbar-collapse" id="navbarsExampleDefault">

<ul class="navbar-nav mr-auto">

<li class="nav-item" @(Model.Content.Root().IsAncestorOrSelf(Model.Content) ? "active" : null)>

<a class="nav-link" href="@Model.Content.Root().Url">@Model.Content.Root().Name</a>

</li>

@if (selection.Length > 0)

{

foreach (var item in selection)

{

<li class="nav-item @(item.IsAncestorOrSelf(Model.Content) ? "active" : null)">

<a class="nav-link" href="@item.Url">@item.Name</a>

</li>

}

}

</ul></div>
Now that we have a navigation page, it’s time to get into making the site functional, right? Wrong! We don’t want to continually copy and paste the same code into every type of page that we have. So, we are going to want to create a layout page & have our pages inherit from that.
Layout pages aren’t specific to Umbraco. Practically every ASP.Net MVC site uses them and all the MVC devs out there already know what they are. In case you don’t, layout pages are simply pages that other pages inherit from. Even your layout page can have a layout page ad infinitum.
I prefer to use Visual Studio as often as I can instead of the back office, so if Visual Studio is running, stop it, right click on views in the solution explorer => Add => MVC 5 View and click Add. Now just simply name the view “Master” and hit enter. First, erase the junk that Visual Studio put in there while it was scaffolding and then you will want to extract the elements that most pages will have in common from your ~/Views/Homepage.cshtml file. Because your master page can serve up any type of page, you won’t be able to pass a document type into your @inherits. So, you will also have to replace all instances of this.Model.[attribute] with Model.Root.GetProperty(“[property name]”).GetValue() or some derivative thereof. In the end, your Master view will look like this:
@inherits Umbraco.Web.Mvc.UmbracoViewPage

@{

Layout = null;

var siteRoot = Model.Root();

}

<!doctype html>

<html lang="en">

<head>

<meta charset="utf-8">

<meta name="viewport" content="width=device-width, initial-scale=1, shrink-to-fit=no">

<meta name="description" content="">

<meta name="author" content="Brandon Osborne">

<meta name="generator" content="Jekyll v3.8.5">

<title>@Model.Root().GetProperty("siteTitle").Value()</title>

<link rel="canonical" href="http://getbootstrap.com/docs/4.3/examples/jumbotron/">

<!-- Bootstrap core CSS -->

<link href="~/Content/bootstrap.css" rel="stylesheet" crossorigin="anonymous">

<style>

.bd-placeholder-img {

font-size: 1.125rem;

text-anchor: middle;

-webkit-user-select: none;

-moz-user-select: none;

-ms-user-select: none;

user-select: none;

}

@@media (min-width: 768px) {

.bd-placeholder-img-lg {

font-size: 3.5rem;

}

}

</style>

<!-- Custom styles for this template -->

<link href="~/Content/Site.css" rel="stylesheet">

</head>

<body>

<nav class="navbar navbar-expand-md navbar-dark fixed-top bg-dark">

<a class="navbar-brand" href="#">@siteRoot.GetProperty(@"SiteName").Value()</a>

<button class="navbar-toggler" type="button" data-toggle="collapse" data-target="#navbarsExampleDefault" aria-controls="navbarsExampleDefault" aria-expanded="false" aria-label="Toggle navigation">

<span class="navbar-toggler-icon"></span>

</button>

@Umbraco.RenderMacro(@"Navigation")

@if (!Convert.ToBoolean(siteRoot.GetProperty("HideSearch").GetValue()))

{

<form class="form-inline my-2 my-lg-0">

<input class="form-control mr-sm-2" type="text" placeholder="Search" aria-label="Search">

<button class="btn btn-outline-success my-2 my-sm-0" type="submit">Search</button>

</form>

}

</nav>

@RenderBody()

<footer class="container">

<p>@siteRoot.GetProperty(@"FooterContent").GetValue()</p>

</footer>

<script src="~/Scripts/jquery-3.3.1.slim.js" crossorigin="anonymous"></script>

<script src="~/Scripts/bootstrap.bundle.js" crossorigin="anonymous"></script>

</body>

</html>
Your Homepage view will now look like this:
@inherits Umbraco.Web.Mvc.UmbracoViewPage<ContentModels.Homepage>

@using ContentModels = Umbraco.Web.PublishedModels;

@{

Layout = "Master.cshtml";

}

<main role="main">

<!-- Main jumbotron for a primary marketing message or call to action -->

<div class="jumbotron">

<div class="container">

<h1 class="display-3">@this.Model.SiteName</h1>

<p>@this.Model.HeaderContent</p>

</div>

</div>

<div class="container">

<!-- Example row of columns -->

<div class="row">

<div class="col-md-4">

<h2>@this.Model.LeftColumnHeader</h2>

<p>@this.Model.LeftColumnContent</p>

</div>

<div class="col-md-4">

<h2>@this.Model.CenterColumnHeader</h2>

<p>@this.Model.CenterColumnContent</p>

</div>

<div class="col-md-4">

<h2>@this.Model.RightColumnHeader</h2>

<p>@this.Model.RightColumnContent</p>

</div>

</div>

<hr>

</div> <!-- /container -->

</main>
Now we can get to coding a page and macro that provides some functionality. Every site needs a contact page, so let’s start with that. The first thing we will want to do is once again, create a document type and template for the contact page. So, once again login to the back office and go to settings. Right click on Document Types, Click Create, Select Document Type. Now we will start building our Doc Type. Select an icon that gives you the warm and fuzzies and name this document type Simple Page. Click on add group & name your group Content. We are going to make this simple, so you only need to create 2 properties.
- Page Title – Textbox – Default settings
- Body Content – Richtext Editor – Default settings.
Now you need to tell Umbraco where this new doc type can go, so click on Homepage click permission, click “Add child” and select Simple Page. This tells Umbraco that a simple page can go under the Home.
Before we build the contact form macro, let’s just quickly build out a simple contact page. Of course, right now we only have an empty template for that page, so we will define the Layout property as we previously did for homepage and simply add the title and a little body content to the page. Here is what your contact view should look like:
@inherits Umbraco.Web.Mvc.UmbracoViewPage<ContentModels.SimplePage>

@using ContentModels = Umbraco.Web.PublishedModels;

@{

Layout = "Master.cshtml";

var pageTitle = string.IsNullOrEmpty(this.Model.PageTitle) ? this.Model.Name : this.Model.PageTitle;

}

<main role="main">

<div class="container">

<h2 class="display-4">@pageTitle</h2>

</div>

<div class="container">

<p>

@this.Model.BodyContent

</p>

</div>

</main>
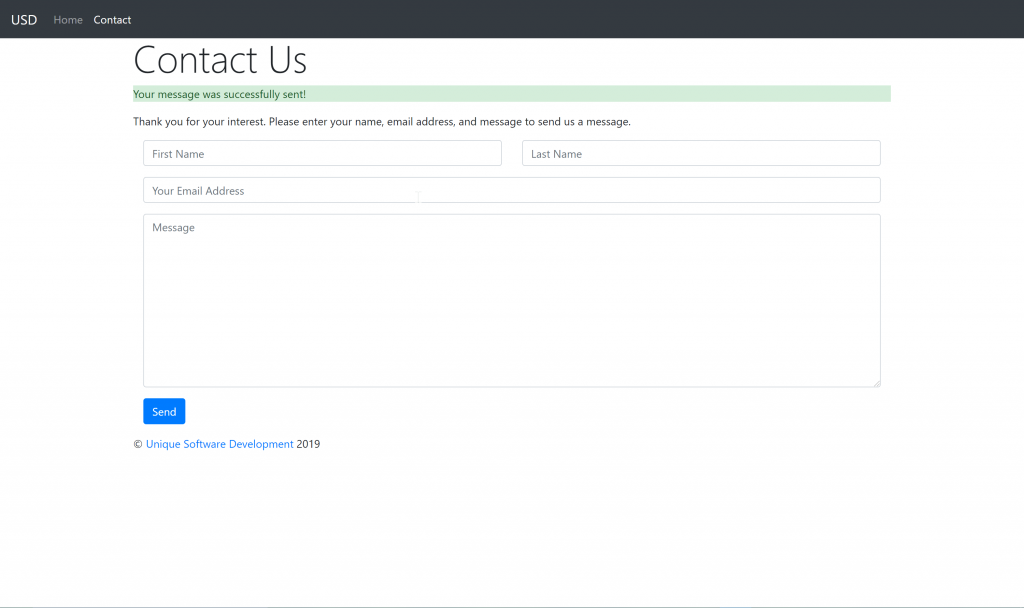
After this, all we need to do is add some content and it will display automagically. So, let’s add a contact page to the site in the back office. So, simply go to the content tab in the back office, right click on Homepage and click Create, click Simple Page, enter Contact as the name, then enter whatever page title and body content that you like. As promised, everything displays as we said it would. Now let’s go about adding that contact us form. We created this as a very generic page because we don’t need a special contact us page in Umbraco because we can simply create a macro that can be rendered from within a Rich Text Editor.
Implementing Macros & Surface Controllers
Now that we have created our page and added content to it, the only thing remaining for us to do is create a macro and surface controller. First, let’s create the macro. Log back in to the back office, go to settings, right click on “Partial View Macro Files,” select “New partial view macro.” First name the macro ContactForm and then we will want to create a form that includes FirstName, LastName, EmailAddress, and Message, and of course, the form will call a surface controller yet to be created. Before we do that, let’s make some changes to the macro settings. Right click on the macro folder under settings, click reload, and select ContactForm. First, set “Use in rich text editor and the grid” to true so we can simply add it to the body content. Now, click on Parameters, add, and create a single parameter with the following values:
Name: Reply To | Alias: replyTo | Editor: Email address
That is all we need to do for the macro from a configuration standpoint. Now all we need to do is code our new view model for the contact form, partial view, and surface controller.
First, we will want to create a view model. So, add a new class to the ~/Models/ directory and let’s call it ContactViewModel.cs. I want to follow an Occam’s Razor approach in these early posts, so we will keep it simple. The code for your model should look like this:
using System.ComponentModel.DataAnnotations;

namespace Umbraco.Demo.UI.Models

{

using System.Web.Mvc;

public class Contact

{

[MinLength(2), MaxLength(25)]

[Required]

[DataType(DataType.Text)]

public string FirstName { get; set; }

[MinLength(2), MaxLength(50)]

[Required]

[DataType(DataType.Text)]

public string LastName { get; set; }

[MinLength(5), MaxLength(100)]

[Required]

[DataType(DataType.EmailAddress)]

[EmailAddress]

public string FromEmailAddress { get; set; }

[MinLength(5), MaxLength(100)]

[Required]

[DataType(DataType.EmailAddress)]

[EmailAddress]

public string ToEmailAddress { get; set; }

[MinLength(25), MaxLength(2000)]

[Required]

[DataType(DataType.MultilineText)]

public string Message { get; set; }

}

}
*NB: If Visual Studio complains about System.ComponentModel.DataAnnotations, go back to Package Manager Console and type the following: Install-Package EntityFramework.
At this point, we need to write some code for our partial view that was created at ~/Views/MacroPartials/ContactForm.cshtml and it should look like the following:
@inherits Umbraco.Web.Macros.PartialViewMacroPage

@{

var contactModel = new Umbraco.Demo.UI.Models.ContactViewModel() { FromEmailAddress = this.Model.MacroParameters["replyTo"].ToString() };

contactModel.FromEmailAddress = this.Model.MacroParameters["replyTo"].ToString();

}

@using (Html.BeginUmbracoForm(@"SendContactMessage", @"Communication", FormMethod.Post))

{

@Html.AntiForgeryToken()

@Html.HiddenFor(x => contactModel.FromEmailAddress, new { })

<div class="container">

<div class="row">

<div class="col col-md-6">

<div class="form-group">

@Html.TextBoxFor(x => contactModel.FirstName, new { placeholder = "First Name", @class = "form-control" })

</div>

</div>

<div class="col col-md-6">

<div class="form-group">

@Html.TextBoxFor(x => contactModel.LastName, new { placeholder = @"Last Name", @class = "form-control" })

</div>

</div>

</div>

<div class="row">

<div class="col col-md-12">

<div class="form-group">

@Html.TextBoxFor(x => contactModel.ToEmailAddress, new { placeholder = @"Your Email Address", @class = @"form-control" })

</div>

</div>

</div>

<div class="row">

<div class="col col-md-12">

<div class="form-group">

@Html.TextAreaFor(x => contactModel.Message, new { placeholder = @"Message", @class = @"form-control", rows = 10 })

</div>

</div>

</div>

<div class="row">

<div class="col col-md-3">

<button type="submit" name="submitContact" id="submitContact" title="Submit Contact Form" class="btn btn-primary">Send</button>

</div>

</div>

</div>

}
As of the time of writing, I personally discovered a now-confirmed bug in Umbraco 8 that causes redirects not to work correctly (along with ViewBag or TempData) when you render a macro inside of a rich text editor, so in order to sidestep this issue for now, we’re simply going to edit ~/Views/SimplePage.cshtml to the following:
@inherits Umbraco.Web.Mvc.UmbracoViewPage<ContentModels.SimplePage>

@using ContentModels = Umbraco.Web.PublishedModels;

@{

Layout = "Master.cshtml";

var pageTitle = string.IsNullOrEmpty(this.Model.PageTitle) ? this.Model.Name : this.Model.PageTitle;

var success = Request.QueryString["success"];

}

<main role="main">

<div class="container">

<h2 class="display-4">@pageTitle</h2>

</div>

@if (!string.IsNullOrEmpty(success))

{

<div class="container">

<div class="row">

<div class="col-md-12">

<div class="@(success == "True" ? "alert-success" : "alert-danger")">Your message was @(Request.QueryString["Success"] == "True" ? " successfully sent!" : " not sent! Check your form input and try again later.")</div>

</div>

</div>

</div>

}

<div class="container">

<p>

@this.Model.BodyContent

</p>

</div>

</main>
Last, but not least, we need to create our surface controller that will finally give our macro and contact page it’s functionality. The code should look like this:
// --------------------------------------------------------------------------------------------------------------------

// <copyright file="CommunicationController.cs" company="Unique Software Development">

// Copyright 2019 Unique Software Development, Inc.

// </copyright>

// <summary>

// The communication controller controls all actions relating to communications (System.Net).

// </summary>

// --------------------------------------------------------------------------------------------------------------------

namespace Umbraco.Demo.UI.Controllers

{

using System.Net.Mail;

using System.Web.Mvc;

using Umbraco.Web.Mvc;

/// <summary>

/// The communication controller.

/// </summary>

public class CommunicationController : SurfaceController

{

public void Index()

{

}

/// <summary>

/// The send contact message.

/// </summary>

/// <param name="contactModel">

/// The contact model.

/// </param>

[HttpPost]

[ValidateAntiForgeryToken]

public void SendContactMessage(Models.ContactViewModel contactModel)

{

var success = false;

if (ModelState.IsValid)

{

var smtpClient = new System.Net.Mail.SmtpClient("localhost", 25);

// Send message to us.

smtpClient.Send(new MailMessage()

{

Body = contactModel.Message,

From = new MailAddress(contactModel.ToEmailAddress, $"{ contactModel.FirstName } { contactModel.LastName }"),

To = { new MailAddress(contactModel.FromEmailAddress) },

IsBodyHtml = false,

Subject = @"Contact Us Form Response"

});

// Send thank you to user.

smtpClient.Send(new MailMessage()

{

Body = @"Thank you for your message! We will get back to you in the next 24 hours.",

From = new MailAddress(contactModel.ToEmailAddress, $"{ contactModel.FirstName } { contactModel.LastName }"),

To = { new MailAddress(contactModel.FromEmailAddress) },

IsBodyHtml = false,

Subject = @"Thank You For Your Message!"

});

success = true;

}

// The point of this exercise is to show you how to create a surface controller, not teach MVC.

// This is obviously incredibly ugly from an MVC / C# point of view.

Response.Redirect($"~/contact/?success={success}", false);

}

}

}
Voila! Now you have a contact us page and a contact us macro that can easily be included on any page either by rendering the macro directly in your view or inside any rich text editor.
Conclusion
We covered the different types of controllers and macros in this article. We also created our first surface controller that serves as a simple contact us form that can be rendered into any view or any rich text editor property type.
The full source code for this article can be found at.
If you have any questions, please feel free to drop me a line anytime.
Coming Up Next Time
In the next lesson, you will learn how to allow users to self-register and self-manage their accounts & how you can manage them in the back office. Until then: Happy Coding!


