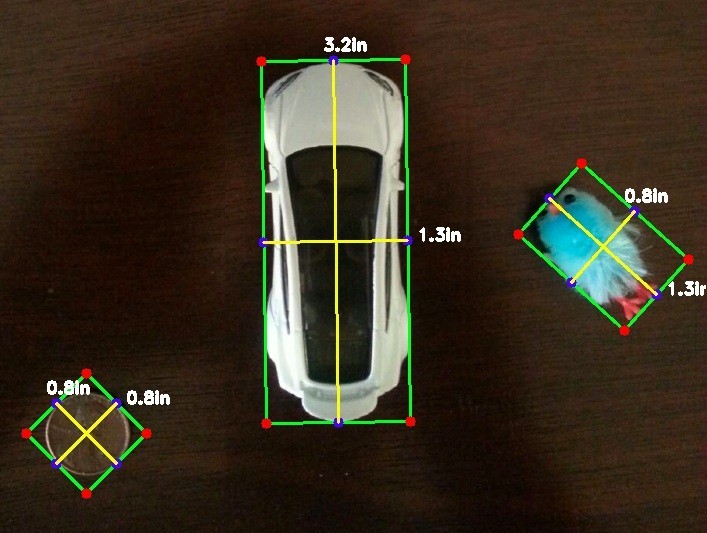
test

Hash Tables Simplified

Hash table is a data structure designed for quick look ups and insertions. On average, its complexity is O(1) or constant time. The main component of a hash table is its hash function. The better the hash function, the more accurate and faster the hash table is. High level process of implementing a hash table is as follows: data is sent to a hash function where it gets evaluated and assigned an index number in an array. The hashing algorithm stores the data under the designated index with a pointer. When a lookup is requested for the same data, the algorithm sends the data to the same hash function and retrieves the index of the data in constant time.


hash table which is also known as hash map, dictionary or just map is a data structure that arranges data for quickly looking up values with a given key.

Average run time complexity of a hash table is O(1) or constant time.

Hash tables are very similar to arrays. Arrays store values in sequential order and they have indices that can be used to look up values instantly. However, arrays have several restrictions: First of all, the indices are generated by the computer in sequential order. Second, if we want to add a value at the beginning or in the middle of the array, we need to move the rest of the values, which requires O(n) steps in the worst case scenario. And in some cases, when we are using non-dynamic arrays, their sizes are fixed.

Hash tables are like giving super powers to arrays. First, instead of relying on sequential indices, we use a function that turns keys into indices. That function is known as the hash function. Hash function is a special function that takes in a key and spits out an index. There are different ways of making hash function and we will look into them later. So then we store the values under that specific index. Later we can use the same function to get the indices and look up values in constant time just like with arrays.

Example

Let’s look at an example case where using a hash table would be a good fit. Let’s say there is a list of students at a university with basic information. |Name|Major|Year| |-|-|-| |Bob|Math|2| |Sam|Biology|1| |Lisa|Art|3|

Now we are asked to organize this data for quick look ups and insertions. Using a hash table we can easily accomplish this task. First we have to pick a key from the list to identify each record. Typically, it is required to choose some value that is unique for each element. But for simplicity purposes we just pick the student names. So we have an array with 5 slots or buckets. Instead of assigning each record in order, we use a hash function to determine which slot each record goes to. We take Bob and give it to the hash function hash('Bob') and the function returns us an index value of 0, for example. We store Bob’s details under the index 0. Then we send Sam to the hash function, the functions tells us to store Sam’s details in slot 4. We do the same for Lisa and store her information in bucket 3.

Hash Function

Now let’s discuss what happens in our hash function. There are countless ways of making hash functions. It is usually preferred to use the ones on the internet which were tested by many people. However, for the sake of understanding the details under the hood, we can implement a simple one here.

Hash function logic We take ASCII value of each character and add them up.

Total %5
B o b
66 111 98 275 0
S a m
83 97 109 289 4
L i s a
76 105 115 97 393 3

For example, for Bob the sum of ASCII values would be 275. Since we have only 5 slots in our array we have to reduce the number to a smaller one. We can use a modulo operator to do that. 275 % 5 = 0

That means we store Bob’s details in slot 0.

Collisions

Remember we said the run time complexity of a hash table is constant – O(1) earlier? Well, its not entirely true. In the worst case scenario, complexity can be as bad as O(n). Main reason for that is the collisions. Collision is a situation when hash function outputs a duplicate index number.

For example, if we send the name Mia to our previous hashing function, it returns index 4. However, that slot is already occupied.

So there are 2 common ways of handling this issue. First one is called Linear Probing. With linear probing, we look at the given index, and if its occupied we go to the next available slot. In our example, there is no next slot. So in this case, we have to wrap around. Meaning we start from the beginning looking for an empty spot. 0 is also taken. We move to slot 1. That place is empty. We insert Mia at index 1. We keep repeating this process for other values if any collisions occur.

Second method is called Chaining. Here we use Linked list to handle duplicate index issues. If you don’t know what a linked list is, here is a good source to read about it. For this method to work, the hash table needs to be properly implemented. All slots should be pointing to the head of the linked list. Then when there is a collision we store the value in the next chain of the linked list. During look ups we need to ensure to check for all nodes by iterating through the list. That is why run time complexity sometimes can be a O(n)

Hash Table in JavaScript

In JavaScript hash table is called Object.

const hash_map = {
	'key':'value'
};

Values in objects could be any type: string, array, integer or even another object. For example, to create an object for the data we had earlier we do the following

const map = {
	Bob: {
		name: 'Bob',
		major:'Math',
		year: 2,
	},
	Sam: {
		name: 'Sam',
		major:'Biology',
		year: 1,
	}
};

Insertion

If we want to insert new key value pairs in the object, we can do it in two ways. First we can use dot method. Second way is similar to **array look up

map['Lisa'] = {
	name: 'Lisa',
	major':'Art',
	year: 3,
};

// OR

map.Lisa = {
	name: 'Lisa',
	major':'Art',
	year: 3,
};

Removal

delete map.Bob;

// OR

delete map['Bob']

Update

map.Lisa.year = 4;
// Or
map['Lisa']['year'] = 4;

Look up

console.log(map.Sam.major);
// Output: 'Biology'

// OR

console.log(map['Sam']['major']);
// Output: 'Biology'

Cheers

Strapi.js – A new way to build Node.js APIs

Strapi.js is the most advanced Node.js Framework and Headless CMS out there. Even though it is not as popular as Express.js, it has the power to save weeks of development time for teams working on Node.js applications. With built-in admin panel and Koa.js under the hood, strapi can help you build your next awesome product.


Pre-requisites:

  • Basic knowledge of JavaScript
  • Node version 10.x+

Outline

  1. Intro
  2. What is Strapi.js?
  3. Features
  4. Get Started!

Intro

Since the launch of Node.js in 2011, we have seen several frameworks that were built on top of this amazing JavaScript runtime environment. Node.js allowed devs to write fast and robust APIs in minutes. Frameworks gave it super powers. The most popular framework for Node.js is and has been Express.js. Main reason for its popularity is its simplicity and minimalistic style. It accelerates Node.js project development even more. Besides Express.js, there are other frameworks such as Hapi, Koa, Meteor and Sails which have found their way into the hearts of developers. In this article, I would like to write about one Node.js framework that has been immensely underrated in the Node community, but has the power to save weeks of development – Strapi.js. Just stick with me here and we will look at the features of this powerful framework and explore what we can do with it.

What is Strapi?

Strapi is an open source Headless CMS based on Node.js. It comes with a flexible and customizable admin panel to build fast and secure content APIs. And it is used by thousands of companies around the world such as IBMWalmartDiscovery and others.

But what is a headless CMS in the first place?

Headless CMS is a type of content management system, such as WordPress, but without the view layer/front end (the head). It means we are not tied to one way of displaying data. We can just plug it into React, Angular or Vue alike view layers. It just provides the APIs and CRUD UI and it can be used with websites, mobile apps widgets, native apps etc. Strapi supports RESTful APIs and also GraphQL.

Features

There are a lot of reasons why you should give Strapi a try on your next project. Below we will go through the main ones.

Koa.js

Strapi is actually built on top of Koa.js, another Node.js framework made by the team who created the Express.js. Koa is a small and more expressive tool which is predicted to be the next generation Node.js framework. Having Koa.js under the hood makes Strapi future proof.

Plugin based

Almost everything in Strapi is plugin. Some of the plugins are installed by default upon creation of the project. Others can be created based on user needs. The real advantage of plugin based framework is that everything is customizable and extensible. Don’t like how the Admin Panel looks, go ahead, customize it. Can’t find the right plugin you are looking for, just create one!

Robust Content Management

Strapi comes with a built-in content management plugin that allows to easily CRUD content, including media files. Admin user interface is super user friendly and anyone can get started with it within minutes. The fact that the content management feature is actually a plugin means that it can be extended to fit any business needs.

React.js

Strapi Admin Panel is built using React.js and the source code is right there inside the project for you to modify if need be. Advanced functionalities of React allows Strapi to deliver amazing user experience.

Content Type Structure

Designing content type structures is made easy by available field types in the Content Type Builder plugin of the Admin Panel. The following types are accessible right out of the box:

  • Text Paragraphs
  • Boolean
  • Email
  • Date
  • Password
  • List of choices
  • Media files
  • JSON
  • String
  • Relation to other Content Types
  • Number

Similar to other plugins, content type builder plugin is also extensible. You can add your own field types to the list!

Secure and flexible APIs

APIs in Strapi can be requested using GraphQL or REST. Calls to all endpoints are secured by default, utilizing the Authentication and Permissions plugin. More often than not, we want our websites or apps to be used by people with different roles. And developing your own RBAC (Role Based Authentication System) can take weeks of development. Strapi provides that functionality out of the box!

Get Started!

Before we get started with Strapi, make sure you have the latest version of Node (10.x and above)

To install Strapi globally on your machine run the following

npm install strapi@alpha -g

Now we can start our new project.

Sample app – Strapi Cycle Bike Rental

We are going to build a backend for a simple bike rental shop using Strapi.js. We want to have APIs to manage clients, bike inventory and orders.

  • /users – to manage the client base
  • /bikes – to manage the bike inventory
  • /orders – to keep track of the orders

The beauty of the framework comes with the “Out of the box” configurations. Once we set up the server and add new models, necessary endpoints for CRUD operations get generated automatically. We can just start using them. Indeed, the APIs can be modified depending on the requirements.

Steps

Step 1

Run the following command to set up a new Strapi project

$ strapi new strapi_cycle

When prompted with the options in the terminal, we can decide which database we want to use and the kind of configurations we want to have. For simplicity, we will be using a local MongoDB database.

- Choose your main database: MongoDB
- Database name: strapi_cycle
- Host: 127.0.0.1
- +srv connection: false
- Port (It will be ignored if you enable +srv): 27017
- Username: <empty>
- Password: <empty>
- Authentication database (Maybe "admin" or blank): strapi_cycle
- Enable SSL connection: false

Note: If you have any issues connecting to your database, make sure you are using correct username/password. Also, leaving the Authentication databasequery blank can cause problems.

Step 2

Navigate to the project folder and run

$ strapi start

Command will start the server on port 1337. So if you navigate to localhost:1337 you should see a page similar to this:

Step 3

In order to create the endpoints for our bike rental shop, we navigate to the built-in admin panel. Click on the /admin link on the welcome page and you should be redirected to registration page.

Since there are no users in the database initially, the user you register first on the this page will have an admin role. Later on when we add more users without specifying the role, they will have a Public role by default. New roles can be added in the Roles and Permissions menu of the sidebar.

Step 4

Click on the Content Type Builder plugin and you will see that there are 3 content types already created by default. Those content types belong to the Roles & Permissions plugin. Since we do not need to use roles or permissions for our backend, we will just ignore the roles and permissions types for now. Lucky for us, the user content type is already there.

Click on the Add new content type button and enter the details for the model. First we create the bike model.

Step 5

Once we create the content type, next we have to add new fields. Click on Add new field button and add new fields for our bike model.

Name Type Value
model String
rate Number
status Enumeration Available,Taken,Broken

Step 6

Repeat steps 4 and 5 for Order model with the following fields

Name Type
rental_start Date
rental_end Number
cost Integer
user Relation with User
bikes Relation with Bike

An important thing to note here is that creating relations between models is ridiculously easy with Strapi.js. When selecting the type of the field for a model, just select the Relation type and you will be given options on how 2 entities should be related to each other.

In our case, an order can belong to a single user and a many bikes belong to many orders. So their relationship will be as follows:

Step 7

That’s it! We are pretty much done creating the APIs for users, bikes and orders. In order to see if they are working properly, let’s add some records and make calls to the newly created endpoints.

On the top of the sidebar, we have a list of our models. Click on each of them and add new records with dummy values.

Step 8

Now we can test our APIs using Postman. If you do not have this awesome tool installed on your machine, please do yourself a favor and download it from here.

Before we can make calls to the endpoints, we need to acquire a token from server. In order to do that, we will send a POST message to localhost:1337/auth/login with the following payload in the body

{
	"identifier":"sardor",
	"password":"<your_password>"
}

After that we can use the token in the header of each API call

Response body for /orders

[
    {
        "rental_time": "2020-04-13T13:00:00.000Z",
        "rental_due": "2020-04-12T16:00:00.000Z",
        "cost": 30,
        "bikes": [
            {
                "model": "M001",
                "rate": 10,
                "status": "Available",
                "_id": "5cbb1f03f3dc0d992df68176",
                "createdAt": "2019-04-20T13:30:43.846Z",
                "updatedAt": "2019-04-20T13:30:43.965Z",
                "__v": 0,
                "id": "5cbb1f03f3dc0d992df68176",
                "orders": null
            }
        ],
        "_id": "5cbb1f9cf3dc0d992df68177",
        "createdAt": "2019-04-20T13:33:16.558Z",
        "updatedAt": "2019-04-20T13:33:16.687Z",
        "__v": 0,
        "user": {
            "confirmed": true,
            "blocked": false,
            "name": "",
            "_id": "5cbb1eb7f3dc0d992df68173",
            "username": "jbourne",
            "email": "jbourne@jb.com",
            "provider": "local",
            "__v": 0,
            "role": "5cbb19ea6369dd710e43a720",
            "id": "5cbb1eb7f3dc0d992df68173"
        },
        "id": "5cbb1f9cf3dc0d992df68177"
    }
]

We are getting 200 status code, which means our APIs are working! If you pay attention to the body of the response, relation among the fields are implemented correctly as well.

Link to GitHub | Strapi

Cheers!

Practical guide to build Serverless applications with Netlify and React.js

Serverless technology is taking over the back-end development world. Some businesses are already dumping microservices infrastructure and switching to serverless. However, the learning curve for serverless is pretty steep and it comes with great complexity. Netlify is trying to solve that problem by providing create & drop functions. In this article, we learn about the main concepts of serverless technology and create a sample application using Netlify functions and React.js.


Pre-requisites:

  • Basic knowledge of JavaScript and React
  • React version 16.8+

Since the introduction of AWS Lambda functions in 2014, the word Serverless has been gaining great popularity among businesses and developers. It was told to be the next generation of DevOps after the explosion of containerization. Some people call it the real evolution and say that it will be the future of DevOps. However, the majority has been reluctant to adopt it. They claim that it is not secure enough or requires too much setting up. Which one is more accurate, is everything going to be “serverless” soon or is it just an unjustified hype that will fade away over time?

Either way, we cannot know what will happen in the future. What we can do is to learn about the technology as much as we can and decide if it is a good fit for our development needs or not. Below we will briefly discuss the concepts serverless methodologies and then build a sample application using Netlify functions and React.js.

What is Serverless again?

Serverless is an execution model where cloud providers such as AWS or Azure are responsible for provisioningmaintaining and managing servers for running code. In simpler terms:

  • Serverless or FaaS (Functions as a Service) is a way to run functions and create APIs without setting up your own servers

So there are servers involved in this model. The difference is – cloud providers handle everything related to servers for a fee, and businesses focus on writing functions.

How is this different from Monolithic way of building applications and Microservices?

As we can see from the picture, the monolithic way is usually the easiest way to setup and build, but it creates major issues when it comes to scaling. Microservices are widely used among many large companies nowadays. However, they require great effort to configure and maintain. Serverless can be a great option when implemented correctly.

Advantages and disadvantages of Serverless

Just like any stack, serverless has its own pros and cons. It is up to the businesses to consider all use cases and make an informed decision. Let us take a look at the pros of serverless model.

Advantages

  1. Auto scaling Since servers are managed by the FaaS providers, they (almost) guarantee auto scaling of your applications. No need to load balance or worry about the inbound traffic surge. System can automatically spin up new function instances during rush hours, if necessary.
  2. Pay for what you use Let us say that we have an application used by thousands of people during the day, and no one really uses it at night. With monolithic or microservices models, we pay for every hour our application runs on the servers – 24/7. With serverless model we pay per request. If there are no requests made at night, we don’t pay anything.
  3. Focus on business logic Does serverless mean zero DevOps? Absolutely not. However, it dramatically reduces the amount of work related to infrastructure. FaaS providers take care of most of the tasks which are usually on DevOps engineers’ plates. No need to buy/manage/maintain servers. Businesses can spend more time on core features, user experience and design.

Disadvantages

  1. Cold starts When a serverless function is called for the first time, it may take up to several seconds to execute the function. It can be frustrating if the function is a critical part of the system. However, there are ways to avoid this issue. One one of them is to run cron jobs. Which means setting up a script that gets triggered periodically and calls the function. So that the next time when real requests come in, the function will be “warm” and ready to execute.
  2. Locked in with vendors It would require tremendous amount of work to set up your own FaaS infrastructure. So we are limited to a number of FaaS providers for now. There are currently 3 vendors that are dominating the cloud: AWSAzure and Google Cloud Platform. Once you choose one of the vendors, your application’s fate will depend on the vendor. They can increase or lower the prices as much as they want and change the rules as often as they need. It is not very flexible.
  3. Complexity Admittedly, learning curve for serverless is steep. With auto scalability and fine granularity comes great complexity. There is more wiring to do at the beginning of the project. However, little patience and experimenting can bring huge savings and improve scalability and maintainability.

What are Netlify functions?

Netlify functions are serverless functions that can be deployed along with the rest of your site to create modern and scalable backend.

They are the real revolution in serverless world. Netlify functions are powered by AWS Lambda and require no setup or ops. Typically, when we want to setup an AWS Lambda function, we need to go through more than 20 steps. Such as creating an AWS account, managing service discovery, configuring API gateways and coordinating deployments and more. Netlify functions take care of the setting up part and allow us to just drop the folder with functions in our project and viola! We have a back-end!

Naturally, there is a certain limit set on the number of function calls we can make in a month for free (125k). But if going serverless is the best option for the business, it is totally worth paying extra money for more bandwidth.

All Netlify functions are version controlled and can be written in JavaScript or Go.

Semantic Weather App

In this section we will be building a simple weather app with Netlify functionsReactJS and Semantic-UI

Link to DEMO | GitHub

Tutorial

Step 1

Before we get started, make sure that you have the latest NodeJS, and create-react-app installed on your machine.

First we need to create a React application

$ create-react-app semantic_weather

Then navigate to the project folder and install the following npm modules

npm i --save semantic-ui-react semantic-ui-css node-fetch encoding npm-run-all

Also, the following development dependencies are necessary

npm i --save-dev netlify-lambda http-proxy-middleware dotenv 

Step 2

Create separate folders in /src for components and css.

To get the icons for the weather app, download this set of icons. Copy the /fonts folder from the package into the /src folder of your project.

After you download the icons package, you should also see the css file named weather-icons.min.css in the there. Copy that file into the /css folder we have just created. Also, while you are inside the /css folder, create a new css file named Weather.css and paste the following code in it:

@media only screen and (max-width: 600px) {
  #main-container {
    width: 100%;
    padding-top: 50px;
  }
}

@media only screen and (min-width: 600px) {
  #main-container {
    width: 50%;
    margin: auto;
    padding-top: 50px;
  }
}

.w-icon {
  font-size: 4.5em;
  color: #db3fe2;
}

.w-h1 {
  font-size: 5em;
}

.w-p {
  font-size: 2em;
  margin: 20px;
}

.w-error {
  color: darkred;
}

Step 3

To insure that our pages have access to Semantic-UI css files, we have to add the following line in src/index.js file of our React project:

import  'semantic-ui-css/semantic.min.css';

Also, open your package.json file and make sure it looks similar to this:

// package.json
{
  "name": "semantic_weather",
  "version": "0.1.0",
  "private": true,
  "dependencies": {
    "encoding": "^0.1.12",
    "node-fetch": "^2.3.0",
    "react": "^16.8.6",
    "react-dom": "^16.8.6",
    "react-scripts": "2.1.8",
    "semantic-ui-css": "^2.4.1",
    "semantic-ui-react": "^0.86.0"
  },
  "scripts": {
    "start": "run-p start:**",
    "start:app": "react-scripts start",
    "start:lambda": "netlify-lambda serve src/lambda",
    "build": "run-p build:**",
    "build:app": "react-scripts build",
    "build:lambda": "netlify-lambda build src/lambda",
    "test": "react-scripts test",
    "eject": "react-scripts eject"
  },
  "eslintConfig": {
    "extends": "react-app"
  },
  "browserslist": [
    ">0.2%",
    "not dead",
    "not ie <= 11",
    "not op_mini all"
  ],
  "devDependencies": {
    "dotenv": "^7.0.0",
    "http-proxy-middleware": "^0.19.1",
    "netlify-lambda": "^1.4.5",
    "npm-run-all": "^4.1.5"
  },
  "proxy": "http://localhost:9000"
}

Step 4

Now we add the main part of the application – Weather component.

Inside the src/components folder, create a new file and name it Weather.js. Add the following code in it:

// src/components/Weather.js

import React, { useState } from "react";
import {
  Header,
  Segment,
  Container,
  Input,
  Form,
  Loader
} from "semantic-ui-react";
import "../css/Weather.css";
import "../css/weather-icons.min.css";
import { useFetchWeather } from '../customHooks';

const Weather = () => {

  const [inputValue, setInputValue] = useState('');
  const [searchValue, setSearchValue] = useState('dallas');
  
  const { data, error, loading } = useFetchWeather(
    '/.netlify/functions/getWeather',
    searchValue
  );

  return (
    <Container id="main-container">
      <Segment raised>
        <Header className="ui basic segment centered">Semantic Weather</Header>
        <Segment>
            <Form onSubmit={() => setSearchValue(inputValue)}>
              <Input 
                  fluid
                  action="Search" 
                  autoFocus 
                  placeholder="e.g. Dallas" 
                  onChange={e => setInputValue(e.target.value)}
                  value={inputValue}
                  size="large"
              />
              {error && <p className="w-error">Please enter a valid city name. (e.g. New York)</p>}
            </Form>
        </Segment>
        <Segment textAlign="center">
            {(!loading && data) ? (
              <div>
                <h1 className="w-h1">{data.temp} °F </h1>
                <div>
                    <i className={`wi wi-owm-${data.weather[0].id} w-icon`}/>
                    <p className="w-p">{data.weather[0].main}</p>
                </div>
                <h1>{data.city}, {data.country}</h1>
              </div>
            ) : <Loader active inline='centered' />}
        </Segment>
      </Segment>
    </Container>
  );
};

export default Weather;

There is one thing missing in the Weather.js file that we have not created yet. useFetchWeather custom hook. This hook will allow us to make a call to the Netlify function we will be creating soon and get weather details for the city provided in the search bar. It is good practice to keep the custom hooks in a separate file. So we create a new file called customHooks.js in /src folder. If you would like to learn more about the React.js custom hooks, checkout this article

// src/customHooks.js

import { useState, useEffect } from "react";

export const useFetchWeather = (url, city) => {
  const [data, setData] = useState(null);
  const [loading, setLoading] = useState(true);
  const [error, setError] = useState(false);

  useEffect(() => {
    setLoading(true);
    fetch(url, {
      method: "POST",
      body: JSON.stringify({ city: city })
    })
      .then(r => r.json())
      .then(res => {
        if (res.cod === 404) {
          setError(true);
          setLoading(false);
        }
        return res;
      })
      .then(res => {
        const data = {
          temp: res.main.temp.toFixed(0),
          city: res.name,
          country: res.sys.country,
          weather: res.weather
        };
        setData(data);
        setLoading(false);
        setError(false);
      })
      .catch(err => {
        setError(true);
        setLoading(false);
      });
  }, [city]);
  return { data, error, loading };
};

After we add the custom hooks and Weather component, our project folder structure should look like this:

Step 5

We are pretty much done with the front end. In order for the useFetchWeather custom hook to work, we need to setup the back end. For back end we can take advantage of the Netlify functions. It may seem little confusing how all the pieces of Netlify functions work together. But after you set up your first function, it will be much easier to understand.

First thing is first, let us create the netlify.toml file in then main directory of the project, which will be used by Netlify to figure out where the functions are and how to run them.

// netlify.toml

[build]
	Command = "npm run build"
	Functions = "lambda"
	Publish = "build"

Now open App.js file of your project and add the following code to import the Weather.js file we have just created.

// App.js

import React from 'react';
import Weather from './components/Weather';

const App = () => <Weather/>;

export default App;

Step 6

Inside the /src folder create a new folder named lambda. Navigate to that folder and create the function file inside it – getWeather.js.

Add the following code in to the getWeather.js file

// src/lambda/getWeather.js

import fetch from "node-fetch";
require("dotenv").config();

const API_KEY = process.env.API_KEY; // Store your key in .env file

exports.handler = async (event, context) => {
  const city = JSON.parse(event.body).city;
  const url = `http://api.openweathermap.org/data/2.5/weather?q=${city}&units=imperial&appid=${API_KEY}`;

  console.log(API_KEY);
  return fetch(url, { headers: { "Accept": "application/json" } })
    .then(response => response.json())
    .then(data => ({
      statusCode: 200,
      body: JSON.stringify(data)
    }))
    .catch(error => ({ statusCode: 422, body: String(error) }));
};

As you can see at the top of the function, we have an environment variable which stores the API key for making calls to OpenWeatherMap. To get your own API key, refer here: Get OpenWeatherMap API Key.

Once you get the API key, create a file named .env in the main directory of your project and inside the dotenv file, provide the API key:

API_KEY=XXXXXXXXXXXXXXXXXXXXXXXXXXXX

Do not forget to add .env name in your .gitignore file. Otherwise your API key will be stored in your remote git repo along with other project files.

Step 7

Before we move on to deploying our app to Netlify, you can run it locally to make sure it is working. In your terminal/command line run npm start to start the app in development mode. You should be able to open localhost:3000 and see the weather app.

Step 8

Next step is it store the project in a remote repository. You can use whatever repository provider you like. I will be storing my project in GitHub.

Once you push the project to a remote repository, we can start the deployment to Netlify. If you do not have an account with Netlify, go ahead and create one!

Step 9

In Netlify:

  • Open the main dashboard and there you should see a big button called New site from Git. Click on that and it will ask you where you want to get project files from. In my case, I select GitHub.
  • Once you authenticate with GitHub (or GitLab/BitBucket), you will see a list of repositories that belong to you. From that list select the Semantic Weather repo and Click Deploy Site
  • Last step is to create an Environment Variable named API_KEY in Netlify. Go to Site settings and click on Environment under Build & Deploy side menu. Then add a new variable and set your OpenWeatherAPI Key as the value.

  • That’s it! It will take couple of minutes for Netlify to fetch your project files and setup the functions. Once it is done, you will see a message saying “Site is live”.
  • If the site is not working, try to trigger deployment manually. It may be having a hard time finding the environment variable.

Link to DEMO | GitHub

Thank you for taking your time to read the article!

Intro to Processing: Creating Colorful Brush Strokes

If you’ve ever wanted to learn to create art and games with programming, you might have heard of Processing. Processing is a kind of coding sketchbook, used by programmers and artists alike. By using basic programming concepts, you can create beautiful visuals, games, and animations. It also can be used with different languages — you can use their own Java-based language, Python, or Javascript. You can even use it to create Android apps or Raspberry Pi projects.

It’s easy to jump straight in, even with very little coding experience. Today I’ll show you how to create color-shifting brush strokes. This will teach you the basics of drawing to the canvas, manipulating shapes, and adding color.

Getting Started

To start, you first need to download Processing. For this tutorial, I’m using the basic editor which is based on the Java language. Once you have it installed, go ahead and open it up.

We’re starting with a blank editor, but we’ll fill it in soon enough! To start, we need to get our canvas setup. Processing gives you a function for this, which is conveniently named setup. This will run once when our program starts and is used to create everything we initially need for our visual, such as our canvas size and background color. Let’s create a basic black canvas.

void setup () {
size(800, 800);
background(0);
}

What we’re doing here is setting the size of the canvas to 800px wide and 800px tall and giving it a black background color. If you click the play button in the top left corner, you should end up with something like this:


So now you have a basic Processing sketch! Let’s make it a little more interesting now.

Creating Shapes

We’ll start by drawing a red circle to the canvas. We need to create a draw function — this will loop forever until we stop the sketch, and it runs automatically when you run the sketch so there’s no need to call it. Drawing a red circle to the canvas only takes a few lines of code:

void draw () {
fill(255, 0, 0);
ellipse(50, 50, 50, 50);
}

We’re setting the color of the circle using fill which takes RGB values. So we have red set to 255, while blue and green are set to 0. We then draw the circle itself using ellipse and giving it the x position, y position, height, and width. In this case, it’ll be 50px to the right, 50px down, 50px tall, and 50px wide. When we run the sketch now, we get this:

You can play with the values of fill and ellipse to the change the color, size, and position of the circle. To make our brush strokes, we’re going to have fun with all three of these!

Moving and Expanding the Circle

We’re going to let the user now interact with our sketch by letting them use the mouse to control the size and position of the mouse.

First, at the start of our file, we need to add an integer named circleSize and set its initial value to 0. Next, we need to update our draw function to do the following:

  • Detect when the mouse is pressed
  • Draw a circle at the x and y position of the mouse
  • While the mouse is pressed, increase circleSize
  • When the mouse is released, reset circleSize to 0

Luckily, Processing gives us a lot of tools to do this. Here’s the code to do this:

int circleSize = 0;

void setup () {
size(800, 800);
background(0);
}

void draw () {
if (mousePressed) {
fill(255, 0, 0);
ellipse(mouseX, mouseY, circleSize, circleSize);
circleSize++;
} else {
circleSize = 0;

}
}

In draw, we check if the mouse is pressed, then draw the circle at the x and y coordinate of the mouse. We continually increase the size of the circle while the mouse is pressed — remember, draw keeps looping so circleSize++ will keep increasing that variable. Finally, if the mouse is not pressed, we reset circleSize to 0.

Now run the program and hold down the mouse, and drag on the canvas. You should be able to do something like this:

Color Shifting

Next, let’s try adding a little more color. There’s a lot of ways to do this (and I encourage you to play around with it!), but let’s make it so each time we click the mouse it’ll add either more red, green, or blue.

Start by adding three new integer values to the top of our file — one for red, green, and blue. Set them all to 0. We’ll also create an integer value called colorMode and set it to 1. We’ll use this to determine which of our three colors we want to add on a mouse click.

Now, we’ll edit our draw function to check our colorMode and determine which color value to increase.

void draw () {
if (mousePressed) {
fill(red, green, blue);
ellipse(mouseX, mouseY, circleSize, circleSize);
circleSize++;

if (colorMode == 1) {
red++;
}

if (colorMode == 2) {
green++;
}

if (colorMode == 3) {
blue++;
}
} else {
circleSize = 0;
}
}

As you can see, we’ll increase either the red, green, or blue values depending on how this is set. But we also need to reset it when the user releases the mouse. Luckily, processing makes this simple. We need to add a function called mouseReleased and add our logic there.

void mouseReleased() {
colorMode++;
if (colorMode > 3) {

colorMode = 1;
}
}

Now, whenever the mouse is released it’ll switch to the next color. If we go above 3, it’ll reset it back to one. So our order will be red, green, blue, repeat.

Try running the program and playing around with it. You should be able to see the circle expanding and changing color with each new click.

There is one problem though — what happens when all of the values reach 255? Well, with our logic now, they’ll just keep increasing. Which means, eventually we’ll just get a while circle and no more color. There’s a number of options to fix this issue. You could just reset the color back to 0 once it hits 255, but it’s a bit jarring of a change. I wanted something a little smoother, so I opted to make the color values decrease once they hit 255, and increase again when they hit zero. So we’ll oscillate between extremes.

To set this up, we need to set up three new integers again at the top of the value. I named mine redValue, greenValue, and blueValue and set them all to 1. We know that if our color value is equal to 255, we want to decrease it gradually back to 0. Once it hits 0, we want to increase it back up to 255. Let’s add this logic for our red color.

if (colorMode == 1) {
if (red == 255) {
redValue = -1;
} else if (red == 0) {
redValue = 1;
}
red += redValue;
}

Now, run the program and hold down the mouse button. The red should increase to its highest value, then start to decrease. It’ll look like it’s getting brighter and then darker.

Let’s add this to our blue and green now. We’ll end up with a draw function that looks like this:

void draw () {
if (mousePressed) {
fill(red, green, blue);
ellipse(mouseX, mouseY, circleSize, circleSize);
circleSize++;

if (colorMode == 1) {
if (red == 255) {
redValue = -1;
} else if (red == 0) {
redValue = 1;
}
red += redValue;
}

if (colorMode == 2) {
if (green == 255) {
greenValue = -1;
} else if (green == 0) {
greenValue = 1;
}
green += greenValue;
}

if (colorMode == 3) {
if (blue == 255) {
blueValue = -1;
} else if (blue == 0) {
blueValue = 1;
}
blue += blueValue;
}
} else {
circleSize = 0;
}
}

Now, let’s play around with it. Run the program and click and drag a few different times. Watch how the colors shift as we hold the mouse down:

And that’s it! You have a basic brush to play around with and an overview of how Processing works.

Additional Changes

I ended up wanting to make more changes to mine. I decided to play around with the opacity of the colors and the stroke. I did that by adding an extra value to my fill method and adding a stroke method on the line above it.

stroke(0, 0, 0, 50);
fill(red, green, blue, 50);

The stroke is just the outline around the shape — so you can set it to whatever color and opacity you want. I made mine black, with an alpha value of 50. You can set the alpha to anywhere between 0 and 255, where 0 is 0% opaque and 255 is 100% opaque. I also added this alpha value to my fill color, so my circles are more transparent. By doing that, I get an effect like this:

And that’s it! Take some time to play around with different values and shapes, and dig into the Processing documentation to get some inspiration and ideas. If you prefer using Javascript or Python, checkout P5JS and Processing.py to get started with those. Processing is a very powerful tool and you can make things as simple or complicated as you want, so be sure to have some fun with it!

Here’s the full code:

int circleSize = 0;
int red = 0;
int green = 0;
int blue = 0;
int redValue = 1;
int greenValue = 1;
int blueValue = 1;
int colorMode = 1;

void setup () {
size(800, 800);
background(0);
}

void draw () {
if (mousePressed) {
stroke(0, 0, 0, 50);
fill(red, green, blue, 50);
ellipse(mouseX, mouseY, circleSize, circleSize);
circleSize++;

if (colorMode == 1) {
if (red == 255) {
redValue = -1;
} else if (red == 0) {
redValue = 1;
}
red += redValue;
}

if (colorMode == 2) {
if (green == 255) {
greenValue = -1;
} else if (green == 0) {
greenValue = 1;
}
green += greenValue;
}

if (colorMode == 3) {
if (blue == 255) {
blueValue = -1;
} else if (blue == 0) {
blueValue = 1;
}
blue += blueValue;
}
} else {
circleSize = 0;
}
}

void mouseReleased() {
colorMode++;

if (colorMode > 3) {
colorMode = 1;
}
}

Exploring React Native

In the previous article, titled “Getting Started with React Native”, we briefly went over what React Native is. We went through the installation process for the Expo CLI and the React Native CLI. The last thing we did was create an Expo and React Native project and made changes to the code, then run the projects.

But at the end of the article you may have wondered, “Now what?”. In this article I will show you some of the built in components that come with React Native. We will use these components to create a fairly simply one screen app that will keep track of a number that can be increased and decreased by a button. The app will teach you how to add an image, text, buttons, keep track of data and style all these components.

Let’s begin!

Built In Components

Begin by opening your project in the code editor of your choice, remember I use Visual Studio Code. If you recall, in the last article there were two ways to create a project. We created an Expo project, called “FirstExpoProject,” and a React Native project, called “FirstRNProject”. I will be using the “FirstRNProject” project but the code in this article will work for both.

In the Explorer, select App.js, open it and delete all the code inside of the file. Throughout this article I will be showing you the code I write, some times it will only be a snippet of the file and I will use “…” to indicate there is more code above and/or below that snippet. At the end of the article I will post the entire code for the App.js file.

The first two line of code will be the following:

import React, { Component } from ‘react’;
import { StyleSheet, Text, View } from ‘react-native’;

The second line is important to us because this is where we will be importing all of the built in components. The StyleSheet allows us to create a specific set of styles for our components, Text component allows us to create text and the View component is one of the fundamental components for the user interface. To learn more about this components and the others provided by React Native check out this link, http://facebook.github.io/react-native/docs/components-and-apis.

Next, create a variable named styles. This is where we will create a StyleSheet and style our components.

const styles = StyleSheet.create({

)};

Time to create the class and export it. Here is how the code will look:

class App extends Component {

}
export default App;

Inside the class, we need to add the render function and return our View component. Save the file.

class App extends Component {
   render() {
     return (
     <View />
     )
   }
}

At this point we can run the app. As I mentioned before I am using the project we created with the React Native CLI, therefore I will open a Terminal on my Mac and head to the directory where the project is located and enter the following command:

react-native run-ios

If you are using Windows or simply want to test on Android, type the following into the Terminal or Command Prompt:

react-native run-android

If you decided to work with the Expo project, type the following into the Terminal or Command Prompt and use one of the methods from the previous article to run the app on your phone or simulator/emulator:

expo start

Again, I am using a Mac and for the time being will be using the iOS simulator. Later on I will use the Android emulator to point out some styling differences.

What you will see when the app is up and running is a white, blank screen. Here is the app running on the iOS simulator:

A blank, white screen looks dull, let’s change that by adding some color to the background:

const styles = StyleSheet.create({
  container: {
    flex: 1,
    backgroundColor: '#bff0d4'
  }
});

class App extends Component {
   render() {
     return (
     <View style={styles.container} />
   )
   }
}

First we add a style prop to the View component. In styles we create a style “container” and gave it a flex of 1 and a background color. “flex: 1”, simply tells the View component to take up all the space available. To learn more about flex, go here http://facebook.github.io/react-native/docs/height-and-width. The color give to the “backgroundColor” can be written in a few ways for React Native, here is a link to learn more, http://facebook.github.io/react-native/docs/colors. If you’ve ever done web development and used CSS, the way to style these components will look familiar. Save the file and if you don’t see the change, reload the simulator/emulator. You can reload by pressing the “Command” and “R” keys for the iOS simulator. For Android emulator, tap “R” twice.

Ok now that we have some color, why not add an image to our app. First thing you need is an image. I found one online of a raccoon, download it and put in a new folder I created inside the project called “img”. But you can also use different type of images, such as using an URL for an image found online. Some of types of images need to have a specific height and width passed to it. Learn more here, http://facebook.github.io/react-native/docs/image. Let’s import the Image component.

import { Image, StyleSheet, Text, View } from 'react-native';

const styles = StyleSheet.create({
  container: {
    flex: 1,
    backgroundColor: '#bff0d4',
    alignItems: 'center',
  }
});

class App extends Component {
  render() {
    return (
    <View style={styles.container}>
    <Image resizeMode='center' source={require('./img/raccoon.png')} />
    </View>
    )
  }
}

Inside the “container” style, I added “alignItems: ‘center’” which centers all the components inside of View horizontally. Next, inside the View component I added the Image component and gave the source the location to the image of the raccoon I am using. I also added “resizeMode=’center’” because the image was large and not displaying properly, this will center the image in the view. Here is what I end up with:

You see that the image is still too large, so we are going to change that.

const styles = StyleSheet.create({
  container: {
    flex: 1,
    backgroundColor: '#bff0d4',
    alignItems: 'center',
  },
  image: {
    height: 200,
    width: 200
  }
});

class App extends Component {
  render() {
    return (
      <View style={styles.container}>
      <Image style={styles.image} resizeMode='contain' source={require('./img/raccoon.png')} />
      </View>
    )
  }
}

Create a new style named “image” and give it a height and width. Pass the style to the Image component and change the “resizeMode” to “contain”. This will ensure the image is resized properly to fit the height and width given.

You will notice the image is too close to the top of the screen and a piece of the ears are cut off. To fix this, add “marginTop” and give it a value of 100. You can play around with the number to get the desired spacing between the top of the screen and the image.

image: {
  height: 200,
  width: 200,
  marginTop: 100
}

Here is what we have:

Inside the View component and right below the Image component, lets add a Text component with the following text, “How many raccoons did you see last night?”.

return (
  <View style={styles.container}>
  <Image style={styles.image} resizeMode='contain' source={require('./img/raccoon.png')} />
  <Text>How many raccoons did you see last night?</Text>
  </View>
)

The text will appear right below the image but it needs some styling. Create a new style named “question” and give it a font size of 20, make it bold, center and change the color. Don’t forget to pass the prop in the Text component.

<Text style={styles.question}>How many raccoons did you see last night?</Text>
question: {
   fontSize: 20,
   fontWeight: 'bold',
   textAlign: 'center',
   color: '#535B60'
}

Looking much better. Next add a new Text component underneath the question which will track the number of raccoons you see. The styling will be similar to that of the question but the font size will be much bigger.

<Text style={styles.number} >0</Text>
number: {
   fontSize: 60,
   fontWeight: 'bold',
   textAlign: 'center',
   color: '#535B60'
}

Here is what we now have:

When we see a raccoon, we will need to be able to press a button which will increase the number or decrease the number. React Native comes with a built in component called Button and we will use it to create a button for increasing the value. Later on, we will use another component that allows for more customization.

import { Button, Image, StyleSheet, Text, View } from 'react-native';
<View style={styles.container}>
  <Image style={styles.image} resizeMode='contain' source={require('./img/raccoon.png')} />
  <Text style={styles.question} >How many raccoons did you see last night?</Text>
  <Text style={styles.number}>0</Text>
  <Button title='PLUS' color='#535B60' />
</View>

Let’s add the Button component right after the Text component display the number. We pass it a title, “PLUS”, and a color. At the moment our button does not do anything. One thing about the Button component is that they look different on iOS than they do on Android. I am going to run the Android emulator and show you the difference.

Here is the button on Android:

And here is the button on iOS:

Notice how on Android the button has “PLUS” in a white font and is surrounded by the color we provided. But on iOS only the text “PLUS” appears and it is in the color we provided. This is something you will notice when working with React Native and you will need to style your components accordingly.

Before telling the button what to do every time it is pressed, lets create a state that will store our number data. Currently, the number of raccoons seen is set to zero but we want it to change with the pressing of the button.

Create a state with “raccoons” set to zero inside of the class App and before the render function. Then use the data to replace the hard coded zero in the Text component.

class App extends Component {
  state = {
    raccoons: 0
  };

render() {
  return (
    <View style={styles.container}>
    <Image style={styles.image} resizeMode='contain' source={require('./img/raccoon.png')} />
    <Text style={styles.question} >How many raccoons did you see last night?</Text>
    <Text style={styles.number}>{this.state.raccoons}</Text>

Notice how I replaced the “0” in the second Text component with “{this.state.raccoons}”, this calls “raccoons” in the state. Change the “0” in the state to another number, save, and see that it changes.

We’re now ready to make our button do something. Create a function called “addMore” and set “raccoons” to increase by 1. Then in the Button component, add the prop “onPress” and pass it the “addMore” function.

addMore = () => {
  this.setState({
    raccoons: this.state.raccoons + 1
  })
}
<Button onPress={this.addMore} title='PLUS' color='#535B60' />

Save the file and see that when you press the button, the counter will increase by one. Here is how it will look:

We can increase the counter but what if we made a mistake and want to decrease the counter? Well, we can create another button that will do just that. This time we will use TouchableOpacity component to create a custom button. Begin by importing TouchableOpacity and adding the component right after the Button component we have in the class. We will wrap the TouchableOpacity around a Text component.

import { Button, Image, StyleSheet, Text, TouchableOpacity, View } from 'react-native';
<Button onPress={this.addMore} title='PLUS' color='#535B60' />

<TouchableOpacity>
<Text>MINUS</Text>
</TouchableOpacity>

Save the file and see that the button needs some styling. We will add styling to the text to change the font size but also to the TouchableOpacity component to make it stand out.

button: {
  backgroundColor: '#BAAAC4',
  width: 200,
  borderRadius: 10
},
buttonText: {
  fontSize: 40,
  fontWeight: 'bold',
  textAlign: 'center',
  color: '#535B60'
}
<TouchableOpacity style={styles.button}>
<Text style={styles.buttonText}>MINUS</Text>
</TouchableOpacity>

We will give the TouchableOpacity component a background color, width of 200 and border radius of 10 to round the corners. To the Text, same as before, font size of 40, bold, align it to the center and give a color. Here is how it will look:

The “Minus” button currently does nothing. We will create a function and pass it to the TouchableOpacity component, just like we did to the Button component.

removeOne = () => {
  this.setState({
    raccoons: this.state.raccoons - 1
  })
}
<TouchableOpacity onPress={this.removeOne} style={styles.button}>
<Text style={styles.buttonText}>MINUS</Text>
</TouchableOpacity>

Test the app! You can add to the counter and remove from it as well. The “MINUS” button is working but it should stop when it reaches zero, we can’t see a negative number of raccoons. This can be easily fixed by adding an if statement to check the current value of “raccoons”.

removeOne = () => {
  if(this.state.raccoons !== 0){
    this.setState({
      raccoons: this.state.raccoons - 1
    })
  }
}

Before calling this app complete, let’s make the “PLUS” button look like the “MINUS” button and do some other styling changes.

import React, { Component } from 'react';
import { Image, StyleSheet, Text, TouchableOpacity, View } from 'react-native';

const styles = StyleSheet.create({
  container: {
    flex: 1,
    backgroundColor: '#bff0d4',
    alignItems: 'center',
  },
  image: {
    height: 200,
    width: 200,
    marginTop: 100,
    marginBottom: 20
  },
  question: {
    fontSize: 30,
    fontWeight: 'bold',
    textAlign: 'center',
    color: '#535B60',
    padding: 20
  },
  number: {
    fontSize: 60,
    fontWeight: 'bold',
    textAlign: 'center',
    color: '#535B60',
    padding: 20
  },
  plusButton: {
    backgroundColor: '#9FC4AD',
    width: 200,
    borderRadius: 10,
    margin: 10
  },
  minusButton: {
    backgroundColor: '#BAAAC4',
    width: 200,
    borderRadius: 10,
    margin: 10
  },
  buttonText: {
    fontSize: 40,
    fontWeight: 'bold',
    textAlign: 'center',
    color: '#535B60'
  }
});

class App extends Component {
  state = {
    raccoons: 0
  };

  addMore = () => {
    this.setState({
      raccoons: this.state.raccoons + 1
    })
  }
  removeOne = () => {
    if(this.state.raccoons !== 0){
      this.setState({
        raccoons: this.state.raccoons - 1
      })
    }
}

  render() {
    return (
      <View style={styles.container}>
      <Image style={styles.image} resizeMode='contain' source={require('./img/raccoon.png')} />
      <Text style={styles.question} >How many raccoons did you see last night?</Text>

      <Text style={styles.number}>{this.state.raccoons}</Text>

      <TouchableOpacity onPress={this.addMore} style={styles.plusButton} >
      <Text style={styles.buttonText}>PLUS</Text>
      </TouchableOpacity>

      <TouchableOpacity onPress={this.removeOne} style={styles.minusButton}>
      <Text style={styles.buttonText}>MINUS</Text>
      </TouchableOpacity>
      </View>
    )
  }
}

export default App;

First, replace the Button component with a TouchableOpacity component wrapped around a Text component. Pass the “buttonText” style to the Text and the “addMore” function to the TouchableOpacity. Next I wanted to differentiate the two buttons, so I created another style named “plusButton” and renamed “button” to “minusButton”, then passed them accordingly. I then changed the font size of the question and added padding and margin to some components to separate them. Here is what I was left with:

I’m not much of a designer but I am happy with the way the project came out but if there’s something you don’t like, play around with the styling. Adjust the font sizes, font color, background colors or spacing between components. There’s a lot you can do to make your app unique. You can change the image of the raccoon to something else, maybe a bird, or change the color scheme. There are a lot of options online to find royalty free images and color schemes.

In the next article, we will continue to work with this project. We will use more built in components and style them. For now, make sure you understand what was done in this article and if there’s something that doesn’t make sense visit the React Native documentation, http://facebook.github.io/react-native/.

Getting Started With React Native

React Native

In this article you will learn how to set up your computer to begin developing apps using React Native.

Before we begin, what is React Native? As stated on the official React Native website, http://facebook.github.io/react-native/, “React Native lets you build mobile apps using only JavaScript. It uses the same design as React, letting you compose a rich mobile UI from declarative components.” The site goes on to say, “With React Native, you don’t build a ‘mobile web app’, an ‘HTML5 app’, or a ‘hybrid app’. You build a real mobile app that’s indistinguishable from an app built using Objective-C or Java. React Native uses the same fundamental UI building blocks as regular iOS and Android apps. You just put those building blocks together using JavaScript and React.”

You can learn more by reading the documentation at http://facebook.github.io/react-native/.

One important thing to keep in mind, is that, although React Native allows you to develop iOS and Android apps, you will need to have a Mac computer to build an iOS application.

Setting Up Your Computer

Depending on your experience, skills and what you plan on doing, you may either want to develop with Expo or with the React Native CLI. What’s the difference?

Expo is the easiest and quickest way to get started and build simple apps. There is no need to use Xcode or Android studio, simply use the Expo CLI to develop your app and run it on your phone using the Expo client app.

React Native CLI, on the other hand, allows more flexibility and control. With it you can do things, such as, using third party packages that require you to run the command “react-native link”. It also allows you to go in and make changes to native iOS and Android code. But the installation process will vary depending on the operating system your computer is running. Window users be aware that you will not be able to build iOS projects because iOS development requires a Mac. On the other hand, Mac using will be able to develop for both iOS and Android.

I will be walking you though, both the Expo and React Native CLI installation. Let’s begin with Expo. If you prefer Reactive Native CLI, please skip ahead to the Reactive Native CLI installation section.

Expo Installation

To use Expo, you need to install Node. The fastest and easiest way to install Node is through the website. Head to http://nodejs.org and choose a version. LTS is more stable, more likely to work, and the recommended option. Current is the latest version of Node but may not work with React Native. Choose one, download it and follow the instructions to install. Node will also install npm. Using the Node website will work for both Mac and Window users.

Once installed you can check the version of Node by opening the Terminal or Command Prompt and type the following and then press the “Enter” key:

node -v

Node will also install npm, to check the version type:

npm -v

If you are unsure how to open Terminal or Command Prompt, here is how to do so:

To open the Terminal on a Mac, open the Applications folder, then the Utilities folder and click on Terminal. Or press “Command” and ‘space” keys to open Spotlight and search for “Terminal”, which will be under “Application” section.

To open the Command Prompt on Windows, search for cmd in the Start menu. Or press the “Windows” and “R” key to open the Run window and search for “cmd”.

Version used in this article:

Node version = v10.15.3 and npm version = 6.9.0

Next install the Expo CLI command line utility. Do so by typing the following into your Terminal or Command Prompt:

npm install -g expo-cli

The next step is not mentioned in the React Native documentation, but the Expo documentation states that you will need Git on your computer to create projects. The link to Expo’s installation documentation is located here.


You can download Git here, http://git-scm.com/downloads. Download the correct version for your computer.

Start the Git setup. The Mac and Windows installation process differ. The Windows setup offers much more options than the Mac setup. I am not a Windows user, so I left all the settings as default and installed. You may need to restart your computer afterwards.


(Git installation on Windows)

The final step is to install the Expo client app on your phone.

Download the Expo client app for iOS from the App Store, http://itunes.apple.com/app/apple-store/id982107779. Or search for “Expo Client” in the App Store.

Download the Expo client app for Android from the Google Play Store, http://play.google.com/store/apps/details?id=host.exp.exponent&hl=en_US. Or search for “Expo Client” in the Google Play Store.

Having an Expo account will open up a few more options, such as publishing projects to your Expo portfolio. You can create an Expo account through the app or through their website, http://expo.io/. This step is optional.

React Native CLI Installation

React Native CLI has a series of steps that will vary for Mac and Window users. I will start by guiding you through the steps for those using Mac, then for those using Windows.

Mac Installation

Start by installing Homebrew, head to http://brew.sh, copy the script and paste it into the Terminal.

Once installed, run the following command in the Terminal:

brew install node
brew install watchman

Installing Node will also install npm.

Next step is to install the React Native CLI by typing:

npm install -g react-native-cli

iOS Set Up

Let’s first start by downloading Xcode, which is necessary for iOS builds.

You will find Xcode at http://itunes.apple.com/us/app/xcode/id497799835?mt=12, click “View in Mac app store” to download and install. Or open the Mac App Store and search for “Xcode”.

Next, install Xcode Command Line Tools. Open Xcode and choose “Preferences…” from  the Xcode menu on the upper left corner of the screen. The General window will open, go to Locations and toward the bottom, install the Command Line Tools by selecting the latest version from the dropdown.

At this point you are ready to create your first React Native project but if you want to develop for Android too, please follow the following steps.

Android Set up

Let’s focus on downloading what’s needed for Android builds.

First thing to do is install the Java SE Development Kit (JDK). You can find it at http://www.oracle.com/technetwork/java/javase/downloads/jdk8-downloads-2133151.html.

Next, install Android Studio, you can find it at http://developer.android.com/studio/index.html.

Once installed open Android Studio, the Android Studio Setup Wizard will open. Click “Next” and when asked to choose between “Standard” and “Custom” installation, pick “Custom”.

Click “Next” and choose the theme you would like, then click “Next”. At this point it will ask you to check the components you would like to download. According to the React Native documentation, check Android SDK, Android SDK Platform, Performance (Intel HAXM) and Android Virtual Device.


(I had Android Studios already install and that is why I got a warning at the bottom.)

Click “Next” and leave the Emulator settings on the recommended setting and click “Next”, then “Finish”.

There are a couple more steps left.

Open Android Studio and in the lower right side of the window, click Android Studio click on “Configure” and “SDK Manager”.

Select the “SDK Platforms” tab, make sure you have “Show Package Details” checked on the bottom right side of the window. Select Android 9.0 (Pie) and make sure Android SDK Platform 28, Intel x86 Atom_64 System Image and Google APIs Intel x86 Atom System Image are checked.

Then click on the “SDK Tools” tab, making sure “Show Package Details” is checked on the lower right side of the window. Look under “Android SDK Build-Tools 29-rc2”, make sure 28.0.3 is selected.

Now click “Apply”, accept the user agreements and install.

Last step is to add a few lines to your “.bash_profile”. Open up Terminal and type:

nano .bash_profile

Then add the following lines:

export ANDROID_HOME=$HOME/Library/Android/sdk
export PATH=$PATH:$ANDROID_HOME/emulator
export PATH=$PATH:$ANDROID_HOME/tools
export PATH=$PATH:$ANDROID_HOME/tools/bin
export PATH=$PATH:$ANDROID_HOME/platform-tools


To save the changes simply press “Control” and “X”. You will be asked to save changes, hit “Y” and then “Enter” to exit.

You’re all set for iOS and Android development on your Mac.

Windows Installation

Begin by installing Chocolatey, which can be found at  http://chocolatey.org/install. Copy the command under “Install with cmd.exe” and paste it into the Command Prompt.


To open the Command Prompt, search for “cmd” in your Start menu, right click on it and select “Run as administrator”. A pop up will open asking for permission, select “Yes”. Copy the command provided into the Command Prompt and install.

Ensure that it is installed by typing:

choco

This will return the version and a command for the help menu.

Then type:

choco install -y nodejs.install python2 jdk8

After that, it is time to install the React Native CLI by typing the following into the Command Prompt:

npm install -g react-native-cli

I noticed that when I tried to do this, I got an error saying “npm” was not a recognized command. Restart your computer, open cmd as an administrator and try again.

Next, install Android Studio. You can find it at http://developer.android.com/studio/index.html. Open Android Studio, the Android Studio Setup Wizard will open. Click “Next” and when asked to choose between “Standard” and “Custom” installation, pick “Custom”.

(This window, and a few of the following, are screenshots taken on a Mac.)

Click “Next” and choose the theme you would like, then click “Next”. At this point it will ask you to check the components you would like to download. According to the React Native documentation, check Android SDK, Android SDK Platform, Performance (Intel HAXM) and Android Virtual Device. Click “Next” and leave the Emulator settings on the recommended setting and click “Next”, then “Finish”.

(Ignore the warning. This image is a screenshot from my Mac and I had previously installed Android Studios.)

Open Android Studio and in the lower right side of the window, click on “Configure” and “SDK Manager”.

Select the “SDK Platforms” tab, make sure you have “Show Package Details” checked on the bottom right side of the window. Select Android 9.0 (Pie) and make sure Android SDK Platform 28, Intel x86 Atom_64 System Image and Google APIs Intel x86 Atom System Image are checked.

Then click on the “SDK Tools” tab, making sure “Show Package Details” is checked on the lower right side of the window. Look under “Android SDK Build-Tools 29-rc2”, make sure 28.0.3 is selected.


Next search for “Environment variables” in the Start menu, and select “Edit the system environment variables”. When the window opens, click on the “Advanced” tab and towards the bottom select the “Environment Variables”. Under “User variables for YOUR_USERNAME”, click “New” and add the following:

Variable name = “ANDROID_HOME”
Variable value = “c:\Users\YOUR_USERNAME\AppData\Local\Android\Sdk”

You can find the location of the SDK by looking in the “SDK Manager” settings of Android Studio.


Next select “Path” in the “User variables for YOUR_USERNAME” and select “Edit”. A new window will open, click “New” and add the following:

c:\Users\YOUR_USERNAME\AppData\Local\Android\Sdk\platform-tools

Close the “Edit environment variable”, “Environment Variables” and “System Properties” windows by clicking “Ok”.

You are all set! Let’s begin by creating an Expo project, if you decide to use only React Native, please skip ahead.

Creating Expo Project

From here on out I will be working on a Mac, the steps will be the same on Windows but I will not be using the Command Prompt. I will be using commands, such as “clear”, that will work in the Terminal but may not work in the Command Prompt.

Open up a new Terminal and head to the directory you wish to save the project in.

I like to save my projects onto my Desktop, so I will type:

cd Desktop

Once in the directory of your choice, type:

expo init FirstProject

“expo init” initializes a directory called “FirstExpoProject”. If you prefer to name the project something else, replace “FirstExpoProject” with the name of your choice.

There will be an option given to “Choose a template”, select “Blank” and press “Enter”.

Next, you are prompted to enter “The name of your app visible on your home screen”. I will type “FirstExpoProject” and press “Enter”.

Congrats! You created your first React Native app. To enter the folder type:

cd PROJECT_NAME

And the follow to start it:

expo start

Or

npm start

A new tab will open in your web browser, called the Expo Dev Tool. Depending on your computer this may take some time.

You will have a few options to view the app.

One way to view the app is to use the QR code. In the Terminal and Expo Dev Tool you will see a QR code. You can scan the code with the Expo app on Android or the iPhone’s camera.

Make sure your computer and phone are on the same network when the “Connection” in Expo Dev Tools is set to “LAN”. If you select “Tunnel”, then both devices can be on different networks.

Another way to view the app is to type “e” in the Terminal, allowing you to send an email or text message with a link to the app. You will have the same option in the browser.

And the final option I will discuss, is to open the app in the Android emulator or iOS simulator, which requires you to first install Android Studio and Xcode. If you want to do this, please look at the section titled “React Native CLI”.

Once you have it running it will look like this:

It’s now time to see what we created! You will need a text editor for this part and my personal preference is Visual Studio Code, which can be downloaded here http://code.visualstudio.com/. There are other options, such as Atom and Sublime, for example. Since I will be using Visual Studio Code, some of the following steps may differ if you are using a different editor.

Open Visual Studio Code, and open the “FirstExpoTutorial” project. On the left side of the editor you will see the “Explorer” section. If you do not see it, click on “View” at the top of the screen and then on “Explorer”.

In the “Explorer”, open up App.js file, this is where we will modify the code.


The first line of code imports the default export React from the module react.

The second line is importing components from React Native. React Native has a bunch of built in components and apis which you can see here, http://facebook.github.io/react-native/docs/components-and-apis.

Next comes the class App, which has the function render(), that returns JSX code, similar to HTML, and is exported.

The JSX consist of a View, a container that supports layout, and Text, a React component for displaying text. Replace the text between the <Text></Text> tags, with:

<Text>Hello World! Welcome to my new expo app!</Text>

Save the file and the app will reload with the new text.

The last block of code you will notice is the constant named styles. This is the styling that is passed to the View component and is similar to CSS styling.

Creating React Native Project

The steps to create a project using the React Native CLI are similar to Expo. Use the command “cd” to move directories. I will use the following command to move to the Desktop directory, but you can choose any directory:

cd Desktop

Once you are in the directory you wish to create the project in, type :

react-native init FirstRNProject

“react-native init” initializes a directory called “FirstRNProject”. You can choose to name your project something else.

During the initialization it may suggest that you use Yarn to speed it up. This is optional but if you want Yarn you can download it at http://yarnpkg.com/en/docs/install#mac-stable. There is a Homebrew option I will use on Mac, type the following in the terminal:

brew install yarn

In Windows either use the Installer or Chocolatey. To use Chocolatey, type the following into the Command Prompt as an administrator:

choco install yarn

Congrats! You created your first React Native app. Now it’s time to run the app. After creating the project, you may have noticed that there are instructions on how to run it. First thing to do is to enter the project folder by typing the following into the Terminal:

cd FirstRNProject

If you are on a Mac, you can run you iOS project two ways. One is to type the following into the Terminal:

react-native run-ios

This command will start building your app and will open it on the iOS simulator. Second way to run the project is to open the “YOUR_PROJECT_NAME.xcodeproj” file inside the “ios” folder of the React Native project. Xcode will open up, select the simulator and click on the run button at the top left side of the window.

This is how the app will look on the simulator:

If you are using Windows or Mac and want to run the app on Android, start by opening up Android Studios to start up the emulator before running the command in the Terminal.

Select “Open an existing Android Studio project” from the “Welcome to Android Studio” window.

Navigate to the directory where the project is located and the select the “android” folder inside and click “Open”. There may be a popup asking you to update the Android Gradle plugin. Don’t upgrade because it may cause the project not to work, I clicked “Don’t remind me again for this project”.

Before running the command in the Terminal, there is one last thing to do and that is to check the AVD Manager. Go to Tools in the top of the screen and click on “AVD Manager”. The Android Virtual Device Manager window will open. I have a device already set up using Android 9.0.

If you don’t see a device or want to create a new one, click on “Create Virtual Device”. Select the device you want and click “Next”. On the following screen select “Pie”, download if needed” and click “Next”.

Give the device a custom name or leave it as default and click “Finish”. Choose a device to run and click on the green play button under “Actions”.

Once the emulator is running, go back to the Terminal and inside the project you created run the following command:

react-native run-android

Here is how the project will look in the emulator:

It’s now time to see what we created! You will need a text editor for this part and my personal preference is Visual Studio Code, which can be downloaded here http://code.visualstudio.com/. There are other options, such as Atom and Sublime, for example. Since I will be using Visual Studio Code, some of the following steps may differ if you are using a different editor.

Open Visual Studio Code, and open the FirstTutorial project. On the left side of the editor you will see the Explorer section. If you do not see it, click on “View” at the top of the screen and then on “Explorer”.

Since the project was created with the React Native CLI, you will notice that this project has more folders than an Expo project. Two folders that stand out are the Android and iOS folders, which will give you access to native code.

In the Explorer, open up App.js file, this is where we will modify the code.

The first line of code, “import React from ‘react’”, imports the default export React from the module react.

The second line is importing components from React Native. React Native has a bunch of built in components and apis which you can see here, http://facebook.github.io/react-native/docs/components-and-apis.

The React Native project will then have a constant named “instructions”. What it does is determine which kind of phone that app is running on and will display text accordingly.

Next comes the class App, which has the function render(), that returns JSX code, similar to HTML, and is exported.

The JSX consist of a View, a container that supports layout, and a few Text, a React component for displaying text. Delete the bottom two, then replace the text between the <Text></Text> tags, with:

<Text>Hello World! Welcome to my new React Native app!</Text>

Save the file and if the text on the simulator/emulator does not change, simply reload the app. To do so on the iOS simulator press “Command” and “D” and click reload. In the Android emulator press “Command” and “M” if running it on Mac or “Control” and “M” on Windows.

The last block of code you will notice is the constant named styles. This is the styling that is passed to the View component and is similar to CSS styling.

Now What?

Congratulations! You have installed everything necessary to create a React Native project, started the project and modified the code. Take a look at the React Native documentation or Expo documentation and play around with the project. Add more text, change the background color, add an image or a button. This is just the beginning, in no time you will be creating amazing apps and publishing them for the world to see.

What are React Hooks and why you should care about them – Part 2

Outline

  1. Context Hook
  2. Custom Hooks
  3. Important Rules with Hooks
  4. Sample application

In the first part of the blog, we discussed the main concepts of React Hooks and the reasons for using them. We compared the traditional ways of creating components and the new ways with hooks. In the second part, we will continue exploring the the different types of hooks, learn about the important rules and create a sample application. We have a lot to cover. Let’s get started!

Context Hook

What is a context?

First of all, what is a context in React?

Context is a way to share global data across components without passing props. Usually, data in React application is passed from parent to child through props. Sometimes we have some data that should be delivered to a component deep inside the component tree. It is tedious to manually pass the same data over and over again through all components. Instead, we can create a central store that can be inserted into any component, just like in Redux.

How about we see an example code without Context API and identify the need for using it.

Let’s say there is a banana  plantation called “App” and it sets the prices for all bananas in the world. Before bananas reach the end customers, they need to go through wholesalers and supermarkets first. After that we can go to the stores and buy them. But since wholesalers and supermarkets need to add their profit margins in the process, the cost of the bananas go up.

Without Context API

// App.js
import React, { useState } from 'react';

const App = () => {
  const [bananaPrice, setBananaPrice] = useState(2); // Original price: $2
  return <Wholesaler price={bananaPrice}/>;
}

const Wholesaler = (props) => {
  const price = props.price + 2;
  return <Supermarket price={price}/>;
}

const Supermarket = (props) => {
  const price = props.price + 3;
  return <Customer price={price}/>;
}

const Customer = (props) => {
  return (
	<div>
		<p>Plantation price: $2</p>
		<p>Final price: ${props.price} :)</p>
	</div>
  );
}

What if we want to buy the bananas straight from the plantation and avoid the middlemen?

Now, the same code with Context API

With Context API

// App.js
import React, { useState } from 'react';

// First we need to create a Context
const BananaContext = React.createContext();

// Second we need to create a Provider Component
const BananaProvider = (props) => {
  const [bananaPrice, setBananaPrice] = useState(2); // Original price: $2
  return (
    <BananaContext.Provider value={bananaPrice}>
      {props.children}
    </BananaContext.Provider>
  );
}

const App = () => {
  return ( // Wrap the component in Provider, just like in Redux
    <BananaProvider>
      <Wholesaler/>
    </BananaProvider>
  );
}

const Wholesaler = () => {
  return <Supermarket/>;
}

const Supermarket = () => {
  return <Customer/>;
}

const Customer = () => {
  return (
    <BananaContext.Consumer>
      {(context) => (
        <div>
          <p>Plantation price: $2</p>
          <p>Final price: ${context} ?</p>
        </div>
      )}
    </BananaContext.Consumer>
  );
}

useContext()

So how can we use Context API with hooks? With useContext!

import React, { useState, useContext } from 'react';

// First we need to create a Context
const BananaContext = React.createContext();

// Then we need to a Provider Component
const BananaProvider = (props) => {
  const [bananaPrice, setBananaPrice] = useState(2); // Original price: $2
  return (
    <BananaContext.Provider value={bananaPrice}>
      {props.children}
    </BananaContext.Provider>
  );
}

const App = () => {
  return ( // Wrap the component in Provider, just like in Redux
    <BananaProvider>
      <Wholesaler/>
    </BananaProvider>
  );
}

const Wholesaler = () => {
  return <Supermarket/>;
}

const Supermarket = () => {
  return <Customer/>;
}

const Customer = () => {
  const context = useContext(BananaContext);
  return (
    <div>
      <p>Plantation price: $2</p>
      <p>Final price: ${context} :)</p>
    </div>
  );
}

I know you could remove the line where you add the price to the cost of the banana and still get $2 at the end. But that is not the point. The point is that you have to do the props drilling when you don’t use Context. Incrementing the price while passing the the components is sort of the cost to do the props drilling.

Custom Hooks

Why?

Why would we want to create our own hooks? Because of 1 reason – it makes component logic more reusable.

  • Custom hook = Reusable logic

How?

How do we create a custom hook? Since hooks are just JavaScript functions, we can create a custom hook by just making a function.

  • The only difference is that the function name must start with the word – use. For example, useFunctionNameuseHungerStatus etc.
  • Custom hooks can call other hooks

Example without custom hook

Say we want to create an application with multiple Stopwatch timers on a single page. How would we do that?

This is what I mean by multiple timers:

Here is the code that implements hooks but does not reuse the logic for the timers

import React, { useEffect, useState } from 'react';

const App = () => {
  const [timerOneStatus, setTimerOneStatus] = useState(false);
  const [timerOneElapsed, setTimerOneElapsed] = useState(0);

  const [timerTwoStatus, setTimerTwoStatus] = useState(false);
  const [timerTwoElapsed, setTimerTwoElapsed] = useState(0);

  useEffect(() => {
    let intervalOne;
    if (timerOneStatus) {
      intervalOne = setInterval(
        () => setTimerOneElapsed(prevTimerOneElapsed => prevTimerOneElapsed + 0.1),
        100
      );
    }
    return () => clearInterval(intervalOne);
  }, [timerOneStatus]);

  useEffect(() => {
    let intervalTwo;
    if (timerTwoStatus) {
      intervalTwo = setInterval(
        () => setTimerTwoElapsed(prevtimerTwoElapsed => prevtimerTwoElapsed + 0.1),
        100
      );
    }
    return () => clearInterval(intervalTwo);
   }, [timerTwoStatus]);

  const handleReset1 = () => {
    setTimerOneStatus(false);
    setTimerOneElapsed(0);
  };

  const handleReset2 = () => {
    setTimerTwoStatus(false);
    setTimerTwoElapsed(0);
  };

  return (
    <div>
      <div>
        <h2>Stopwatch 1</h2>
        <h1>{timerOneElapsed.toFixed(1)} s</h1>
        <button onClick={() => setTimerOneStatus(!timerOneStatus)}>
          {timerOneStatus ? "Stop" : "Start"}</button>
        <button onClick={handleReset1}>Reset</button>
      </div>
      <div>
        <h2>Stopwatch 2</h2>
        <h1>{timerTwoElapsed.toFixed(1)} s</h1>
        <button onClick={() => setTimerTwoStatus(!timerTwoStatus)}>
          {timerTwoStatus ? "Stop" : "Start"}</button>
        <button onClick={handleReset2}>Reset</button>
      </div>
    </div>
  );
}

As we can see, we are not DRY coding here. Logic for the timers need to repeated every time we want to create a new timer. Imagine if we had 10 timers on one page.

Example with custom hook

Now what we could do is to separate the timer logic as a custom hook and use that one hook for creating any number of timers. Each timer would have its own state and action items. In the main component we use the custom hook just like useState or useEffect and destructure returned parameters from the hook.

import React, { useEffect, useState } from 'react';

const App = () => {
  const [timerOneStatus, setTimerOneStatus, timerOneElapsed, resetTimerOne] = useTimer();
  const [timerTwoStatus, setTimerTwoStatus, timerTwoElapsed, resetTimerTwo] = useTimer();

  return (
    <div>
      <div>
        <h2>Stopwatch 1</h2>
        <h1>{timerOneElapsed.toFixed(1)} s</h1>
        <button onClick={() => setTimerOneStatus(!timerOneStatus)}>
          {timerOneStatus ? "Stop" : "Start"}</button>
        <button onClick={() => resetTimerOne()}>Reset</button>
      </div>
      <div>
        <h2>Stopwatch 2</h2>
        <h1>{timerTwoElapsed.toFixed(1)} s</h1>
        <button onClick={() => setTimerTwoStatus(!timerTwoStatus)}>
          {timerTwoStatus ? "Stop" : "Start"}</button>
        <button onClick={() => resetTimerTwo()}>Reset</button>
      </div>
    </div>
  );
}

const useTimer = () => {
  const [status, setStatus] = useState(false);
  const [elapsedTime, setElapsedTime] = useState(0);

  useEffect(() => {
      let interval;
      if (status) {
        interval = setInterval(() =>
          setElapsedTime(prevElapsedTime => prevElapsedTime + 0.1),
          100
        );
      }
      return () => clearInterval(interval);
    },[status]);

  const handleReset = () => {
    setStatus(false);
    setElapsedTime(0);
  };

  return [status, setStatus, elapsedTime, handleReset];
}

In this case, we can place the hook in another file with other custom hooks and call it from anywhere in our project. Much cleaner and more reusable!

Rules with Hooks

Even though hooks are just functions, react team recommends to follow certain rules when using them. If you are lazy or just want to make sure you are following the rules automagically, you can install this linter. However, it is important that we have some common knowledge about the rules.

Rule 1 – Call hooks only at the top level

What does that mean?

It means we should not call hooks inside conditions, loops or nested functions. Rather use them at the top level of React functions.

Rule 2 – Hooks cannot be called from regular JavaScript functions. Call them from React functions

You can call hooks from the following functions:

  • Custom hooks
  • React function components

Rule 3 – Always start your custom hooks’ name with the word ‘use’

Sample application

Now let us build an application that takes advantage of the most hooks we have covered so far.

We will be building an application called Caturday and it will fetch pictures of random cats on the internet and allow us to vote on the pictures. It will keep count of our likes and dislikes. We will also add a button that can turn our page into dark mode (just change the background color of the page for simplicity).

Here is what the final result will look like: Link to Demo | Github

Step 1

We start building our app by running

$ create-react-app caturday

(If you don’t have create-react-app module installed, please run npx create-react-app caturday)

After navigating into the project folder, run

$ npm install semantic-ui-react --save

to install the Semantic UI design tool that will make dealing with CSS much easier.

Step 2

Create 3 files in the /src folder:

  • Caturday.js,
  • Caturday.css
  • customHooks.js

Step 3

Open the Caturday.css file and copy paste the following:

@media only screen and (max-width: 600px) {
  #image-container {
    width: 100%;
    padding-top: 50px;
  }
}
@media only screen and (min-width: 600px) {
  #image-container {
    width: 50%;
    margin: auto;
    padding-top: 50px;
  }
}
.dark-mode {
  background-color: #3b3939;
}
.main-img {
  margin: auto;
  height: 30em !important;
}
.main-placeholder {
  height: 30em !important;
}

Step 5

We create 2 custom hooks to use in our application. Open customHooks.js file and add these hooks

import { useState, useEffect } from "react";

export const useFetchImage = (url, likeCount, mehCount) => {
  const [data, setData] = useState(null);
  const [loading, setLoading] = useState(true);

  useEffect(() => {
    setLoading(true);
    fetch(url)
      .then(j => j.json())
      .then(data => {
        console.log(JSON.stringify(data))
        setData(data);
        setLoading(false);
      })
      .catch(err => {
        console.log(err);
      });
  }, [likeCount, mehCount]);
  return { data, loading };
};

export const useDarkMode = () => {
  const [enabled, setEnabled] = useState(false);
  useEffect(
    () => {
      enabled
        ? document.body.classList.add("dark-mode")
        : document.body.classList.remove("dark-mode");
    },
    [enabled] // Only re-runs when 'enabled' changes
  );
  return [enabled, setEnabled]; // Return state and setter
};

Step 5

We start constructing the primary file Caturday.js by importing the css file and creating a container for the app. We will also define the state of component and a customs hooks that update the image url when Like/Dislike buttons are clicked.

import React, { useState, useEffect } from "react";
import { Header, Segment, Image, Placeholder, Button, Container, Label, Icon, Checkbox } from "semantic-ui-react";
import './Caturday.css';

const Caturday = () => {
  const [likeCount, setLikeCount] = useState(0);
  const [mehCount, setMehCount] = useState(0);
  const [darkMode, setDarkMode] = useDarkMode();
  const {data, loading} = useFetchImage(
    "http://api.thecatapi.com/v1/images/search",
    likeCount,
    mehCount
  );
  
  return (
	<Container id="main-container">
      <Segment raised>
        // Header
        // Dark Mode toggle
        // Image container
        // Like and Dislike buttons
      </Segment>
    </Container>
  );
};

export default Caturday;

Step 6

Now when we define each element of our Caturday component and put all pieces together, our Caturday.js file should look like this.

import React, { useState, useEffect } from "react";
import { Header, Segment, Image, Placeholder, Button, Container, Label, Icon, Checkbox } from "semantic-ui-react";
import './Caturday.css';
import {useDarkMode, useFetchImage} from './customHooks';

const Caturday = () => {
  const [likeCount, setLikeCount] = useState(0);
  const [mehCount, setMehCount] = useState(0);

  const [darkMode, setDarkMode] = useDarkMode();
  const { data, loading } = useFetchImage(
    "http://api.thecatapi.com/v1/images/search",
    likeCount,
    mehCount
  );

  return (
    <Container id="image-container">
      <Segment raised>
      <Header className="ui basic segment centered">Caturday</Header>
        <Segment>
          <Checkbox onChange={() => setDarkMode(!darkMode)} toggle floated='right' label="Dark mode"/>
        </Segment>
        {
          loading ?
          <Placeholder fluid><Placeholder.Image className="main-placeholder"/></Placeholder> :
          <Image src={data[0] ? data[0].url : ''} className="main-img"/>
        }
        <Segment textAlign="center">
          <Button as="div" labelPosition="right">
            <Button onClick={() => setLikeCount(likeCount+1)} icon color="green">
              <Icon name="heart" />
              Like
            </Button>
            <Label as="a" basic pointing="left">
              {likeCount}
            </Label>
          </Button>
          <Button as="div" labelPosition="left">
            <Label as="a" basic pointing="right">
              {mehCount}
            </Label>
            <Button onClick={() => setMehCount(mehCount+1)} color="red" icon>
              <Icon name="thumbs down" />
              Meh
            </Button>
          </Button>
        </Segment>
      </Segment>
    </Container>
  );
};

export default Caturday;

Step 7

Open the App.js file and replace the return content with Caturday component

import React from 'react';
import Caturday from './Caturday';

const App = () => {
	return (
      <Caturday/>
    );
}

export default App;

Conclusion

We have covered most of the concepts about hooks and that should be enough for you to get started. If you have a project that you are working on right now that implements states and components in a traditional way, it is absolutely fine. No need to convert everything into hooks. However, when you are about to create new components, just give the hooks a try. They are 100% compatible with regular components with classes. You will be surprised how many lines of code you will be avoiding to accomplish the same functionalities. If you need more information about hooks, please checkout the official documentation by Facebook.

Thanks for spending your time to read the article!

What are React Hooks and why you should care about them – Part 1

Outline

  1. Intro
  2. What is wrong with React Components now?
  3. Hooks overview
  4. useState
  5. useEffect
  6. TLDR

Intro

There is a new kid on the block . React introduced a new feature called Hooks which will improve the code quality even more and make creating user interfaces easier. From now on, if you are going to create a new project, you should definitely take advantage of the new addition and keep your projects lean and clean. It was actually released a while ago, but production ready stable version has come out recently. So now is the time to really start using them. In this article, we will cover the main concepts and look at some examples. At the end of the article, you will have a fair amount of idea about React Hooks and you can start implementing them in your applications.

Before we dive in to the details of hooks, let us take a step back to understand the motivation behind it.


What is wrong with React components now?

3 things:

  1. Classes
  2. Hierarchical abyss (Not reusing stateful logic)
  3. Big components

1. Classes

Currently, there are mainly two ways to create components in React. First way is by using stateless functions:

function Greet(props){
	return <h1>Hello there, {props.name}!</h1>;
}

Second, using ES6 Classes:

class Greet extends React.Component {
	render(){
		return <h1>Hello there, {props.name}!</h1>;
	}
}

Right, so why are you saying there is something wrong with those two methods, you ask?

Well, first of all, there are no classes in JavaScript. A class is a syntactical sugar over JavaScript’s prototype-based inheritance. In other words, it is just a function with special features, which creates extra work for browser to process. But that is not the problem here. The problem is, classes are harder to understand and do not play well with minifying. They cause issues with hot reloading. Also, people often struggle when deciding to use classes or functions to make the components. Which results in inconsistency.

So, why not to use just functions then? Functions are stateless. Meaning, we cannot manage state in them. We can pass props back and forth, but that makes it hard to keep track of the changes.

2. Hierarchical Abyss

Just take a look at the picture below.

Extreme level of nested component tree makes it difficult to follow the data flow through the app.

3. Big components

Whether we like it or not, at some point of the development, our application gets large and requires more complex components. When that happens, our components end up implementing multiple React lifecycles that might contain unrelated data. A single task can be split across different lifecycles. That creates an opportunity for bugs in the application.


Hooks to the rescue!

Hooks solve all of the issues mentioned above. It does that by allowing us to add state management to functional components and use other React features.

Say what?

See, it is usually preferred to use just functions to create components. But as we mentioned above, we cannot manage the state or use lifecycles in our functions. But with the hooks we can!

(If you are thinking, why not use Redux for state management, hold on to that thought. That’s a discussion for another time.)

State Hook

Let’s look at an example code that changes a text when we click a button.

import React, { useState } from 'react';

function FruitMaster(){
	const [fruit, setFruit] = useState('Banana');
	return (
		<div>
			<p>Selected:{fruit}</p>
			<button onClick={
				() => setFruit(fruit=='Banana'?'Apple':'Banana')
			}>Change</button>
		</div>
	);
}

This is what supposed to happen:

We have a selected text variable, which is set to Banana by default. When we click on the Change button it changes the text from Banana to Apple or vice versa.

Now, let us break down the new elements in the component.

What are those things in the state variable?

In this case, setFruit() is equivalent of this.setState(). There is one important difference though. When we use this.setState(), it merges the changes to the state object. State hook on the other hand, will completely replace the state with the given value.

We used a state hook called useState in this example. There are other hooks too. We will see them soon.

So a hook, is actually a function that uses React features and returns a pair of values: one to hold the state value and one function to manage the value. We can name those values whatever we want. We can set a default value by passing it to the useState function.

Note that we are using a destructuring assignment to retrieve the pair of values. If you are not familiar with this method, take a look at here. Having said that, we could actually get the two values this way too:

const stateVariable = useState('Cherry'); //Returns an array with 2 values
const fruit = stateVariable[0];
const setFruit = stateVariable[1]; //function

Converting

Now, let’s convert our functional component to a class based component:

import React from 'react';

export default class FruitMaster extends React.Component {
  constructor(props){
    super(props);
    this.state = {
      fruit: 'Banana'
    };
    this.setFruit = this.setFruit.bind(this);
  }

  setFruit(value){
    this.setState({fruit: value});
  }

  render(){
    return (
      <div>
        <p>Selected: {this.state.fruit}</p>
        <button onClick={
          () => this.setFruit(this.state.fruit == 'Banana' ? 'Apple' : 'Banana')
          }>Change</button>
      </div>
    );
  }
}

Comparison

We can see from the picture that using hooks reduces code volume almost by half!

Now, let us address the elephant in the room. What do we do when we have more than one variable in state?*

Simple! Create more state variables.

const [fruit, setFruit] = useState('Banana');
const [food, setFood] = useState('Taco');

Multiple state variables

import React, { useState } from 'react';

function FruitMaster(){
	const [fruit, setFruit] = useState('Banana');
	const [food, setFood] = useState('Taco');
	return (
		<div>
			<p>Fruit: {fruit}</p>
			<p>Lunch: {food}</p>
			<button onClick={
				() => setFruit(fruit=='Banana'?'Apple':'Banana')
			}>Change Fruit</button>
			<button onClick={
				() => setFood(food=='Taco'?'Burger':'Taco')
			}>Change Lunch</button>
		</div>
	);
}

What if I want to store all variables in one object? you might ask. Well, go ahead. But one thing to remember is that, state hook function replaces the stateand not merges to it. this.setState() merges the given values to the state object, hook function does not. But there is a way to fix it. Let us see how:

import React, { useState } from 'react';

function MealMaster(){
	  const [myState, replaceState] = useState({
	    fruit: 'Apple',
	    food: 'Taco'
	  });
	  return (
	    <div>
	      <p>Fruit: {myState.fruit}</p>
	      <p>Lunch: {myState.food}</p>
	      <button onClick={
	        () => replaceState(myState => ({
	          ...myState,
	          fruit: myState.fruit=='Banana'?'Apple':'Banana'
	        }))
	      }>Change Fruit</button>
	      <button onClick={
	        () => replaceState(myState => ({
	          ...myState,
	          food: myState.food=='Taco'?'Burger':'Taco'
	        }))
	      }>Change Lunch</button>
	    </div>
	 );
}

We have to use spread operator to change the only part of the state we need and keep the rest of it as it is.

Effect Hook

What about the lifeCycle methods of React? We could use those with classes. But now they are gone…

Not really.

There is another hook called useEffect and we can use it instead of the lifecycles. In other words, we can handle side effects in our applications with hooks. (What is a side effect?)

Here is an example of a component that uses familiar lifecycles:

Old method

import React from 'react';

class TitleMaster extends React.Component {
	constructor(props){
		super(props);
		this.state = {
			title: 'Tuna'
		};
	}
	componentDidMount(){
		document.title = this.state.title; // Changes tab title
	}
	componentDidUpdate(){
		document.title = this.state.title;
	}
	updateTitle(value){
		this.setState({title: value});
	}
	
	render(){
		return (
			<div>
		        <button onClick={
		          () => this.updateTitle(this.state.title =='Tuna'?'Donut':'Tuna')
		        }>Update Title</button>
		    </div>
		);
	}
}

Our component in action.

The component is bulky even for a small functionality. Code in componentDidMount and componentDidUpdate is repeated.

With hooks

Now let’s create the same component with hooks!

import React, { useState, useEffect } from 'react';

function TitleMaster(){
  const [title, updateTitle] = useState('Tuna');
  useEffect(() => {
    document.title = title;
  });
  return (
      <div>
          <button onClick={
            () => updateTitle(title =='Tuna'?'Donut':'Tuna')
          }>Update Title</button>
      </div>
    );
}

export default TitleMaster;

Much cleaner. Less code. Easier to understand.

As we mentioned before, a hook is a function. useEffect is also a function that accepts another function and an array. Don’t worry about the array part for now.

So inside the function we pass to useEffect, we can perform our side effect logic. In the example above, we are updating the tab title in the browser. Another common practice is to use data fetching in the useEffect hooks.

We can also use multiple useEffect hooks in one component.

Note that we are placing the hooks inside of our component functions. That way they will have access to the state variables.

Infinite loop

By default useEffect re-renders every time the component changes. Sometime incorrectly implementing the hook might cause infinite loop issue. Remember, we said that the useEffect takes 2 arguments? So the second argument is an object or array of values. Which tells React, “Hey React, re-run the useEffect only when these state values change

const [user, setUser] = userState();
useEffect(() => {
	document.title = user.id;
}, [user.id]); // Re-render the hook Only when user.id changes

Cleanup logic

useEffect hook can also handle cleanup logic. What does that mean? Well, sometimes we subscribe to some APIs and once we are done, we need to unsubscribe from it to prevent any leaks. Or when we create an eventListener, we need a way to remove it.

useEffect can do it by returning a function.

import React, { useState, useEffect } from 'react';

function TitleMaster(){
  const [title, updateTitle] = useState('Tuna');
  useEffect(() => {
    document.title = title;
    return () => {
		// Perform clean up logic here
	}
  });
  return (
      <div>
          <button onClick={
            () => updateTitle(title =='Tuna'?'Donut':'Tuna')
          }>Update Title</button>
      </div>
    );
}

TLDR:

React hooks are special functions that can be used in stateless components. They allow us to hook into react features and add state management to the components. There are 3 main hooks: useState, useEffect and useContextuseState can replaces the current way of declaring state object in the constructor and manipulating values in it by using this.setState()useEffect can be used instead of react lifecycles. These hooks are not meant to replace the current way of creating components. They are backwards compatible. No need to rewrite your existing components using hooks. They can make your projects much cleaner by letting you write less code though.

Part 2: What are React Hooks and why you should care about them

In Part 2 we will cover the following:

  • Context Hook
  • How to make custom hooks!
  • Important Rules with Hooks
  • Real life application example

How To Build a Serverless React.js Application with AWS Lambda, API Gateway, & DynamoDB – Part 4

Part 4 : Code Review, Deploy, & Configure an effective CI/CD Pipeline on AWS

This is a continuation of our multi-part series on building a simple web application on AWS using AWS Lambda and the ServerlessFramework. You can review the first, second, and third parts of this series starting with the setup of your localenvironment at:

You can also clone a sample of the application we will be using in this tutorial here: Serverless-Starter-Service

Please refer to this repo as you follow along with this tutorial.

Code Review Agility

We have definitely covered a lot of ground by now, and it may be best to take a minute and work through a Code Review of sorts, that we can use to absorb all of this information that we have reviewed and implemented together before merging our code and deploying our services into production. It is definitely a good idea to take this time to think about the workflow we will put in place to manage our day to day development and implementation activities as a team of engineers. In my case it’s just Wilson and I, remember?

Collaborating with other team members can be tricky, that is, it can be tricky if you don’t have a plan in place to work in an organized manner!!! We recommend that the documentation for any project repository include a set of ContributionGuidelines.md that dictate how each member of your team shall interact with the organization’s source code. There are numerous examples out in the ether that you can look to as a set of guiding principles, and yet, you know I have a suggestion for you anyway. As someone who has published OpenSource work for NASA as a contractor, I suggest you model any ContributionGuidelines that you make for you and your team after the NASA OpenMCT project guildelines to start off. It is pretty straght forward and really gets to the point in terms of what a good OpenSource contribution policy should look like.

Pull Request Check Lists Examples & Best Practices

In an Agile development environment, we just want a process that we can use to iterate over a predefined Code Reviewworkflow that will help us implement and merge new updates to our source code efficiently, transparently, and with close to zero downtime in the Wild. When a team member writes and implements a set of features, there should be someone, again, in my case Wilson, who will review the code you have implemented on a topic-branch in git after you create a Pull Request for your project lead to review your code.

The Code Review process is an important part of your team workflow because it allows you to share the knowledge you gained from the implementation of the logic and functionality that defines the feature you will deploy, it gives you a layer of quality assurance that lets your peers contribute and provide insight into the feature you will deploy, and it allows new team members to learn from the rest of the team by taking ownership of a feature and implementing the logic the new feature needs to deploy.

The Agile framework requires that every Code Review complete a Pull Request in phases. The first phase would require your Tech Lead to look at your implementation and any changes you made, and compare it to the code that you are refactoring. The second phase of the review requires the Reviewer to add feedback and comments to your implementation that critique your work. The Reviewer should get you to question all scenarios and edge-cases that you have to consider before approving your Pull Request.

You should complete and attached these checklists to any pull requests you create or file as an author or reviewer of a new feature in your project’s repository. When you decide to merge a pull request please complete a checklist similar to the version of the checklists provided below:

Author Checklist

  • Do the changes implement the correct feature?
  • Did you implement and update your Unit Tests?
  • Does a build from the Cmd Line Pass?
  • Has the author tested changes?

Reviewer Checklist

  • Do the changes implement the correct functionality?
  • Are there a sufficient amount of Unit Tests included?
  • Does the file’s code-style and inline comments meet standards?
  • Are the commit messages appropriate?

Collaborating with your team throughout the Code Review process is the most important part of the Pull Request workflow. When you create a Pull Request you initialize a collaborative review process that iterates between the updating and reviewing of your code. The process finishes with the Reviewer executing a merge of your code onto the next brange in the stage of deployment that your team defined.

The Pull Request & Agile Code Review

What have you done!?!?

If you have gotten this far I am impressed. You might still have a chance at completing your first production ready application soon enough. We still need to customize the logic in our starter template so that it matches the list of Lambda functions that I promised you earlier that we would eventually get around to implementing. We are not there yet, but we are really close. Let’s take a second to put it all down into a sort of OnePager that we can use to refer back to these commands throughout future projects.

Serverless MicroService Implementation Best Practices
  1. Setup local Serverless Environment:
    • Instal nvm and Node.js v8.10.0
    • Setup Editor & Instal ESLint
    • Configure SublimeText3
  2. Configure your Serverless Backend on AWS:
    • Decrease Application Latency with Warm Starts
    • Understand the AWS Lambda Runtime Environment
    • Register with AWS and configure your AWS-CLI
    • Setup the ServerlessFramework for local development
  3. Infrastructure As Code, Mock Services, & Unit Testing:
    • Configuring your Infrastructure As Code
    • Configure an API Endpoint
    • Mocking Services before Deployment
    • Unit Testing & Code Coverage
    • Run Tests before Deployment

Deploy the ServerlessStarterService Template

We have finally gotten to the coolest part of this tutorial. The buildup is enormous, I know. Do not let your head explode on me yet, I Promise there is a point to all of this. We have already run npm installrun lint, and test on our Serverless-Starter-Service that we have cloned on our local machine; We also mocked the Serverless-Starter-Service locally with sls local invoke and our local environment responded with all of the appropriate Response: 200 OK messages as expected. Now it is time to deploy our serverless + microservice to see what we can do. Are you ready?!?!

Navigate into the Serverless-Starter-Service project directory on your local machine and execute the following command in your terminal:

  • $ serverless deploy

Here is the result of the deployment; the output also includes the Service Information you need to consume the resources from the API you have just implemented on AWS!

Serverless-Starter-Service Output

MyDocs (master) ServerlessStarterService
$ serverless deploy
Serverless: WarmUp: setting 1 lambdas to be warm
Serverless: WarmUp: serverless-starter-service-node-dev-displayService
Serverless: Bundling with Webpack...
Time: 1008ms
Built at: 2019-03-29 19:19:19
               Asset      Size  Chunks             Chunk Names
    _warmup/index.js  8.94 KiB       0  [emitted]  _warmup/index
_warmup/index.js.map  7.42 KiB       0  [emitted]  _warmup/index
          handler.js  6.84 KiB       1  [emitted]  handler
      handler.js.map  5.82 KiB       1  [emitted]  handler
Entrypoint handler = handler.js handler.js.map
Entrypoint _warmup/index = _warmup/index.js _warmup/index.js.map
[0] external "babel-runtime/regenerator" 42 bytes {0} {1} [built]
[1] external "babel-runtime/helpers/asyncToGenerator" 42 bytes {0} {1} [built]
[2] external "babel-runtime/core-js/promise" 42 bytes {0} {1} [built]
[3] external "source-map-support/register" 42 bytes {0} {1} [built]
[4] ./handler.js 2.58 KiB {1} [built]
[5] external "babel-runtime/core-js/json/stringify" 42 bytes {1} [built]
[6] external "babel-runtime/helpers/objectWithoutProperties" 42 bytes {1} [built]
[7] ./_warmup/index.js 4.75 KiB {0} [built]
[8] external "aws-sdk" 42 bytes {0} [built]
Serverless: Package lock found - Using locked versions
Serverless: Packing external modules: babel-runtime@^6.26.0, source-map-support@^0.4.18
Serverless: Packaging service...
Serverless: Creating Stack...
Serverless: Checking Stack create progress...
.....
Serverless: Stack create finished...
Serverless: Uploading CloudFormation file to S3...
Serverless: Uploading artifacts...
Serverless: Uploading service serverless-starter-service-node.zip file to S3 (1.4 MB)...
Serverless: Validating template...
Serverless: Updating Stack...
Serverless: Checking Stack update progress...
................................................
Serverless: Stack update finished...
Service Information
service: serverless-starter-service-node
stage: dev
region: us-east-1
stack: serverless-starter-service-node-dev
resources: 16
api keys:
  None
endpoints:
  GET - http://g0xd40o7wd.execute-api.us-east-1.amazonaws.com/dev/starterService
functions:
  displayService: serverless-starter-service-node-dev-displayService
  warmUpPlugin: serverless-starter-service-node-dev-warmUpPlugin
layers:
  None
MyDocs (master) ServerlessStarterService
$

Serverless Starter Service Template API Endpoint

This is the endpoint to our Lambda. You should have something similar that will produce a similar result if you have followed along:

  • Template Endpoint: http://g0xd40o7wd.execute-api.us-east-1.amazonaws.com/dev/starterService

Deployment Output to terminal

Triggering the new resource we deployed on API Gateway from the address bar in our browser to our new Template Endpoint at http://g0xd40o7wd.execute-api.us-east-1.amazonaws.com/dev/starterService will produce the following output to our device screen:

{
	"message":"You are now Serverless on AWS! Your serverless lambda has executed as it should! (with a delay)",
	"input": {
		"resource":"/starterService",
		"path":"/starterService",
		"httpMethod":"GET",
		"headers": {
			"Accept":"text/html,application/xhtml+xml,application/xml;q=0.9,*/*;q=0.8",
			"Accept-Encoding":"br, gzip, deflate",
			"Accept-Language":"en-us",
			"CloudFront-Forwarded-Proto":"http",
			"CloudFront-Is-Desktop-Viewer":"true",
			"CloudFront-Is-Mobile-Viewer":"false",
			"CloudFront-Is-SmartTV-Viewer":"false",
			"CloudFront-Is-Tablet-Viewer":"false",
			"CloudFront-Viewer-Country":"US",
			"Host":"g0xd40o7wd.execute-api.us-east-1.amazonaws.com",
			"User-Agent":"Mozilla/5.0 (Macintosh; Intel Mac OS X 10_14_4) AppleWebKit/605.1.15 (KHTML, like Gecko) Version/12.1 Safari/605.1.15",
			"Via":"2.0 6ba5553fa41dafcdc0e74d152f3a7a75.cloudfront.net (CloudFront)",
			"X-Amz-Cf-Id":"20__-h2k2APyiG8_1wFfAVbJm--W1nsOjH1m0la_Emdaft0DxqzW7A==",
			"X-Amzn-Trace-Id":"Root=1-5c9eac1d-58cadfb397aea186074bd6ab",
			"X-Forwarded-For":"134.56.130.56, 54.239.140.19",
			"X-Forwarded-Port":"443",
			"X-Forwarded-Proto":"http"
		},
		"multiValueHeaders": {
			"Accept":["text/html,application/xhtml+xml,application/xml;q=0.9,*/*;q=0.8"],
			"Accept-Encoding":["br, gzip, deflate"],
			"Accept-Language":["en-us"],"CloudFront-Forwarded-Proto":["http"],"CloudFront-Is-Desktop-Viewer":["true"],
			"CloudFront-Is-Mobile-Viewer":[
				"false"
			],
			"CloudFront-Is-SmartTV-Viewer":[
				"false"
			],
			"CloudFront-Is-Tablet-Viewer":[
				"false"
			],
			"CloudFront-Viewer-Country":[
				"US"
			],
			"Host":[
				"g0xd40o7wd.execute-api.us-east-1.amazonaws.com"
			],
			"User-Agent":[
				"Mozilla/5.0 (Macintosh; Intel Mac OS X 10_14_4) AppleWebKit/605.1.15 (KHTML, like Gecko) Version/12.1 Safari/605.1.15"
			],
			"Via":[
				"2.0 6ba5553fa41dafcdc0e74d152f3a7a75.cloudfront.net (CloudFront)"
			],
			"X-Amz-Cf-Id":[
				"20__-h2k2APyiG8_1wFfAVbJm--W1nsOjH1m0la_Emdaft0DxqzW7A=="
			],
			"X-Amzn-Trace-Id":[
				"Root=1-5c9eac1d-58cadfb397aea186074bd6ab"
			],
			"X-Forwarded-For":[
				"134.56.130.56, 54.239.140.19"
			],
			"X-Forwarded-Port":[
				"443"
			],
			"X-Forwarded-Proto":[
				"http"
			]
		},
		"queryStringParameters":null,
		"multiValueQueryStringParameters":null,
		"pathParameters":null,
		"stageVariables":null,
		"requestContext": {
			"resourceId":"bzr3wo",
			"resourcePath":"/starterService",
			"httpMethod":"GET",
			"extendedRequestId":"XU_UiEVSIAMFnyw=",
			"requestTime":"29/Mar/2019:23:37:01 +0000",
			"path":"/dev/starterService",
			"accountId":"968256005255",
			"protocol":"HTTP/1.1",
			"stage":"dev",
			"domainPrefix":"g0xd40o7wd",
			"requestTimeEpoch":1553902621048,
			"requestId":"8cef7894-527b-11e9-b360-f339559a98bd",
			"identity": {
				"cognitoIdentityPoolId":null,
				"accountId":null,
				"cognitoIdentityId":null,
				"caller":null,
				"sourceIp":"134.56.130.56",
				"accessKey":null,
				"cognitoAuthenticationType":null,
				"cognitoAuthenticationProvider":null,
				"userArn":null,
				"userAgent":"Mozilla/5.0 (Macintosh; Intel Mac OS X 10_14_4) AppleWebKit/605.1.15 (KHTML, like Gecko) Version/12.1 Safari/605.1.15",
				"user":null
			},
			"domainName":"g0xd40o7wd.execute-api.us-east-1.amazonaws.com",
			"apiId":"g0xd40o7wd"
		},
		"body":null,
		"isBase64Encoded":false
	}
}

With the completion of this review and with the deployment of our ServerlessStarterTemplate, we are ready to proceed with the configuration of a proper Continuous Integration & Continuous Deployment pipelline that will allow us to abstract the deployment of our services a bit so that we can focus on implementing new features instead of maintaining infrastructure.

You have successfuly deployed your first serverless + microservice on AWS with the ServerlessFramework!

Implementing Continuous Integration & Continuous Deployment on AWS

Moving forward with our project, and this tutorial, we can now take some time to discuss and understand the principles, practices, and benefits of adopting a DevOps mentality. We will also study and review concepts in Continuous Integration and Continuous Delivery to really start getting comfortable deploying enterprise ready software to the AWS Cloud. Just to make sure you are ready, we will review and get you comfortable with commiting your code to a Version Control repository on something like GitHub, and I’ll show you how to setup a continuous integration server and integrate it with AWS DevOpstools like CodeDeploy and CodePipeline.

“Opportunity is missed by most people because it is dressed in overalls and looks like work.” – Thomas A. Edison

DevOps definitely conjures up the feeling of mysticism and confusion amongst those who discuss it in the cryptographic and vitriolic corners of the Dark Web and Tor Browser drum circles. If there was anything that you can call The Force, it would definitely be DevOps.

DevOps is really a benevolent force for cultural good that promotes collaborative working relationships between development teams, and their operational counterparts to work together to deploy and deliver software and infrastructure at a pace that allows the business units to cash in on the monetization of new features. The biggest benefit to this philosophy, is that the business teams can be sure that their efforts enforce the reliability and stability of the production environment holistically, because all of the key stakeholders are involved in the success of the product.

Implementing a DevOps mindset allows you to completely automate your deployment process, testing and validating every new feature that you implement using a consistent process-framework, starting with every developer on your team, all the way until the feature finds itself in use by your users, in production. This process is designed to eliminate IT silos of information across distributed teams of developers and operations teams. The idea is to breakdown the barriers that prevent teams from accessing information transparently, so that you can deploy infrastructure programatically, using a standard resource template, that allows you and your team to focus on developing new features and launching your product faster.

The idea is to apply software development practices like quality control, testing, and code reviews to infrastructure and feature deployment that can be rolled into production with little intervention and minimal risk. Transparency is prioritized so that every team member has a clear view at every stage of the development and deployment process from its implemetation by the dev team, all the way to the operations team that monitors and measures your application’s resources and infrastructure deployed in production.

Understanding Continuous Integration (CI)

Continuous Integration started with this evolution of collaborative ideas that we now call DevOps. Ine perfect world, you want you and your team of engineers implementing and integrating new features into your platform, continuously, i.e. Continuous Integration.

As you continuously integrate new features into your platform that will make the world a better place; hopefully, you and your group of code monkeys, have defined some kind of git commit style guideinto those needles ContributionGuidelines.mdthat I told you about earlier. What you need to be doing is continuouslly using $ git commit to $ git push origin new-feature-branch-1 new features that you implement into some god forsaken form of central version control repository that you and your team use to share and review code.

When you or someone on your team implements a new change to the source code that you have saved on your central, and version controlled repository, that is hopefully on something Free, like GitHub, the changes you $ git push must complete a build process that includes an automated unit testing phase that we used jest.js to implement in a previous discussion in this tutorial series for our use case. The architecture that decided to implement is suppossed to give you immediate feedack about any changes that you introduce into the source code files that you save on GitHub.

Being able to obtain a response with instant feedback from the implementation paradim that we have tried to show you throughout this tutorial series, enables you and the rest of your team to fix and correct any mistakes, errors, or bugs that you find along the way, quickly, so that you and your team may continue moving forward and iterating over the development of your product, so you can take it to market ASAP! The whole point of Continuous Integration is to optimize the $ git merge topic-branch of new features into your source code so that you can stay focused on launching new products that help your business and operations teams measure bottom line growth. When you deliver quality software very fast,your business will make more money and will be able to afford to pay you you salary. Play ball because there is no crying in Baseball!!!

Continuous Integration (CI) Workflow

Development

Visually, on the development side of the team, this would look like the image above with a developer making a change to a business feature deployed into production. The developer would commit the new code changes to the project’s GitHub repository onto the master branch. The master branch is where all of the changes that the engineers on the team make to their topic branches flow into, once each Pull Request is reviewed and merged into production.

The code changes that your engineers will $ git merge into production after the Code Reviews are complete for each feature implementation, will automatically trigger a system Build. A system Build that your Continuous Integration pipeline triggers automatically when your CI Server detects your newest changes, will verify that your code will compile and execute successfully at runtime. Our Unit Tests that we implement will execute at this time, and will run against the new code changes that our CI Server detects when merged onto the master branch by your team. The goal used as a Best Practice in these scenarious is to have our CI Servers complete the Build and Test process quickly so that you and your development team get the immediate feedback you need to quickly iterate your way to a solution. The name of the game is speed, and launch your product ASAP.

Operations

When the idea of Continuous Integration devolved into this paradigm that we now call DevOps, it was originally only put into practice by engineering and devlopment teams within their Agile framework to deliver quality code faster. Database AdministratorsIT Operators, and Network Admins didn’t pay any attention to these models, and they moved on provisioning and autoscaling servers and load balancers on their own, in secret. Over time however, as the DevOps mentality and its transparent culture of collaboration amongst teams spread throughout the business realm, more teams adopted its philosophy. At some point, someone wrote a book about all of the headaches these companies were facing with these distributed teams of information silos, and one day, when CEO’s were convinced of its ability to improve their bottom line, all of these software development patterns and practices percolated through the industry which led infrastructure and operations teams straight to their adoption.

Graphically, this means that you and your operations engineers can write all of your infrastructure, as code, in a declarative YAML or json-formatted template and commit it to the same GitHub repository that your engineering and development teams are using to commit code to impolement new features. Following in the footsteps on the development teams, we then proceed to have our CI Server pull any of our infrastructure changes that we merge onto our Version Control Repositories to automate our build and unit testing processes. In the case of infrastructure we won’t be compiling and code or triggering any unit tests. Instead, we will use the build process to spin up any Linux Images (AMIs) or resources that we need to have deployed to the cloud. Furthermore, instead of testing code, we will use the test phase to validate our YAML-formatted templates used by [CloudFormation] and to run infrastructure tests to be sure our application is listening on the expected network ports and that our enpoints are returning the expected http responses.

The goal here is the same as in development, to get feedback quickly; we want to get your infrastructure engineer immediate information pertaining to the status of the resources deployed. Your operations teams need to be able to anticipate any issues and respond to feedback immediately to correct any issues that may appear in production.

Understanding Continuous Delivery (CD)

Continuous Delivery simply builds on the concept and process of Continuous Integration and is intended to automate the entire release of the application all the way on through the production environment. To execute this continuous integration and delivery lifecycle your team has to commit to practicing the DevOps culture transparently and in a consistent and Agile manner.

Development and operations teams shall implement the same model for versioning both application and infrastructure implemented as code to allow your Continuous Integration (CI) Servers to run automated builds and tests, that will trigger the deployment of new versions of our application to development branches before we decide to promote them into production ourselves. This brings up an important distinction in the different variations that we can choose to run our CI/CD pipelines which we will discuss shortly. For now please take a second to review a simple example of what a CI/CD Pipeline will look like:

This is a CI/CD Pipeline

We will need to follow a workflow similar to the pipeline described above, on both the development and operations sides of our implementation teams. Both of our teams will have to have the discipline to follow a standard set of ContributionGuidelines.md as we have discussed in previous parts in this series to holds team members accountable and committed to pushing all of their changes to our GutHub repositories that we are using as our Version Control Framework. With you and the rest of the team committing changes to the repository that stores our project’s source code, our Continuous Integration (CI) Server will initiate the builds and tests that will then trigger a deplpoyment to either a new or existing environment in production. This is our CI/CD Pipeline as shown in the image above.

The image does in fact simplify what we will be implementing over the course of this tutorial. We will also touch upon a few more complex examples throughout the rest of this tutorial. You can also customize your own CI/CD Pipeline to suit your own project’s needs, to include as many stages as you may require to suitably deploy your application with minimal risk of failure.

Continuous DELIVERY Stages

Looking at this implementation from the high level view of the Systems Architect, the above is what a CI/CD Pipeline variation looks like. As we have discussed, the first step in the process includes a source stage where you and your team will commit your changes to the source and any new feature implementations to your respositories on GitHub.

The next stage will run a build process that will compile your source code and spin up any AMI‘s, Lambda‘s, or other infrastructure that your Operations team has declared as code, and which your application needs to function at scale. This stage will also perform and run unit tests, and infrastructure template validations on the resources declared as code that you will deploy with CloudFormation. Unit Tests are executed within this build step to mitigate against any errors or bugs that are introduced by any changes to the source at this stage of the process. Your Unit Tests SHALL trigger a deployment into the staging environment next INSTEAD OF deploying into production automatically. When the Final Release of the application to the production environment is NOT executed automatically, then this is known as Continuous DELIVERY. Typically there is a Business Rule or Manual Activity completed before the final decision is made to release, and promotethe new version into production.

Furthermore, you can add a stage that is run after Unit Tests are completed on your application’s source code files that mayload tests and execute them against your infrastructure to make sure that your application’s performance is acceptable. The objective of all of this is to make sure that everything must be validated and shown to work as designed at each stage before it moves on to the next step of the delivery or deployment process.

Continuous DEPLOYMENT Stages

Here is where things get tricky and where everyone confuses the diferences between Continuous Delivery vs Continuous Deployment. Be careful, there are always decisions to make, and this is one of those times when a decision must be made. In having to choose a path, this is the exact point where the road begins to diverge for many DevOps Teams. In a Continuous DEPLOYMENT pipeline on AWS, the last step of moving into production is automatic. As long as each stage of the pipeline on AWS was successful, the code that you commit to GitHub will ALWAYS go through the pipeline and into productionAUTOMATICALLY, assuming that all stages have completed and pased all testing successfuly.

In summary, in a Continuous DEPLOYMENT pipeline on AWS, the goal is to completely automate everything from end-to-end. The commits that we push to our GitHub repositories will automatically trigger a build phase and any appropriate Unit Testing on your appliction’s source code and infrastructure as code. The workflow will culminate with the deployment of the application into either a development, or staging environment, where will eventually be pushing our application into production from, onl after having completed a MANUAL process or BUSINESS RULE validation with the project’s principals.

In our specific use case as we work through the implementation of the PayMyInvoice application throughout the rest of this tutorial, we will be eliminating the manual task that provisions and configures our infrastructure, while making sure to define all of our application and infrastructure source code declaratively, to optimize our workflow with an implementation of a Continuous Deployment pipeline on AWS for our implementation of a CI/CD workflow for our application.

By pushing all of our application and infrastructure source code to a repository where we $ git commit all of our changes, you and your team will have the benefit and ability to see exactly what team member has changed and added to the sourcecode. This transparency and versioning controlled by a central repository also allows you to rollback to previous versions of you software as need and in case of emergency.

The implied goal of all of the processes is to unify the software delivery process so that our application and its infrastructure are treated as one object that we can run through our end-to-end automated testing build phase to validate all of our application, infrastructure, and configuration logic and provisioning is correct and to the project’s requirements and specifications.

[AWS CodeBuild] and AWS Code Pipeline are a few tools we will be using to implment our CI/CD pipeline. CodeBuild allows us to easily AUTOMATE our build and DEPLOYMENT to rapidly release new features and services. CodePipeline is a Continuous Delivery service that lets us model and visualize our solftware releases.

How To Build a Serverless React.js Application with AWS Lambda, API Gateway, & DynamoDB – Part 3

How To Configure Infrastructure As Code, Mock Services, & Unit Testing

This is a continuation of our multi-part series on building a simple web application on AWS using AWS Lambda and the ServerlessFramework. You can review the first and second parts of this series starting with the setup of your localenvironment at:

You can also clone a sample of the application we will be using in this tutorial here: Serverless-Starter-Service

Please refer to this repo as you follow along with this tutorial.

Configuring Infrastructure As Code

The ServerlessFramework lets you describe the infrastructure that you want configured for your serverless + microservice based application logic. You can use template files in .yml or .json format to tell AWS CloudFormation what exact resources you need deployed on AWS to correctly run your application. The YAML or JSON-formatted files are the blueprints you design and architect to build your services with AWS resources. We can see that by using the AWS Template Anatomy to describe our infrastructure, that the templates on AWS CloudFormation will include a few major sections described in the template fragments shown below:

YAML-formatted

This is a YAML-formatted template fragment. You can find more information on JSON-formatted templates at: AWS Template Anatomy.

---
AWSTemplateFormatVersion : "version date",

Description:
  String

Metadata:
  template metadata

Parameters:
  define any parameters

Mappings:
  configure your mappings

Conditions:
  declare any conditions

Transform:
  define any transforms

Resources:
  application resources

Outputs:
  define your outputs

The Resources section of the template is the only section that needs in your YAML or JSON-formatted template. When describing the services you need deployed to AWS on your CloudFormation templates it will be helpful to use the order I will be describing below because some sections may refer to values in a previous section, however, you can include these sections in your template in any order that you feel is appropriate.

  1. Format Version (optional)
  • This is the AWS CloudFormation template version that the YAML or JSON-formatted file abides by. This is a versioning format internal to AWS and can change independently of any API or WSDL versions published.
  1. Description (optional)
  • This is simply a description of the template on AWS CloudFormation. If used, you SHALL include this section after the Format Version section listed above.
  1. Metadata (optional)
  • You can use this object to give CloudFormation more information about the application and the template you are using to use AWS infrastructure.
  1. Parameters (optional)
  • These are values that you can declare and pass to your serverless.yml file at runtime when you update or create a stack on CloudFormation. You can use these parameters and call them from the Resources or Outputs sections defined in your serverless.yml file.
  1. Mappings (optional)
  1. Conditions (optional)
  • You can also control the creation of a resource or whether resource properties have values assigned that you declare when you update or create a stack in AWS. Depending on whether a stack is for a development or production environment, you can for example, conditionally create a resource for each stage as needed by your application.
  1. Transform (optional)
  1. Resources (REQUIRED)
  • This is the only required Template Section that you MUST include in your serverless.yml file in your serverless backend. You SHALL use this section to specify the precise stack resources and their properties that you need AWS CloudFormation to create for you on AWS. You can use ServerlessFramework to define the infrastructure you need to deploy with your serverless.yml file.
  1. Outputs (optional)
  • This section will let you view your properties on the CloudFormation stack and the values that it returns to you. You can easily use the AWS CLI to use commands that will display the values returned by your stack for outputs that you declare in your serverless.yml file.

In our CloudFormation Template called serverless.yml found in each of our serverless + microservices that we implement for our API, we describe the AWS Lambda functions, API Gateway endpoints to configure, DynamoDB tablesCognito User & Identity Pools, and S3 Buckets that we need to deploy to our serverless + microservice properly. This reality is what we call Infrastructure As Code. The goal in using an IAC Architecture is to reduce or prevent errors by avoiding the AWS Management Console. When we describe our Infrastructure As Code we can quickly and easily create multiple environments with minimal development time and effort exerted.

Transpiling and converting ES Code in Node v8.10 is the responsibility of the serverless-webpack plugin that we include with the ServerlessFramework.

AWS Resources & Property Types Reference

This is the AWS Resource & Property Types Reference information for the resources and properties that AWS CloudFormation supports as Infrastructure As Code. Resource type identifiers SHALL always look like this:

service-provider::service-name::data-type-name

We will use a few of the services that you can find in the AWS Resource & Property Types Reference. Below you will find a list of the resources in our demo application that we have implemented for this tutorial:

For now, please open the serverless.yml file found at the ServerlessStarterService repository. Please look at the sections below for an explanation of each declaration in our ServerlessFrameworkCloudFormation template:

# TODO: http://serverless.com/framework/docs/providers/aws/guide/intro/

# New service names create new projects in aws once deployed
service: serverless-starter-service(node.js)

# Use the serverless-webpack plugin to transpile ES6
# Using offline to mock & test locally
# Use warmup to prevent Cold Starts
plugins:
  - serverless-webpack
  - serverless-offline
  - serverless-plugin-warmup

# configure plugins declared above
custom:
  # Stages are based on the stage value-params you pass into the CLI when running
  # serverless commands. Or fallback to settings in provider section.
  stage: ${opt:stage, self:provider.stage}

  # Load webpack config
  # Enable auto-packing of external modules
  webpack:
    webpackConfig: ./webpack.config.js
    includeModules: true

  # ServerlessWarmup Configuration
  # See configuration Options at:
  # http://github.com/FidelLimited/serverless-plugin-warmup
  warmup:
    enabled: true # defaults to false
    forlderName: '_warmup' # Name of folder generated for warmup
    memorySize: 256
    events:
      # Run WarmUp every 720 minutes
      - schedule: rate(720 minutes)
    timeout: 20

  # Load secret environment variables based on the current stage
  # Fallback to default if it is not in PROD
  environment: ${file(env.yml):${self:custom.stage}, file(env.yml):default}

provider:
  name: aws
  runtime: nodejs8.10
  stage: dev
  region: us-east-1

  # Environment variables made available through process.env
  environment:
    #### EXAMPLES
    # tableName: ${self:custom.tableName}
    # stripePrivateKey: ${self:custom.environment.stripePrivatekey}

Taking a closer look at the YAML-formatted template above, the service block is where you will need to declare the name of your serverless + microservice with CloudFormation. The ServerlessFramework will use this as the name of the stack to create on AWS. If you change this name and redeploy it to AWS, then CloudFormation will simply create a new project for you in your AWS account.

The environment block is where we load secrets saved in our env.yml file. You must remember that AWS Lambda only gives you 4KB of space for this file which should be more than enough for our needs. The important thing to remember is to keep your logic modular and do not put all of you application secrets in one file. Use an env.yml file for each serverless + microservice that you implement. The secrets and custom variables that we load from our env.yml file are based on the stage that we are deploying to at any given point in the development lifecycle using file(env.yml):${self:custom.stage}. If you do not define your stage, then our application will fall back to load everything under the default: block with file(env.yml):default. The ServerlessFramework will check if custom.stage is available before falling back to default.

As shown in the example, we can also use this mechanism to add other custom variables that we may need loaded at any given time. You may add any environment variable to the environment block using something like:

${self:custom.environment.DECLARE_YOUR_VARIABLE}

Any custom variable that we declare in the manner shown above is available to our Lambda function with something like this:

process.env.DECLARE_YOUR_VARIABLE

Configure an API Endpoint

In the ServerlessStarterService serverless.yml AWS CloudFormation template that describes our infrastructure, we define the functions that we have implemented as Lambda that we want exposed on AWS. You must remember that each serverless + microservice will have its own serverless.yml template in the project’s root directory that will define the endpointsassociated with each serverless + microservice. Below is an example of a Lambda function defined in our ServerlessStarterService CloudFormation template:

functions:
  # Defines an HTTP API endpoint that calls the microServerless function in handler.js
  # - path: url path is /microServerless
  # - method: GET request
  # - cors: enabled CORS (Cross-Origin Resource Sharing) for browser cross
  #     domain api call
  # - authorizer: authenticate using an AWS IAM Role
  displayService:
    handler: handler.starterService
    events:
      - http:
          path: starterService
          method: get
          cors: true
          authorizer: aws_iam
    # Apply Warmup to each lambda to override
    # settings in custom.warmup block globally.
    warmup:
      enabled: true

Do not think that you must memorize this information. Use the Force and read the documentation and ask questions on Stack Overflow to discuss with the larger community of Jedi. As needed, do not forget to refer to the AWS Resource & Property Types Reference information for the resources and properties that AWS CloudFormation supports as Infrastructure As Code.

You configured your new serverless + microservice using the Infrastructure As Code architecture.

Mocking Serverless + MicroServices before Deploying to AWS

We have to mock, or fake the input parameters for a specific event needed by our Lambda’s with a *.json file to be stored in a directory within the serverless + microservice project that we will use by executing the ServerlessFramework’s invokecommand. The invoke command will run your serverless + microservice code locally by emulating the AWS Lambda environment. As the old saying goes however:

“If everything were candy and nuts, everyday would be Christmas…” – unknown

You just must remember that this is not a 100% perfect emulation of the AWS Lambda environment. There will be some differences between your cloud environment and your local machine, but this will do for most use-cases. There are a lot of discussions online, and tools available that promote different approaches that you can take to perfect your localenvironment and your machine for local development outside of the Cloud. We will be mocking the context of our serverless + microservices within this tutorial with simple mock data only. We will leave the study of these tools for a future tutorial. We do however find resources like LocalStack, which is a tool that supplies an easy testing and mocking framework for developing Cloud applications on the AWS Cloud, remarkably interesting, to say the least. Please feel free to experiment with LocalStack and let us know how it works, in the future we will extend this tutorial to include a guide on its implementation also.

When saving a *.json-formatted event in a /<microservice-project-directory>/mocks directory that we will use with the ServerlessFramework invoke command, we will execute the local serverless event as shown below:

Example Usage of invoke

$ serverless invoke local --function functionName --path mocks/testFile.json

invoke Options on local

  • --function or -f: The name of the function in your microservice that you want to invoke locally. Required.
  • --path or -p: The path to a json file storing the input data that you need to pass to the invoked Lambda that an event in the queue will trigger at a specific state in the application. This path is relative to the root directory of the microservice.
  • --data or -d: This is the String data you need to pass as an event to your Lambda function. Be aware that if you pass both --path and --data, the information included in the --path file will overwrite the data that you passed with the --data flag.
  • --raw: This flag will allow you to pass data as a raw string, even if the string you are working with is a .json-formatted string. If you do not set this flag, then any .json-formatted data that you pass into the CLI when you invoke local, will imply that the AWS Cloud runtime will parse and pass this data to your function as an object.
  • --contextPath or -x: This is the path to the .json-formatted file that you must store the input that you will pass in as a context parameter value to the function that you decide to invoke locally. This path is relative to the root directory of your serverless + microservice.
  • --context or -c: This is string data that you want to pass as the context to the function that you want to invokelocally. The information included with the --contextPath flag will overwrite the data that you passed with the --context flag.
  • --env or --e: This is a string that will represent an environment variable that you want to declare when you invokeyour function locally. The format of the environment variable SHALL have a declaration with the following syntax: <name> = <value>. You can reuse this for more than one environment variable that you may need declared in your application.

The invoke local command gives us the ability to fake it until we make it while implementing the serverless architecture for our applications. The functionality provided by the ServerlessFramework will set reasonable environment configuration parameters for us that will allow us to successfully test the functions that we trigger with invoke local. The ServerlessFramework configures all the local AWS specific values that are like those that we find in the actual AWS Cloud where our Lambda functions will execute when we deploy our application. It is also important to remember that ServerlessFramework will define the IS_LOCAL variable when using invoke local. This is important because it will prevent you from executing a request to services in production accidentally to help you safeguard your application while developing and extending new features. The ServerlessFramework will do its best to help you and I from reliving any Dilbert cartoons.

invoke local serverless function example with --data

$ serverless invoke local --function functionName --path mocks/data.json

In the example you can see that we are using the --function option as described, to tell invoke local which Lambda we want to mock on our local machine. When using the -f flag we also must provide the name of the Lambda function that we want to trigger with invoke local on our development machine. We are using functionName as a placeholder for the name of the Lambda function that we want to invoke.

Moving on, you will notice that we have also used the --path option to pass the .json-formatted data that we have saved in the mocks/data.json file that is relative to our project directory. We will use this information when we trigger the invoke local command for the functionName that we have declared as our Lambda in this example.

Example data.json File

{
  "resource": "/",
  "path": "/",
  "httpMethod": "GET",
  // etc  //
}

Limitations

We have tried to condense the most important topics and fundamentals that you need to understand to correctly mock and implement your application as a serverless + microservice. Please refer to the invoke local documentation to better understand how the ServerlessFramework helps you emulate the AWS Cloud on your local machine to help you expedite the development of your application that will help make the world a better place

Node.js, Python, Java, and Ruby are the only runtime environments that currently support the invoke local emulation environment. To obtain the correct output when using the Java runtime locally, your response class will need to implement the toString() method.

invoke local Mock example with ServerlessStarterService

Earlier, we asked you to create a project structure for the PayMyInvoice demo application that we will build once we complete the review of the fundamentals of serverless application development. If you recall, we asked you to complete a few steps to Setup the Serverless Framework locally. After installing and renaming the ServerlessStarterService as instructed, you should have ended up with a project structure for the PayMyInvoice application that looks a little something like this:

PayMyInvoice
    |__ services
       |__ invoice-log-api (renamed from template)
       |__ FutureServerlessMicroService (TBD)

To show you how to Mock your services locally, we would like to step back from this example for a second to walk you through a specific example we have set up for you in the ServerlessStarterService repository.

Please keep both of this repositories close. We will be performing exercises in both to better relate the material in this tutorial to each other.

Navigate to your home directory from your terminal and clone the ServerlessStarterService so that you can deploy it locally after we perform our invoke local testing and mocking.

  1. $ git clone http://github.com/lopezdp/ServerlessStarterService.git
  2. Run$ npm install
  3. $ serverless invoke local --function displayService
  • The displayService function is the name of the lambda function that we have declared in the serverless.yml file. The lambda functions in the ServerlessStarterService template should look like this:
functions:
# Defines an HTTP API endpoint that calls the microServerless function in handler.js
# - path: url path is /microServerless
# - method: GET request
# - cors: enabled CORS (Cross-Origin Resource Sharing) for browser cross
#     domain api call
# - authorizer: authenticate using an AWS IAM Role
displayService: # THIS IS THE NAME OF THE LAMBDA TO USE WITH INVOKE LOCAL!!!
  handler: handler.starterService
  events:
    - http:
        path: starterService
        method: get
        cors: true
  # Warmup can be applied to each lambda to override 
  # settings in custom.warmup block globally.
  warmup:
    enabled: true
  1. After executing invoke local your output should look something like this:

Invoke Local Output

More precisely your terminal will give you some .json output that will look like the following bit of text:

{
    "statusCode": 200,
    "body": "{\"message\":\"You are now Serverless on AWS! Your serverless lambda has executed as it should! (with a delay)\",\"input\":\"\"}"
}

Dont worry, I will walk you through this some more in a future section of this tutorial while we build the demo application. Keep reading young padawan, and may the force be with you.

Resources and IAM Permissions

When an event defined by your application triggers a Lambda function on the AWS Cloud, the ServerlessFramework creates an IAM role during the execution of the logic on your serverless + microservice. This will set all the permissions to the settings that we provided during the implementation of our infrastructure that you see in the iamRoleStatements block, that is in your serverless.yml file for the serverless + microservice in question. Every call your application makes to the aws-sdkimplemented in this Lambda function, will use the IAM role that the ServerlessFramework created for us. If you do not explicitly declare this role, then AWS will perform this task by creating a key pair and secret as an environment variable like:

  • AWS_ACCESS_KEY_ID
  • AWS_SECRET_ACCESS_KEY

The problem with mocking your services on your local machine with invoke local is that your machine does not have Jeff Bezos’ magic money inside of it. The role needed to invoke these Lambda functions are not available!!! You are not AWS! Trust me, I wish I was Jeff Bezos too (or at least his bank account). As a Cuban, I can wholeheartedly tell you that he is the hero of an Island of Caribeños who came to the USA in search of the ever so elusive Sueño Americano or what some call the American Dream. #Learn2Code.

не верь не бойся не проси

Russian Trained Programmers

Now you know why I am an AWS #fanboy but I still must explain what is wrong with this picture…

It is different when you use the ServerlessFramework and its invoke local function because the role just is not available to your local machine and the aws-sdk is just going to default to using your default profile that you specified inside of your AWS credential configuration file. You can control how we use the default choice, or not, by hard coding another user directly in your code (not ideal), or with a key pair of environment variables (preferred).

Please take some time to review the official AWS documentation to better understand what you need to achieve in a secure manner. In this tutorial, the JavaScript SDK is our primary concern, but this process should be similar for all SDK’s:

The point of all of this is to make you aware that the set of permissions used will be different, regardless of the approach you decide to implement. You will have to play around with different tools because you will not be able to precisely emulate the actual AWS IAM Policy in place. Not to sound repetitive, but therefore we recommend resources like LocalStack, which is a tool that supplies an easy testing and mocking framework for developing cloud native applications on the AWS Cloud. Future tutorial in the making… (Not anytime soon though! –> Unless you send Bitcoin!)

You can now Mock and FAKE all your Serverless + MicroServices locally before Deploying to AWS.

Serverless Unit Testing & Code Coverage

We are taking an automated testing approach to achieving our ideal Code Coverage goals. Automated tests SHALL execute whenever a new change to the source code is merged into the main development branch of the project repository. We think that using a tool like GitHub is really the best approach here in terms of your project repositories; just keep things simple and unbelievably you will change your life!

You can implement Automated Testing with typical unit tests that will execute individual software modules or functions, in our case our unit tests will execute our Lambda functions on the AWS Cloud. When implementing your tests, you really want to try to make them useful, if not at least relevant to the goal of your application’s business logic. You really want to take some time to think of any edge cases that your users may be inputting into your application to ensure that your application’s user experience meets your user’s needs and expectations. If you are working as part of a team, you really should collaborate with them on the different test cases that you should implement to mitigate any potential errors, that your users may confront out in the wild

Examples of useful test cases should consider the following:

  • Tests which reproduce any bugs and their causes to verify that errors have a resolution by the latest updates to the application.
  • Tests that return the details that confirm the correct and precise implementation of the system requirements and specifications. Tests that return the proper data types as specified in the system’s data dictionary would be an appropriate metric.
  • Tests that confirm that your software is correctly handling expected or unexpected edge, and corner cases are appropriate.
  • Tests that confirm any expected state changes and interactions with loosely coupled modules and system components are a Best Practice.

Throughout our automated testing processing and workflow, code coverage KPI’s and metrics are a source of data to record and keep safe. It would be ideal to support Linear Code Sequence Coverage above 80%.

Jest.js Implementation and Configuration

This tutorial and its author have decided to use Jest.js for this “lecture”. We have decided to use this automated testing framework to test our codebase and the correctness of our logic and our application’s functionality because Jest.js is very simple, it works with the libraries and frontend frameworks that we will be implementing in future parts to this series, it takes minimal configuration, it is easy to determine the percentage of code coverage we have implemented and most importantly, Jest.js is well documented.

For this tutorial and the demo application that we will be walking through together shortly, you will notice a directory within each serverless + microservice labeled something like:

/<serverless-microservice-project>/tests/<component>.test.js

Jest.js is already installed as a dependency in your package.json file, which means that every time you npm install a new serverless + microservice project with our Serverless-Starter-Service project, you will automatically have Jest.js installed on your local environment for you. Easy Peasy my friend, work smart is the name of the game… For all the rest of you out there who simply refuse to just follow along because you absolutely must do everything from scratch yourself, then go ahead and get it done with the following cmd:

$ npm install --save-dev jest

You still must push forward, there is always more to accomplish; you also need to add a line of .json to update the scripts block in your package.json file. You need to add the following:

"scripts": {
  "test": ":jest"
}

With the above configuration complete, you will be able to use the $ npm test command to run your unit testing with the Jest.js framework from your terminal.

Add Unit Tests

Ideally you will want to try to keep your project files organized, you know, unlike the way you keep your bedroom. Show this to your mother, go ahead, let her know that you are out here getting an education and not wasting away watching porn. The internet is not all trolls and Dark Web, you can find a good example or two out here in this digital desert wasteland my friends. Either way, keep yourself organized!!! Anytime you add or implement any new unit tests for each serverless + microservice endpoint you define in each of your Lambda functions, make sure to create a new file for the endpoint that you are implementing. Proceed as such:

$ touch ~/<ApplicationProjectName>/service/<serverless-microservice-project>/tests/<serverless-endpoint>.test.js

Pay attention to the relative structure of the path that I have chosen to use in the example above as it will make more sense once we start digging into the implementation details of our demo application in this tutorial series. The crucial point to remember is that <test>.js files will save in the /tests directory. Easy enough, no???

We can use the example starter.test.js file that we have implemented in our Serverless-Starter-Service project to better understand how we will be implementing our test cases with the Jest.js framework:

Need to Debug Implementation (Not Ready for Publishing)!!!

import * as handler from "../handler.js";

// FIXME: Correct eslint `no-undef` errors
test("starterService Execution", async () => {
  const event = "event";
  const context = "context";
  const callback = (error, response) => {
    expect(response.statusCode).toEqual(200);
    expect(typeof response.body).toBe("string");
    expect(response.body).toMatch(/executed/);
  };

  await handler.starterService(event, context, callback);
});

The implementation of our tests is straight forward and easy, once you can understand how to assert values and data types as provided from our serverless + microservice responses. Here we are simply adding one test to assert that the response we are getting back from our service is a string. We carry out this with the .toMatch() method in the last line of the test we have implemented here as an example. We will explain this further as we implement the functionality in our demo application. In the meantime, be sure to read more about using Jest.js as a testing tool in their documentation.

Run Tests

Once you have your unit tests implemented, you can run those tests in your command line interface from the root of project using the following command:

$ npm test

The terminal will supply an output for a successful result that will look like this:

Testing Output

$ npm test

> serverless-starter-service(node.js)@1.1.16 test /Users/MyDocs/DevOps/ServerlessStarterService
> jest

 PASS  tests/starter.test.js
  ✓ starterService Execution (1007ms)

Test Suites: 1 passed, 1 total
Tests:       1 passed, 1 total
Snapshots:   0 total
Time:        2.044s
Ran all test suites.

Unit Test Output

And that is it. We have discussed the fundamentals of building out the backend logic of an application using the serverless + microservice architecture with AWS Lambda. You know what Lambda functions are, how to configure and implement the logic you need in each Lambda, you know how to Mock, or fake your serverless + microservices on your local machine using the invoke local command provided to us by the ServerlessFramework, and you know how to implement the Unit Tests we will need to implement to create an automated testing pipeline we can use to eventually Continuously Integrate & Continuously Deploy our application to the different stages we define for our development and production environment slater on.

All services should implement the proper logic within the correct project structure as described. You will then mock and test each service before deploying any resources or infrastructure to the AWS Cloud as a software development Best Practice.

You configured your serverless backend as IAC to Mock & execute automated Unit Tests. Good Luck!

Part 4: Configuring an effective Continuous Integration & Continuous Deployment Pipeline

Table of Content